Springdoc integrates OpenAPI specification and Spring Boot. Like SpringFox, it generates Swagger files. The difference between them is that Springdoc uses Swagger 3, while SpringFox uses Swagger 2. So developers who use SpringFox, it’s time to move to Springdoc!
The complete code can be found in .
Basic Settings
Creating a Project
Create a Spring Boot project, and include Spring Web and Validation frameworks. If you are not familiar with creating Spring Boot projects, you can refer to the following article.
Then, add the following packages in build.gradle.kts.
dependencies {
    implementation("org.springdoc:springdoc-openapi-ui:1.4.3")
    implementation("org.springdoc:springdoc-openapi-kotlin:1.4.3")
}
These packages are:
- springdoc-openapi-ui: Integrate swagger-ui.
- springdoc-openapi-kotlin: Support Kotlin.
Adding REST APIs
Add User, the code is as follows:
package com.waynestalk.springdoc

data class User(val name: String, val age: Int, val email: String)
Add AddUserRequest, the code is as follows:
package com.waynestalk.springdoc

data class AddUserRequest(val name: String, val age: Int, val email: String)
Finally add UserController, the code is as follows:
package com.waynestalk.springdoc

import org.springframework.web.bind.annotation.*

@RestController
@RequestMapping("/users")
class UserController {
    var users = mutableListOf(
            User("Jack", 10, "jack@abc.com"),
            User("Monika", 11, "monika@abc.com"),
            User("Peter", 12, "peter@abc.com"),
            User("Jane", 13, "jane@abc.com")
    )

    @GetMapping
    fun findUsers(@RequestParam age: Int?) = if (age == null) users else users.filter { it.age == age }

    @GetMapping("/{name}")
    fun getUser(@PathVariable name: String) =
            users.find { it.name == name } ?: throw Exception("$name is not found")

    @PostMapping
    fun addUser(@RequestBody request: AddUserRequest): User {
        val user = User(request.name, request.age, request.email)
        users.add(user)
        return user
    }
}
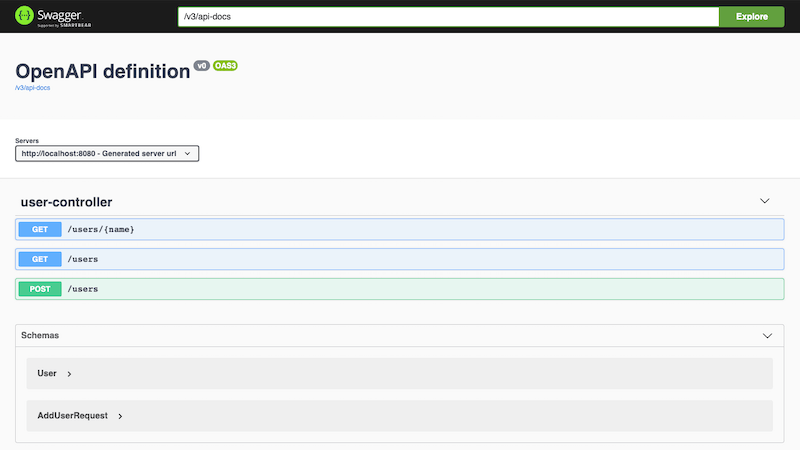
The basic project is completed. Execute the project, and browse http://localhost:8080/swagger-ui.html , you can see Swagger UI screen!
Springdoc Annotations
Now let’s use Springdoc’s annotations to document REST APIs.
@OpenAPIDefinition – Setting the Title and Version
We can use @OpenAPIDefinitionto to set the title and version on the Swagger UI.
Add SpringdocConfiguration, the code is as follows. In the code, we set the title to Wayne’s Talk API and set the version to v1.0.0.
package com.waynestalk.springdoc

import io.swagger.v3.oas.annotations.OpenAPIDefinition
import io.swagger.v3.oas.annotations.info.Info
import org.springframework.context.annotation.Configuration

@OpenAPIDefinition(info = Info(title = "Wayne's Talk API", version = "v1.0.0"))
@Configuration
class SpringdocConfiguration
Execute the project, you can see the setting result as shown in the figure below.

@Operation – Setting Descriptions to APIs
In the current Swagger UI, GET /users/{name} has no descriptions to the purpose of it. And this description is the most important thing in this documentation. Let’s add descriptions for each API.

We can use @Operationto to add descriptions. Modify UserController as follows:
package com.waynestalk.springdoc

import io.swagger.v3.oas.annotations.Operation
import org.springframework.web.bind.annotation.*

@RestController
@RequestMapping("/users")
class UserController {
    @Operation(summary = "Find users with a given age", description = "Find users whose ages are the same as a given age")
    @GetMapping
    fun findUsers(@RequestParam age: Int?) = if (age == null) users else users.filter { it.age == age }

    @Operation(summary = "Get a user with a given name", description = "Get a specific user with a given name")
    @GetMapping("/{name}")
    fun getUser(@PathVariable name: String) =
            users.find { it.name == name } ?: throw Exception("$name is not found")

    @Operation(summary = "Add a user", description = "Create a new user")
    @PostMapping
    fun addUser(@RequestBody request: AddUserRequest): User {
        val user = User(request.name, request.age, request.email)
        users.add(user)
        return user
    }
}
Run the project, you can see a title in summary section and a description in description section.

@Parameter – Setting Descriptions to API Parameters
There are two kinds of API parameters:
- Path Variables: In
GET /users/{name},nameis a path variable. It maps to the parameter annotated with@PathVariableingetUser(). - Query Parameters: The
agewithinGET /users?age=10is called query parameter. It maps to the parameter annotated with@RequestParaminfindUsers().
@Parameter can be used to add description for these two kinds of parameters. Let’s add descriptions for the parameters of getUser()and findUsers().
package com.waynestalk.springdoc

import io.swagger.v3.oas.annotations.Operation
import io.swagger.v3.oas.annotations.Parameter
import org.springframework.web.bind.annotation.*

@RestController
@RequestMapping("/users")
class UserController {

    @Operation(summary = "Find users with a given age", description = "Find users whose ages are the same as a given age")
    @GetMapping
    fun findUsers(@Parameter(description = "age to match users", example = "11") @RequestParam age: Int?) =
            if (age == null) users else users.filter { it.age == age }

    @Operation(summary = "Get a user with a given name", description = "Get a specific user with a given name")
    @GetMapping("/{name}")
    fun getUser(@Parameter(description = "name of user", example = "Irene") @PathVariable name: String) =
            users.find { it.name == name } ?: throw Exception("$name is not found")
}
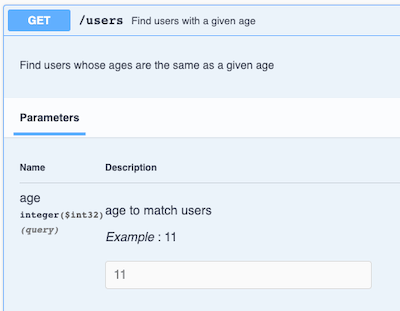
Run the project, you can see that the API’s parameters not only have descriptions, but also have preset values as examples.

@Schema – Settings Descriptions to API’s Request Body
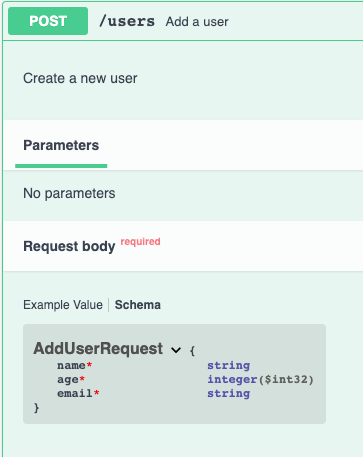
As shown in the figure below, you can see that the request body of POST /users has no explanation. Springdoc only displayed types of fields of AddUserRequest, but we often cannot know the meaning of fields only by their names.
We can use @Schema to add Constraints, Example, and Description to each field. Modify AddUserReuqest as follows.
package com.waynestalk.springdoc

import io.swagger.v3.oas.annotations.media.Schema

data class AddUserRequest(
        @field:Schema(description = "name of user", minLength = 1, example = "Irene")
        val name: String,
        @field:Schema(description = "age of user", minimum = "1", example = "18")
        val age: Int,
        @field:Schema(
                description = "email of user",
                pattern = "^([a-zA-Z0-9_\\-\\.]+)@([a-zA-Z0-9_\\-\\.]+)\\.([a-zA-Z]{2,5})\$",
                example = "irene@abc.com")
        val email: String)
After executing the project, you can see the request body of POST /users in schema section has detailed descriptions including Constraints and Examples for AddUserRequest.
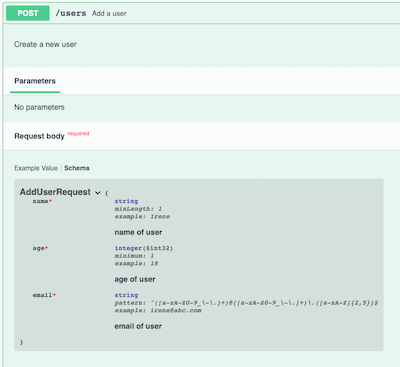
In addition, on the Example Value section, each field is filled with examples we set.

@APIResponses – Setting Descriptions to API’s Responses
Let’s look at the response section of /users/{name}, only Status Code 200 is defined. And it’s schema section is deduced by the return value of getUser().
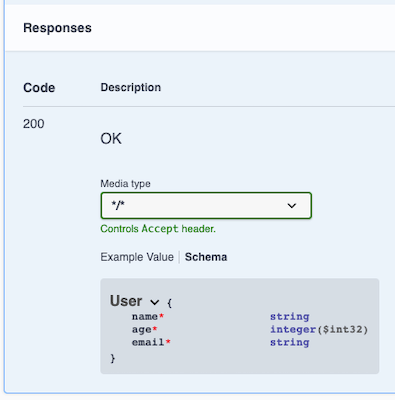
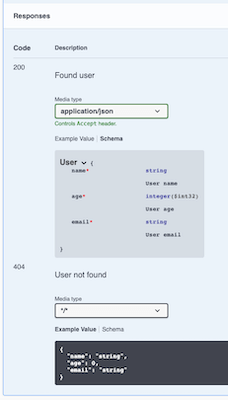
We define other status codes using @APIResponse to tell developers when status code is 404, it means user does not exist. Moreover, it can also explain what each field in response means. These can greatly increase the readability of documentation. Let’s add descriptions to responses for /users/{name}.
Modify User as follows. We add descriptions to each field of User.
package com.waynestalk.springdoc

import io.swagger.v3.oas.annotations.media.Schema

data class User(
        @field:Schema(description = "User name")
        val name: String,
        @field:Schema(description = "User age")
        val age: Int,
        @field:Schema(description = "User email")
        val email: String)
Modify UserController, adding a description for status code 404 for getUser(). In addition, we also add mediaType for status code 200.
package com.waynestalk.springdoc

import io.swagger.v3.oas.annotations.Operation
import io.swagger.v3.oas.annotations.Parameter
import io.swagger.v3.oas.annotations.media.Content
import io.swagger.v3.oas.annotations.media.Schema
import io.swagger.v3.oas.annotations.responses.ApiResponse
import io.swagger.v3.oas.annotations.responses.ApiResponses
import org.springframework.web.bind.annotation.*

@RestController
@RequestMapping("/users")
class UserController {
    @Operation(summary = "Get a user with a given name", description = "Get a specific user with a given name")
    @ApiResponses(value = [
        ApiResponse(
                responseCode = "200",
                description = "Found user",
                content = [Content(mediaType = "application/json", schema = Schema(implementation = User::class))]
        ),
        ApiResponse(
                responseCode = "404",
                description = "User not found"
        )
    ])
    @GetMapping("/{name}")
    fun getUser(@Parameter(description = "name of user", example = "Irene") @PathVariable name: String) =
            users.find { it.name == name } ?: throw Exception("$name is not found")
}
Run the project, and now you can see the explained responses. Is it more readable?
Integrating Spring Validation
Spring Validation can help us automatically check whether the data in RequestBody meets the requirements. For example, AddUserRequest.age cannot be less than 1. With Spring Validation, we no longer need to write a program to check all the data, but define constraints of data through annotations.
And we have introduced above, we shows how to use Springdoc to define data’s constraints. However, these definitions are only displayed on document. In fact, the program does not really check whether each data conforms to the constraints like Spring Validation.
Springdoc has integrated Spring Validation. It will display Spring Validation’s constraints on Swagger UI. In other words, when using Spring Validation to define constraints, we don’t need to use Springdoc to define it again.
First of all, we must include the Spring Validation framework, which was already introduced when we first created the project.
Modify AddUserRequest, add a constraint to each field.
package com.waynestalk.springdoc

import io.swagger.v3.oas.annotations.media.Schema
import javax.validation.constraints.Min
import javax.validation.constraints.NotBlank
import javax.validation.constraints.Pattern

data class AddUserRequest(
        @field:Schema(description = "name of user", example = "Irene")
        @field:NotBlank
        val name: String,
        @field:Schema(description = "age of user", example = "18")
        @field:Min(1)
        val age: Int,
        @field:Schema(description = "email of user", example = "irene@abc.com")
        @field:Pattern(regexp = "^([a-zA-Z0-9_\\-.]+)@([a-zA-Z0-9_\\-.]+)\\.([a-zA-Z]{2,5})\$")
        val email: String)
In addUser(), add @Valid into parameters of AddUserRequest, then Spring Validation knows to check request’s parameters.
import javax.validation.Valid

@RestController
@RequestMapping("/users")
class UserController {
    fun addUser(@Valid @RequestBody request: AddUserRequest): User {
        val user = User(request.name, request.age, request.email)
        users.add(user)
        return user
    }
}
After having modified, execute the project. Browse Swagger UI, your can see the descriptions in schema section of POST /users is same as previous one. Also, try to send a request, but set age to -1. You will see Spring Validation block this Bad Request for us.
Conclusion
The interface of Swagger UI is clean and beautiful, which makes you love it. It is very convenient, allowing you to write API documentats in code. Coupled with Springdoc, we can write documents with annotations without programming. Once program is deployed, document will be deployed along with it.


