
In recent years, Spring Boot is a very popular back-end development framework. Spring Boot applications can be easily converted to micro-service application using Spring Cloud. This article will introduce how to use Spring Boot to create a back-end program, provide REST APIs, and connect to database.
The complete code for this chapter can be found in .
Table of Contents
Creating a Project – Spring Initializr
The easiest way to create a Spring Boot project is to use the Spring Initializr online tool. You have to fill in these options to create a project.
- Project: Choose Maven or Gradle build automation tool.
- Language: Choose Java or Kotlin language.
- Spring Boot: It’s better to choose latest stable version.
- Project Metadata: Fill in group, artifact and name.
- Packaging: Select packaging. If you choose Jar, Tomcat will be included and can be executed directly.
- Java: Select the version of Java SDK. Kotlin is finally compiled into Java bytecode.
- Dependencies: Click ADD DEPENDENCIES button to add packages. Let’s add the Spring Web framework, which allows the project to have REST APIs.
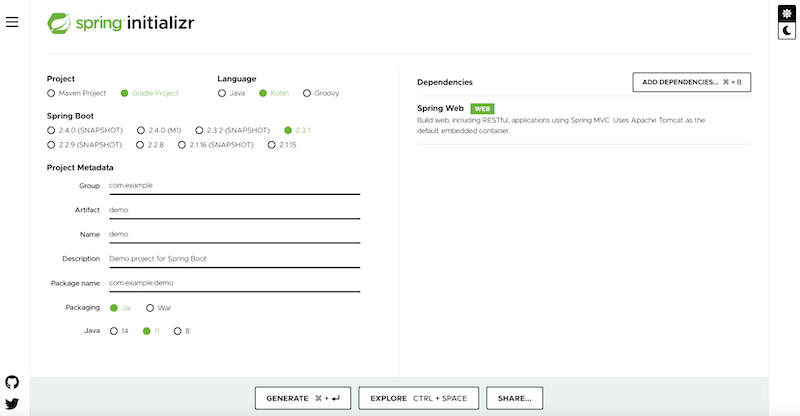
After selecting everything, click GENERATE at the bottom left to download the project, and then open it with IDE. For IDE, you can use Eclipse for free , and IntelliJ IDEA is recommended for paid one.
Creating RESTful Web Services
HTTP GET Requests
Let’s build a REST API. First, add User.
package com.waynestalk.demo.domain

data class User(val name: String?, var age: Int?)
Second, add UserController with 2 annotations:
@RestController: Combines@Controllerand@ResponseBody. If a controller is to provide RESTful Web Service, it will use@RestController.@RequestMapping: Map a Web Request to a path. In the project, it maps to /users. If it is added to a class, it means that all methods in the class will be under /users. If added to a method, it means only the method maps to /users.
In the UserController, add a GET Request handler.
- @GetMapping : It maps an HTTP GET request to this method. We did not specify a sub-path here, so it will use /users specified to UserController. In addition, it is equivalent
@RequestMapping(method = [RequestMethod.GET]). - @RequestParam : If a request URL is /users?age=20, it will parse the following query string.
requiredmeans whetherageis necessary to be set.defaultrefers to use default value when it is not set. - @GetMapping (“/{name}”): All /users/XXX HTTP GET requests will maps to this method, XXX refers to any string.
- @PathVariable : Put the XXX value into the
nameparameter.
package com.waynestalk.demo.controller

import com.waynestalk.demo.domain.User
import org.springframework.web.bind.annotation.GetMapping
import org.springframework.web.bind.annotation.RequestMapping
import org.springframework.web.bind.annotation.ResponseBody
import org.springframework.web.bind.annotation.RestController

@RestController
@RequestMapping("/users")
class UserController {
    private var users = listOf(
            User("Jason", 20),
            User("Alan", 22),
            User("David", 21),
            User("Monika", 20),
            User("Angela", 22)
    )

    @GetMapping
    fun getUsers(@RequestParam(required = false, defaultValue = "0") age: Int) =
            if (age == 0) users else users.filter { it.age == age }

    @GetMapping("/{name}")
    fun getUserBy(@PathVariable name: String) =
            users.find { it.name == name }
                    ?: throw ResponseStatusException(HttpStatus.NOT_FOUND, "User $name not found")
}
After executing the project, you can open http://localhost:8080/users directly with the browser to get all users:
[
   {
      "name":"Jason",
      "age":20
   },
   {
      "name":"Alan",
      "age":22
   },
   {
      "name":"David",
      "age":21
   },
   {
      "name":"Monika",
      "age":20
   },
   {
      "name":"Angela",
      "age":22
   }
]
You can also use curl command to send an HTTP GET request.
% curl --location --request GET 'http://localhost:8080/users'
[{"name":"Jason","age":20},{"name":"Alan","age":22},{"name":"David","age":21},{"name":"Monika","age":20},{"name":"Angela","age":22}]
Search for users whose age is 20.
% curl --location --request GET 'http://localhost:8080/users?age=20'
[{"name":"Jason","age":20},{"name":"Monika","age":20}]
Get User Monika.
% curl --location --request GET 'http://localhost:8080/users/Monika'
{"name":"Monika","age":20}
HTTP POST Requests
Next, we will add a REST API to add a User. In UserController, create a POST request handler.
- @PostMapping : It is equivalent to
@RequestMapping(method = [RequestMethod.POST]) - @RequestBody : It will convert the body of the webrequest into a
Userobject. It will choose a HttpMessageConverter to parse the body according toContent-Typein web request header
@RestController
@RequestMapping("/users")
class UserController {
    @PostMapping
    fun addUser(@RequestBody user: User): User {
        if (users.find { it.name == user.name } != null)
            throw ResponseStatusException(HttpStatus.CONFLICT, "Duplicated user ${user.name}")
        users.add(user)
        return user
    }
}
Use curl command to add User Sofia.
% curl --location --request POST 'http://localhost:8080/users' \
--header 'Content-Type: application/json' \
--data-raw '{
    "name": "Sofia",
    "age": 10
}'
HTTP PUT Requests
Generally speaking, POST requests are used to add something, while PUT request are used to modify something. Their usages are similar.
@RestController
@RequestMapping("/users")
class UserController {
    @PutMapping("/{name}")
    fun modifyUser(@PathVariable name: String, @RequestBody user: User): User {
        val found: User = users.find { it.name == name }
                ?: throw ResponseStatusException(HttpStatus.NOT_FOUND, "User $name not found")
        found.age = user.age
        return found
    }
}
Use curl to modify User Monika.
% curl --location --request PUT 'http://localhost:8080/users/Monika' \
--header 'Content-Type: application/json' \
--data-raw '{
    "age": 24
}'
HTTP DELETE Requests
DELETE Requests are used to delete something.
@RestController
@RequestMapping("/users")
class UserController {
    @DeleteMapping("/{name}")
    fun removeUser(@PathVariable name: String): User {
        val found = users.find { it.name == name }
                ?: throw ResponseStatusException(HttpStatus.NOT_FOUND, "User $name not found")
        users.remove(found)
        return found
    }
}
Use curl to delete User Monika.
% curl --location --request DELETE 'http://localhost:8080/users/Monika'
RESTful API Naming Conventions
We have introduced 4 types of HTTP requests above. But we only 2 URIs, one is /users and the other is /users/{name}. We might think why not every HTTP request has a unique URI? Like this:
- GET: /users/get, /users/{name}/get
- POST: /users/add
- PUT: /users/{name}/update, or /users/update and specify name in the body
- DELETE: /users/{name}/delete, or /users/delete and specify name in the body
The reason is explained in detail in the REST API Naming Convention . In short, REST APIs should be named according to resources instead of actions. In other words, resource /users/Monika provides 3 actions, allowing us to get data (GET), update (PUT), and remove (DELETE). And /users provides 2 actions so that we can get the list and add.
Connecting Database – JPA
JPA is short for Java Persistence API. It cannot be used directly, but instead defines a set of APIs that can be implemented by other frameworks. So with JPA, we can replace the underlying database without changing the program.
JPA uses Object Relational Mapping (ORM) architecture. ORM allows data table and data table fields map to their corresponding objects. Therefore, when using it, developers are facing with objects, not databases. So development is relatively easier and faster, and there is no need to write SQL directly.
H2
H2 is an in-memory database. In the early stages of a project, or when writing test programs, In-memory databases is always your choice.
To use H2, you need to include Spring Data JPA and H2 Database framework.

After adding those two dependencies, you will find the following lines added in build.gradle.kts:
// build.gradle.kts

plugins {
    kotlin("plugin.jpa") version "1.3.72"
}

dependencies {
    implementation("org.springframework.boot:spring-boot-starter-data-jpa")
    runtimeOnly("com.h2database:h2")
}
After including those frameworks, we need to modify our project to store a list of User in database.
First, modify User as follows. There are some annotations added.
- @Entity : Set a class as an entity.
class Userwill map to the user table. - @Column : When a class is set to an entity, each field in it will map to a column of the data table. You can configure a table column using @Column. For example, here we set the
namemust be unique –Column(unique = true). - @Id : Set a column to be primary key.
- @GeneratedValue : Automatically generate the value of the column set with
@Id.
package com.waynestalk.demo.domain

import javax.persistence.Column
import javax.persistence.Entity
import javax.persistence.GeneratedValue
import javax.persistence.Id

@Entity
data class User(
    @Column(unique = true) val name: String?,
    var age: Int?,
    @Id @GeneratedValue var id: Long? = null)
Add UserRepository to access the database. UserRepository is an interface, and inheritance JpaRepository (and it inherites Repository). Spring will scan all interfaces inheriting Repository, and automatically generate corresponding class. JpaRepository already defines some methods, and Spring will automatically generate them.
In addition, JPA has a naming mechanism, and Spring will automatically generate the corresponding code based on the method named by that mechanism. As shown below, we have customized two search methods. The naming mechanism is explained in detail in Query Creation .
package com.waynestalk.demo.repository

import com.waynestalk.demo.domain.User
import org.springframework.data.jpa.repository.JpaRepository
import org.springframework.stereotype.Repository

interface UserRepository : JpaRepository<User, Long> {
    fun findAllByAge(age: Int): List<User>

    fun findByName(name: String): User?
}
Finally, modify UserController to let it access databases.
package com.waynestalk.demo.controller

import com.waynestalk.demo.domain.User
import com.waynestalk.demo.repository.UserRepository
import org.springframework.http.HttpStatus
import org.springframework.web.bind.annotation.*
import org.springframework.web.server.ResponseStatusException

@RestController
@RequestMapping("/users")
class UserController(private val userRepository: UserRepository) {
    @GetMapping
    fun getUsers(@RequestParam(required = false, defaultValue = "0") age: Int): List<User> =
            if (age == 0) userRepository.findAll() else userRepository.findAllByAge(age)

    @GetMapping("/{name}")
    fun getUserBy(@PathVariable name: String) =
            userRepository.findByName(name)
                    ?: throw ResponseStatusException(HttpStatus.NOT_FOUND, "User $name not found")

    @PostMapping
    fun addUser(@RequestBody user: User) = userRepository.save(user)

    @PutMapping("/{name}")
    fun modifyUser(@PathVariable name: String, @RequestBody user: User): User {
        val found = userRepository.findByName(name)
                ?: throw ResponseStatusException(HttpStatus.NOT_FOUND, "User $name not found")
        if (user.age != null) {
            found.age = user.age
        }
        userRepository.save(found)
        return found
    }

    @DeleteMapping("/{name}")
    fun removeUser(@PathVariable name: String): User {
        val user = userRepository.findByName(name)
                ?: throw ResponseStatusException(HttpStatus.NOT_FOUND, "User $name not found")
        userRepository.delete(user)
        return user
    }
}
For testing purposes, we insert some User data to the database when the program starts.
package com.waynestalk.demo

import com.waynestalk.demo.domain.User
import com.waynestalk.demo.repository.UserRepository
import org.springframework.boot.ApplicationRunner
import org.springframework.context.annotation.Bean
import org.springframework.context.annotation.Configuration

@Configuration
class UserConfiguration {
    @Bean
    fun initUsers(userRepository: UserRepository) = ApplicationRunner {
        userRepository.saveAll(listOf(
                User("Jason", 20, 1),
                User("Alan", 22, 2),
                User("David", 21, 3),
                User("Monika", 20, 4),
                User("Angela", 22, 5)
        ))
    }
}
MySQL
MySQL is a very popular free database system. Many commercial applications use MySQL. Generally speaking, if companies are rich, use Oracle. Individuals and small companies use MySQL.
If you want to use MySQL in your applications, you need to include Spring Data JPA and MySQL Driver frameworks.

After including the frameworks, the following lines are added to build.gradle.kts.
// build.gradle.kts

plugins {
    kotlin("plugin.jpa") version "1.3.72"
}

dependencies {
    implementation("org.springframework.boot:spring-boot-starter-data-jpa")
    runtimeOnly("mysql:mysql-connector-java")
}
Finally, add some settings for data source in application.properties.
spring.datasource.url=jdbc:mysql://localhost:3306/dbname?useUnicode=true &characterEncoding=utf-8&autoReconnect=true&serverTimezone=Asia/Taipei
spring.datasource.username=root
spring.datasource.password=123456
spring.datasource.driver-class-name=com.mysql.cj.jdbc.Driver
spring.jpa.hibernate.ddl-auto=update
spring.jpa.database-platform=org.hibernate.dialect.MySQL8Dialect
spring.jpa.properties.hibernate.dialect.storage_engine=innodb
- spring.datasource.url: The URL of the database.
- useUnicode=true&characterEncoding=utf-8: Set to use UTF-8 to encode characters, so that Chinese can be supported.
- autoReconnect=true: Automatically re-establish the connection.
- serverTimezone=Asia/Taipei: Set the time zone.
- spring.datasource.username: Username.
- spring.datasource.password: Password.
- spring.datasource.driver-class-name: Set the JDBC driver.
- spring.jpa.hibernate.ddl-auto: Set the automatic schema generation of Hibernate .
- spring.jpa.database-platform: Set the type of database.
- spring.jpa.properties.hibernate.dialect.storage_engine: When Hibernate automatically creates a table, set to use Innodb instead of MyISAM.
It’s finished to change database. Thanks to JPA, we don’t need to change any code!
Conclusion
If you are new to Spring Boot, you will definitely find Spring Boot difficult. This is because it has a lot of annotations to understand, but also because these annotations make the code of Spring Boot applications very small. For example, you don’t need to write code to set a method to map a HTTP request, but just declare it through an annotation. Spring Boot provides a lot of annotations to help us simplify this kind of code. After getting familiar with it, you will find it quite convenient!


