
This article will explain Spring Security‘s OAuth Login in a simple way. And, take Google Sign-In as an example to show how to use Spring Security’s OAuth Login to integrate Google Sign-In. Hope that after reading, you can have an in-depth understanding of OAuth Login.
The complete code can be found in .

Table of Contents
OAuth 2 Authentication
OAuth Login of Spring Security provides OAuth 2.0 login authentication. In OAuth 2.0 Authentication Framework, Authorization Grant has 4 modes, namely:
- Authorization Code
- Implicit
- Resource Owner Password Credentials
- Client Credentials
Spring Security’s OAuth Login only supports Authorization Code Grant mode, such as GitHub. In addition, it also supports the OpenID Connect Authorization Code Grant mode, such as Google.
The following figure shows the flow of Authorization Code Grant mode. You can understand this diagram more easily with Google Sign-In.
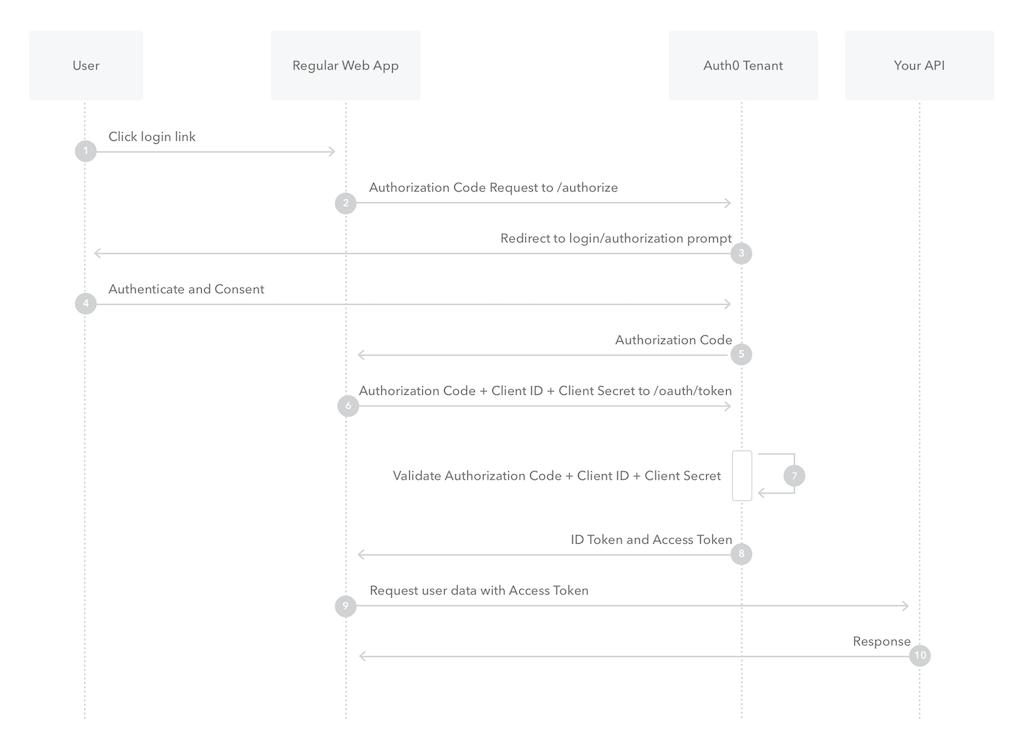
The flow of Authorization Code is:
- A user clicks login link on Web App.
- Web App requests authorization code from a OAuth server.
- The OAuth server redirects the user to login screen.
- The user uses an account to login to the OAuth server.
- The OAuth server verifies the user’s account and password. After the verification succeeds, it redirects to the Web App with an authorization code.
- The Web App requests /oauth/token of the OAuth Server with authorization code, client ID, and client secret.
- OAuth server verifies the authorization code, client ID, and client secret.
- If the verification succeeds, return to Web App with ID token and access token. There may also be a refresh token, but this is optional.
- The overall flow is completed at the previous step. This step only means that Web App can use the access token to access the resources of the OAuth server, such as user data.
In the above flow, Google can be OAuth Server, and Web App can be a backend application (such as Spring Boot) or a frontend application (such as Angular).
Spring Security also integrates OAuth servers such as Google, Facebook, and GitHub. You only need to set client ID, client secret, and platform ID, then you can integrate OAuth Login into your Spring Boot project.
Next, we will use Google Sign-In as an example to learn more about the flow and architecture of Spring Security’s OAuth Login.
OAuth Login Using Google Sign-In
Assuming that we have a Spring Security project setting up OAuth Login and Google Sign-In, the whole flow will be as follows:
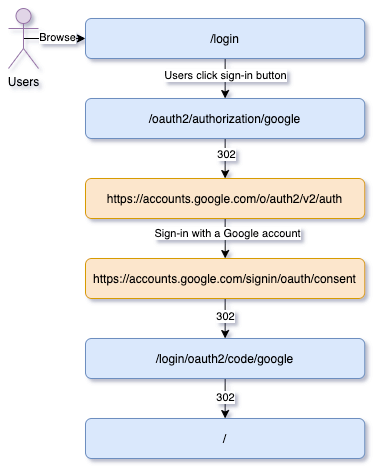
Spring Security automatically generates a login page, which is is /login by default. This login page has a link titled Google Sign In, and it connects to /oauth2/authorization/{registrationId}. In this example, the registrationId is google, and it also can be facebook or github etc. Spring Security parse out this registrationId and use different settings and flow according to it.
When registrationId is google, Google-related settings will be used. According to this settings, it will redirect to the login screen of Google Sign-In. After users login with Google accounts, it will redirect back to /login/oauth2/code/{registrationId}. And, this URI is also called Redirect URI.
When this redirect back to Spring Security, it will bring an authorization code. Spring Security will start Authorization Code Grant verification flow. Finally, it will obtain an ID token, access token, and refresh token.
After the verification is completed, it redirects to the preset success URI, which is /.
Spring Security OAuth Login Flow
You can see that the entire flow can be divided into three parts:
- /oauth2/authorization/{registrationId} – OAuth2AuthorizationRequestRedirectFilter
- /login/oauth2/code/{registrationId} – OAuth2LoginAuthenticationFilter
In the list, the first and third parts are processed by two Spring Security’s filters. If you are not familiar with Spring Security’s filter, please read the following article first.

OAuth2AuthorizationRequestRedirectFilter
The following figure shows the flow of OAuth2AuthorizationRequestRedirectFilter.
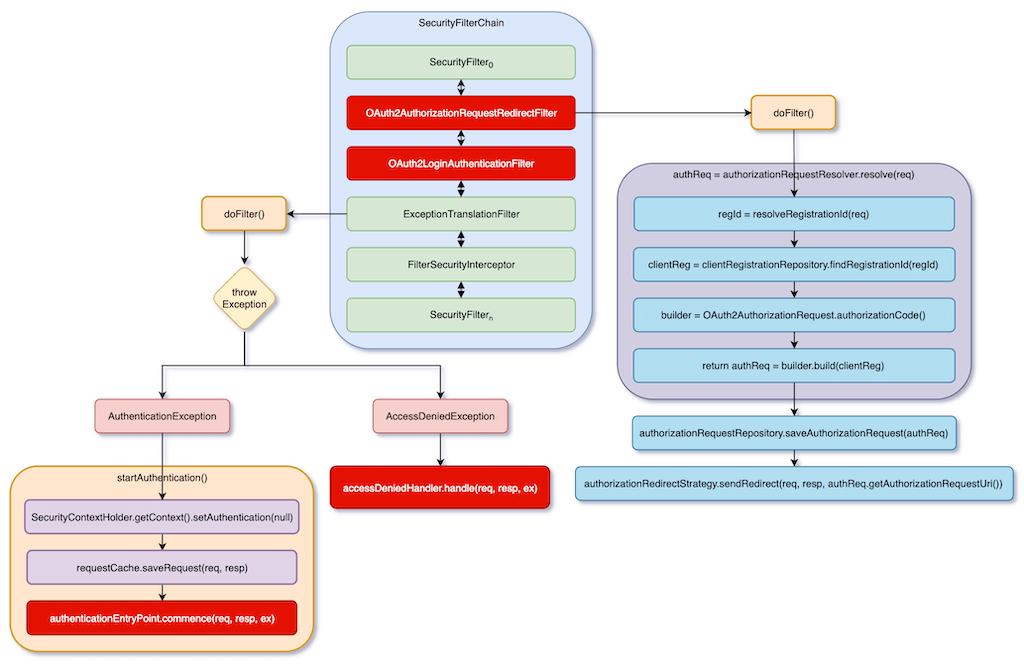
First, if a user wants to access resources without logging in, authenticationEntryPoint.commence() will redirects to /login. This uses Spring Security’s default flow. If you are not familiar with it, you can read the following article first.
When a user accesses /oauth2/authorization/{registrationId}, the request will be intercepted by OAuth2AuthorizationRequestRedirectFilter. It will first determine registrationId based on URI. According to the previous example, it will be google. Then, use this registrationId to get ClientRegistration, which stores Google-related settings.
Next, according to ClientRegistration, it generates all verification data, including its URL, and all Query Parameters following the URL. Then, temporarily store this data, and then redirect to this URL for OAuth verification.
OAuth2LoginAuthenticationFilter
When OAuth server redirects to Redirect URI /login/oauth2/code/{registrationId}, OAuth2LoginAuthenticationFilter will intercept the flow, which as follows:

First, it obtains the OAuth authentication data temporarily stored in OAuth2AuthorizationRequestRedirectFilter according to HTTP request. This HTTP request from OAuth server carries an authorization code. Then, it call AuthenticationManager.authenticate() to perform OAuth 2.0 Authorization Code Flow on the verification data and the HTTP request. The complex logic is all in this method.
Next, if the verification succeeds, it redirects to the preset URI. Because OAuth2LoginAuthenticationFilter also inherits AbstractAuthenticationProcessingFilter, the rest of the flow is the same as Form Login. For details, please refer to the following article.

Spring Security OAuth 2.0 Architecture
We looked at the process of Spring Security OAuth Login from an overview perspective. After understanding the whole process, it helps to understand the details.
OAuth2AuthorizationRequestRedirectFilter
First, let’s take a look at the architecture of OAuth2AuthorizationRequestRedirectFilter, as shown in the following figure:
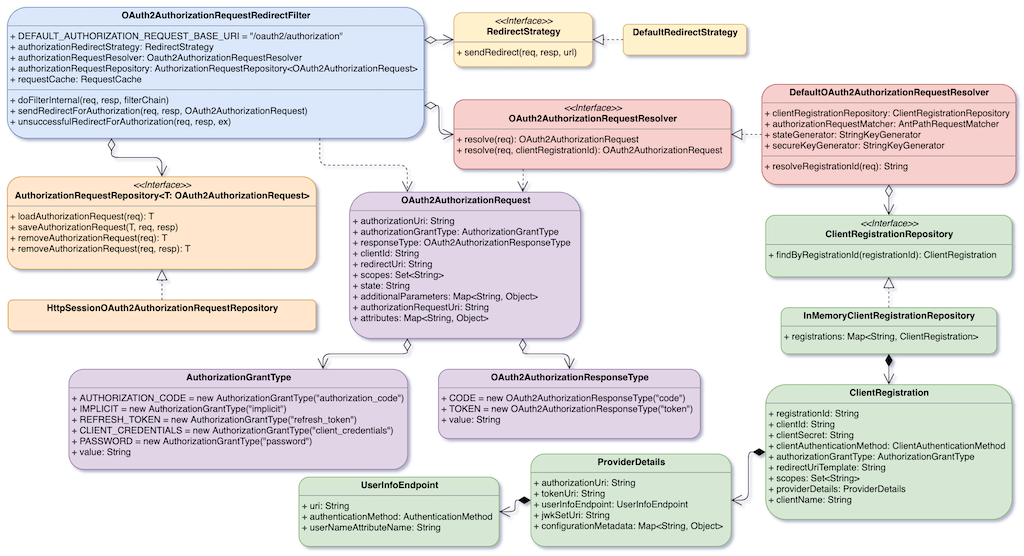
The logic of OAuth2AuthorizationRequestRedirectFilter is actually quite simple. It is based on HTTP request URI to determine registrationId. Then, according to this registrationId, it gets ClientRegistration.
ClientRegistration is a very important data structure. Look carefully, it contains all the settings required by OAuth 2.0, such as Secret, AuthenticationGrantType, Redirect URL, Scopes, Authorization URL, Token URL, UserInfoEndpoint URL, etc. In other words, if you want to customize for an OAuth server, the most important thing is to provide a ClientRegistration for Spring Security. Of course, your OAuth server must use Authorization Code Grant mode.
After OAuth2AuthorizationRequestRedirectFilter obtains ClientRegistration, it passes ClientRegistration to OAuth2AuthorizationRequest. According to this information, OAuth2AuthorizationRequest can generate a HTTP request to request an authorization code.
The code can roughly be simplified as follows:
public class OAuth2AuthorizationRequestRedirectFilter {
    void doFilterInternal(HttpServletRequest request, HttpServletResponse response, FilterChain filterChain) {
        String registrationId = resolveRegistrationId(request);
        OAuth2AuthorizationRequest authorizationRequest = authorizationRequestResolver.resolve(request);
        if (authorizationRequest != null) {
            authorizationRequestRepository.saveAuthorizationRequest(authorizationRequest, request, response);
            authorizationRedirectStrategy.sendRedirect(request, response, authorizationRequest.getAuthorizationRequestUri());
        } else {
            filterChain.doFilter(request, response);
        }
    }
}

public DefaultOAuth2AuthorizationRequestResolver implements OAuth2AuthorizationRequestResolver {
    OAuth2AuthorizationRequest resolve(HttpServletRequest request, String registrationId) {
        ClientRegistration clientRegistration = clientRegistrationRepository.findByRegistrationId(registrationId);
        OAuth2AuthorizationRequest.Builder builder = OAuth2AuthorizationRequest.authorizationCode();
        builder
            .clientId(clientRegistration.getClientId())
            .authorizationUri(clientRegistration.getProviderDetails().getAuthorizationUri())
            .redirectUri(redirectUriStr)
            .scopes(clientRegistration.getScopes())
            .state(this.stateGenerator.generateKey())
            .attributes(attributes);
        return builder.build();
    }
}
What DefaultOAuth2AuthorizationRequestResolver.resolve() does is to take out ClientRegistration and create an OAuth2AuthorizationRequest based on it.
OAuth2LoginAuthenticationFilter
You will find OAuth2LoginAuthenticationFilter quite complicated. A lot of code and a lot of data structure are dazzling. The following figure shows the structure of OAuth2LoginAuthenticationFilter. Of course, it does not contain all data structures, but it contains most of it.

The complex logic of OAuth2LoginAuthenticationFilter is mostly doing OAuth 2.0 Authorization Code Grant verification, while the rest is quite simple. In other words, if you want to understand OAuth2LoginAuthenticationFilter, you must first understand the entire flow of OAuth 2.0 Authorization Code Grant. This part has already been explained in the first half of this article, and it is recommended to look at it together.
OAuth2LoginAuthenticationFilter first fetches the OAuth2AuthorizationRequest temporarily stored in AuthorizationRequestRepository. The registrationId is stored in the OAuth2AuthorizationRequest, and ClientRegistration can be obtained based on it. Then, convert the parameters in the HTTP request sent by OAuth server into OAuth2AuthorizationResponse. And, use OAuth2AuthorizationRequest, OAuth2AuthorizationResponse, and ClientRegistration to create an OAuth2LoginAuthenticationToken.
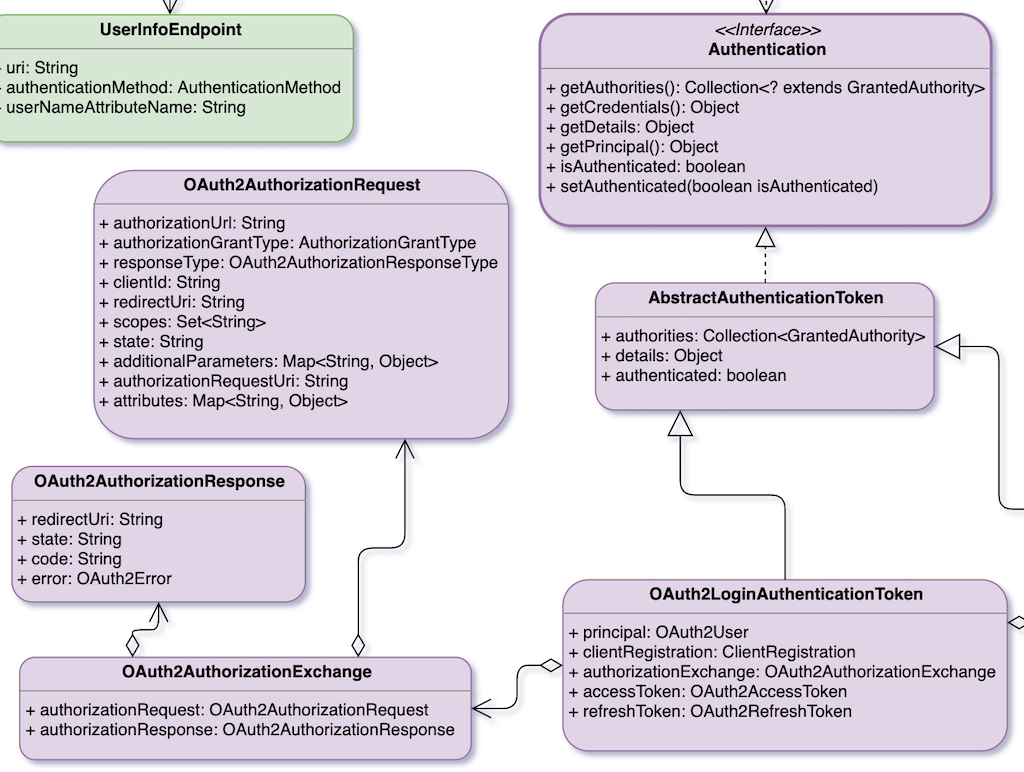
Next is to use OidcAuthorizationCodeAuthenticationProvider to verify the OAuth2LoginAuthenticationToken called authenticationRequest. Oidc is the abbreviation of OpenID Connect, so it is used for authentication of OpenID Connect Authorization Code Grant mode. Therefore, if the authentication succeeds, OidcAuthorizationCodeAuthenticationProvider.authenticate() will return an OAuth2LoginAuthenticationToken called authenticationResult. The authenticationResult will contain ID token, access token, and refresh token.

Finally, create OAuth2AuthenticationToken and OAuth2AuthorizedClient with authenticationResult, and return OAuth2AuthenticationToken.
The code of the entire process is simplified as follows:
public class OAuth2LoginAuthenticationFilter extends AbstractAuthenticationProcessingFilter {
    @Override
    public Authentication attemptAuthentication(HttpServletRequest request, HttpServletResponse response) {
        OAuth2AuthorizationRequest authorizationRequest = authorizationRequestRepository.removeAuthorizationRequest(request, response);
        String registrationId = authorizationRequest.getAttribute(OAuth2ParameterNames.REGISTRATION_ID);
        ClientRegistration clientRegistration = this.clientRegistrationRepository.findByRegistrationId(registrationId);
        OAuth2AuthorizationResponse authorizationResponse = OAuth2AuthorizationResponseUtils.convert(params, redirectUri);
        OAuth2LoginAuthenticationToken authenticationRequest =
            new OAuth2LoginAuthenticationToken(clientRegistration, new OAuth2AuthorizationExchange(authorizationRequest, authorizationResponse));

        OAuth2LoginAuthenticationToken authenticationResult = (OAuth2LoginAuthenticationToken) this.getAuthenticationManager().authenticate(authenticationRequest);

        OAuth2AuthenticationToken oauth2Authentication = new OAuth2AuthenticationToken(
            authenticationResult.getPrincipal(),
            authenticationResult.getAuthorities(),
            authenticationResult.getClientRegistration().getRegistrationId());

        OAuth2AuthorizedClient authorizedClient = new OAuth2AuthorizedClient(
            authenticationResult.getClientRegistration(),
            oauth2Authentication.getName(),
            authenticationResult.getAccessToken(),
            authenticationResult.getRefreshToken());

        authorizedClientRepository.saveAuthorizedClient(authorizedClient, oauth2Authentication, request, response);

        return oauth2Authentication;
    }
}
The returned OAuth2AuthenticationToken will be passed into successfulAuthentication() in which it will be set to SecurityContextHolder. For the detail of this part, you can refer to the following article.
OAuth Login Project with Google Sign-In
After understanding Spring Security OAuth Login, let’s create a Spring Security OAuth Login project and integrate Google Sign-In.
Creating Google OAuth Credentials
First, we need to obtain a pair of client ID and client secret.
Go to the Google Console and click Credentials on the left. After switching to the Credentials page, click CREATE CREDENTIALS above, and select OAuth Client ID.

In the Application type field, please select Web application. Enter the name of your project in the Name field.
Authorized JavaScript origins are the origins from which your frontend sends login requests. Because our Spring Boot only runs on local, we use http://localhost:8080 .
Authorized redirect URIs are the URLs used by Google to redirect back to our Spring Boot after users login to Google. As mentioned in this chapter, the Redirect URI is /login/oauth2/code/{registrationId}. So, the URL will be http://localhost:8080/login/oauth2/code/google.

Finally, Google Console will generate a pair of client ID and client secret.

Creating Project
Create a Spring Boot project and include the 4 dependencies in the figure below.

If you don’t know how to create a project, or don’t understand the picture above, you can refer to the following article first.

Configuring Spring Security
Put the obtained client ID and client Secret into application.properties.
spring.security.oauth2.client.registration.google.client-id=63245096424-6nn16rjn23h8p11g8bkp2aogl4kqneuc.apps.googleusercontent.com
spring.security.oauth2.client.registration.google.client-secret=JP-lvQxE8eo359zgQMKpvC5k
Add SecurityConfig, its code is as follows:
package com.waynestalk.oauthloginexample.config

import org.springframework.context.annotation.Configuration
import org.springframework.security.config.annotation.web.builders.HttpSecurity
import org.springframework.security.config.annotation.web.configuration.WebSecurityConfigurerAdapter

@Configuration
class SecurityConfig : WebSecurityConfigurerAdapter() {
    override fun configure(http: HttpSecurity) {
        http
                .authorizeRequests()
                .anyRequest()
                .authenticated()

                .and()
                .oauth2Login()
    }
}
UserController
Add UserController, which has a GET /user.
package com.waynestalk.oauthloginexample.controller

import org.springframework.web.bind.annotation.GetMapping
import org.springframework.web.bind.annotation.RestController
import java.security.Principal

@RestController
class UserController {
    @GetMapping("/user")
    fun user(principal: Principal): Principal {
        return principal
    }
}
Testing
Browse http://localhost:8080/login, and you can see that Spring Security has automatically generated a login page for you. Click Google, and you will see the sign-in screen of Sign-in with Google. After successfully logging in, you will be redirected to http://localhost:8080/#.
Because / does not have any pages, a 404 will be displayed. However, you have successfully logged in, and now you can directly access http://localhost:8080/user, you can see the output of GET /user!
Setting Up Login Page
We can also set the login page. In the code below, we changed the login page to /login.html, which was originally /login.
@Configuration
class SecurityConfig : WebSecurityConfigurerAdapter() {
    override fun configure(http: HttpSecurity) {
        http
                .authorizeRequests()
                .antMatchers("/login.html").permitAll()
                .anyRequest()
                .authenticated()

                .and()
                .oauth2Login()
                .loginPage("/login.html")
    }
}
Add index.html under static/. The login link inside must be /oauth2/authorization/google. Still remember /oauth2/authorization/{registrationId}!
<!DOCTYPE html>
<html lang="en">
<head>
    <meta charset="UTF-8">
    <title>Login</title>
</head>
<body>
<a href="/oauth2/authorization/google">Sign-in Google</a>
</body>
</html>
Browse http://localhost:8080/login.html , you can see our login page.
Setting Up Login Success Page
After logging in successfully, it will be redirected to / by default. We can also change this URI. The following code, set the success page to /login-success.
@Configuration
class SecurityConfig : WebSecurityConfigurerAdapter() {
    override fun configure(http: HttpSecurity) {
        http
                .authorizeRequests()
                .antMatchers("/login.html").permitAll()
                .anyRequest()
                .authenticated()

                .and()
                .oauth2Login()
                .loginPage("/login.html")
                .defaultSuccessUrl("/success.html")
    }
}
Add success.html under static/.
<!DOCTYPE html>
<html lang="en">
<head>
    <meta charset="UTF-8">
    <title>LoginSuccess</title>
</head>
<body>
<a href="/user">Get Me</a>
</body>
</html>
Try to login again, after successfully logging in, you will be redirected to /success.html. In /success.html, click Get Me to connect to GET /user.
Method Security
Spring Security’s OAuth Login supports Method Security too. If you don’t understand Method Security, you can read the following article first.
All users who have logged in successfully have ROLE_USER permissions by default. So, we first add hasRole(‘ROLE_ADMIN’) permission to GET /user.
@RestController
class UserController {
    @GetMapping("/user")
    @PreAuthorize("hasRole('ROLE_ADMIN')")
    fun user(principal: Principal): Principal {
        return principal
    }
}
Then, try to login again. After logging in successfully, access GET /user again. You will get a 403 error at this time. This means that the Method Security we just added works now!
Now, let’s add ROLE_ADMIN permission to our login account. Add a bean to SecurityConfig, the code is as follows:
@Configuration
@EnableWebSecurity
@EnableGlobalMethodSecurity(prePostEnabled = true)
class SecurityConfig : WebSecurityConfigurerAdapter() {
    // ..

    @Bean
    fun userAuthoritiesMapper(): GrantedAuthoritiesMapper {
        return GrantedAuthoritiesMapper { authorities ->
            val mappedAuthorities = HashSet<GrantedAuthority>()
            authorities.forEach { authority ->
                mappedAuthorities.add(authority)
                if (OidcUserAuthority::class.java.isInstance(authority)) {
                    val oidcUserAuthority = authority as OidcUserAuthority
                    val email = oidcUserAuthority.attributes["email"]

                    if (email == "your.email@waynestalk.com") {
                        mappedAuthorities.add(OidcUserAuthority("ROLE_ADMIN", oidcUserAuthority.idToken, oidcUserAuthority.userInfo))
                    }
                }
            }

            mappedAuthorities
        }
    }
}
Here, we check the email. If the email is your.email@waynestalk.com, we add ROLE_ADMIN permission to it. Email is used here because we treat this email as username. Remember to replace your.email@waynestalk.com with your own email.
Run the project again, login again, and access GET /user. At this time, it should be able to access successfully.
Conclusion
Spring Security’s OAuth Login helps us save a lot of time. Otherwise, you have to implement the flow of Authorization Code Grant yourself, which will be quite time-consuming! Although, from the perspective of this article, the logic of OAuth Login is quite complicated. However, the complexity is all about the flow of Authorization Code Grant. If you implement it yourself, maybe it will still be quite complicated!


2 comments
Hi Wayne,
I’m not able to glue these filters explained (OAuth2LoginRequestRedirectFilter and OAuth2LoginAuthenticationFilter) to the spring security. getting lot of exceptions. Is this code is maintained at anywhere? I have see in your github but these filters logic is not there
Thanks
Hi Sai,
OAuth2LoginRequestRedirectFilter and OAuth2LoginAuthenticationFilter are used in Spring Security internally. You won’t use them directly. In this article, section 1 to 4 are just about explaining the architecture of Spring Security. Section 5 is an example of using OAuth Login with Google SignIn, and I think this is the only thing you want. Also, the source code for this article is only for section 5.