
Springdoc 是一個整合 OpenAPI Specification 和 Spring Boot 的套件。和 SpringFox 套件一樣,它產出 Swagger 文件。兩者不同在於,Springdoc 是用 Swagger 3,而 SpringFox 是用 Swagger 2。所以使用 SpringFox 的開發者,是時候轉移到 Springdoc!
Table of Contents
基本設定
建立專案
建立一個 Spring Boot 專案,而且要引入 Spring Web 和 Validation 套件。如果不熟悉建立 Spring Boot 專案的話,可以參照以下這篇。

然後,在 build.gradle.kts 裡,加上以下的套件。
dependencies {
    implementation("org.springdoc:springdoc-openapi-ui:1.4.3")
    implementation("org.springdoc:springdoc-openapi-kotlin:1.4.3")
}
這些套件的功用,分別是:
- springdoc-openapi-ui:整合 swagger-ui。
- springdoc-openapi-kotlin:支援 Kotlin。
新增 REST APIs
新增 User,程式碼如下:
package com.waynestalk.springdoc

data class User(val name: String, val age: Int, val email: String)
新增 AddUserRequest,程式碼如下:
package com.waynestalk.springdoc

data class AddUserRequest(val name: String, val age: Int, val email: String)
最後新增 UserController,程式碼如下:
package com.waynestalk.springdoc
import org.springframework.web.bind.annotation.*
@RestController
@RequestMapping("/users")
class UserController {
var users = mutableListOf(
User("Jack", 10, "jack@abc.com"),
User("Monika", 11, "monika@abc.com"),
User("Peter", 12, "peter@abc.com"),
User("Jane", 13, "jane@abc.com")
)
@GetMapping
fun findUsers(@RequestParam age: Int?) = if (age == null) users else users.filter { it.age == age }
@GetMapping("/{name}")
fun getUser(@PathVariable name: String) =
users.find { it.name == name } ?: throw Exception("$name is not found")
@PostMapping
fun addUser(@RequestBody request: AddUserRequest): User {
val user = User(request.name, request.age, request.email)
users.add(user)
return user
}
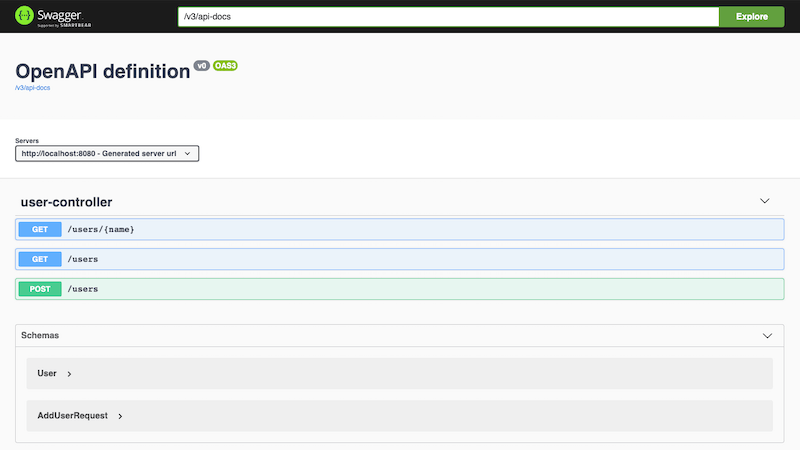
}這樣基本的專案就完成了。執行專案,然後開啟瀏覽器,瀏覽 http://localhost:8080/swagger-ui.html,就可以看到 Swagger UI 畫面了!
Springdoc Annotations
現在我們來利用 Springdoc 提供的 Annotations,在 Swagger UI 上加入說明。
@OpenAPIDefinition – 設定標題與版本
我們可以利用 @OpenAPIDefinition 設定 Swagger UI 上的標題與版本。
新增 SpringdocConfiguration,程式碼如下。在程式碼中,我們設定標題為 Wayne’s Talk API,並將版本設定為 v1.0.0。
package com.waynestalk.springdoc

import io.swagger.v3.oas.annotations.OpenAPIDefinition
import io.swagger.v3.oas.annotations.info.Info
import org.springframework.context.annotation.Configuration

@OpenAPIDefinition(info = Info(title = "Wayne's Talk API", version = "v1.0.0"))
@Configuration
class SpringdocConfiguration
執行專案,可以看到如下圖的設定結果。

@Operation – 設定 APIs 的說明
在目前 Swagger UI 裡的 GET /users/{name},並沒有任何的文字說明這隻 API 的用途。而這個文字說明正是這份文件的最重要的東西。讓我們來替每隻 API 加上說明文字吧。

我們可以用 @Operation 來加上說明文字。修改 UserController 成如下:
package com.waynestalk.springdoc
import io.swagger.v3.oas.annotations.Operation
import org.springframework.web.bind.annotation.*
@RestController
@RequestMapping("/users")
class UserController {
@Operation(summary = "Find users with a given age", description = "Find users whose ages are the same as a given age")
@GetMapping
fun findUsers(@RequestParam age: Int?) = if (age == null) users else users.filter { it.age == age }
@Operation(summary = "Get a user with a given name", description = "Get a specific user with a given name")
@GetMapping("/{name}")
fun getUser(@PathVariable name: String) =
users.find { it.name == name } ?: throw Exception("$name is not found")
@Operation(summary = "Add a user", description = "Create a new user")
@PostMapping
fun addUser(@RequestBody request: AddUserRequest): User {
val user = User(request.name, request.age, request.email)
users.add(user)
return user
}
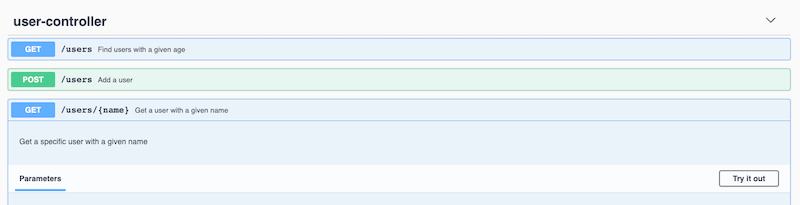
}跑一下專案,可以看到 summary 是 API 的標題,而 description 是 API 的詳細說明。
@Parameter – 設定 APIs 參數的說明
常用 API 的參數有二種:
- Path Variables:API
GET /users/{name}中的name就是一個 path variable。在getUser()的參數中,對應的參數前面會有@PathVariable。 - Query Parameters:API
GET /users?age=10裡的age就是一個 query parameter。在findUsers()的參數中,對應的參數前面會有@RequestParam。
@Parameter 可以用來替這兩種形式加上說明。讓我們來試著替 getUser() 和 findUsers() 的參數加上說明吧。
package com.waynestalk.springdoc
import io.swagger.v3.oas.annotations.Operation
import io.swagger.v3.oas.annotations.Parameter
import org.springframework.web.bind.annotation.*
@RestController
@RequestMapping("/users")
class UserController {
@Operation(summary = "Find users with a given age", description = "Find users whose ages are the same as a given age")
@GetMapping
fun findUsers(@Parameter(description = "age to match users", example = "11") @RequestParam age: Int?) =
if (age == null) users else users.filter { it.age == age }
@Operation(summary = "Get a user with a given name", description = "Get a specific user with a given name")
@GetMapping("/{name}")
fun getUser(@Parameter(description = "name of user", example = "Irene") @PathVariable name: String) =
users.find { it.name == name } ?: throw Exception("$name is not found")
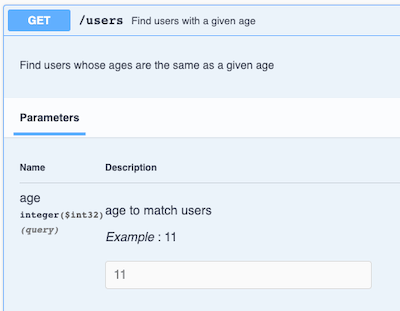
}跑一下程式,可以看到 APIs 的 Parameters 不但有了說明,還有預設的參數值當作範例。

@Schema – 設定 APIs Request Body 的說明
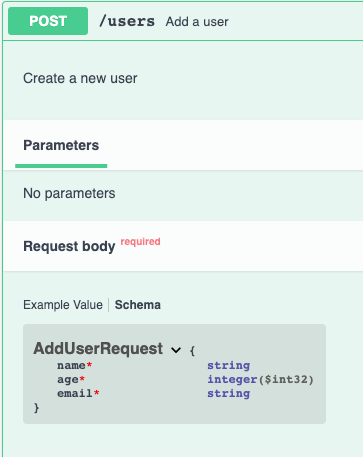
如下圖,可以看到目前的 API POST /users 的 Request body 是沒有任何的說明。Springdoc 只有顯示 AddUserRequest 裡面的每個欄位的型態而已。但我們常常無法只有經由欄位的名稱,就得知欄位真正的意思。
我們可以利用 @Schema 來替每個欄位加上 Constraints、Example、和 Description。修改 AddUserReuqest 成如下。
package com.waynestalk.springdoc

import io.swagger.v3.oas.annotations.media.Schema

data class AddUserRequest(
        @field:Schema(description = "name of user", minLength = 1, example = "Irene")
        val name: String,
        @field:Schema(description = "age of user", minimum = "1", example = "18")
        val age: Int,
        @field:Schema(
                description = "email of user",
                pattern = "^([a-zA-Z0-9_\\-\\.]+)@([a-zA-Z0-9_\\-\\.]+)\\.([a-zA-Z]{2,5})\$",
                example = "irene@abc.com")
        val email: String)
執行程式後,可以看到 POST /users 的 Request body 的 Schema 頁面中,AddUserRequest 的欄位有詳細的說明,包含 Constraints 與 Examples。
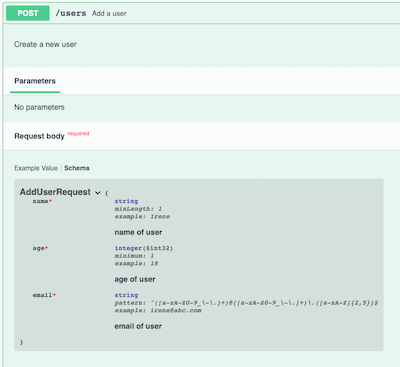
另外在 Example Value 頁面,各個欄位都填上了我們設定的 Example。

@APIResponses – 設定 APIs Response 的說明
看一下 /users/{name} 的 Responses 頁面,目前只有 Status Code 是 200 的定義。而它的 Schema 是根據 getUser() 的回傳值推導出來的。
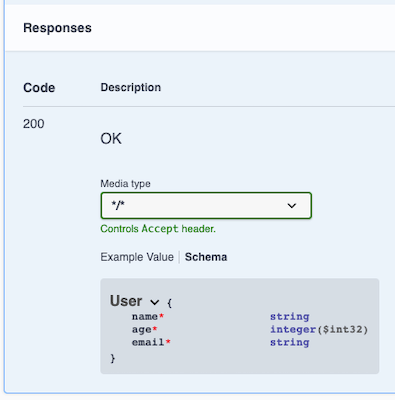
我們可以藉由 @APIRespons 來定義其他的 Status Code,已告知讀文件的開發者,如當 Status Code 是 404 的時候,是指 User 不存在。而且,還可以說明在 Response 中每個欄位是代表什麼意思。這些都可以大大地增加文件的可讀性。讓我們來試著替 /users/{name} 加上 Responses 的說明吧。
修改 User 如下。我們對 User 的每個欄位都加上 description。
package com.waynestalk.springdoc
import io.swagger.v3.oas.annotations.media.Schema
data class User(
@field:Schema(description = "User name")
val name: String,
@field:Schema(description = "User age")
val age: Int,
@field:Schema(description = "User email")
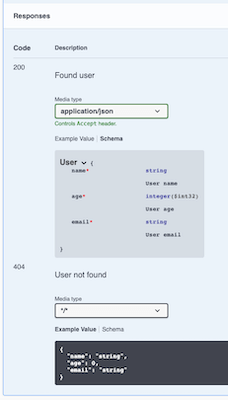
val email: String)修改 UserController,替 getUser() 加上 Status Code 404 的定義。此外,也替 Status Code 200 時,加上 mediaType。
package com.waynestalk.springdoc

import io.swagger.v3.oas.annotations.Operation
import io.swagger.v3.oas.annotations.Parameter
import io.swagger.v3.oas.annotations.media.Content
import io.swagger.v3.oas.annotations.media.Schema
import io.swagger.v3.oas.annotations.responses.ApiResponse
import io.swagger.v3.oas.annotations.responses.ApiResponses
import org.springframework.web.bind.annotation.*

@RestController
@RequestMapping("/users")
class UserController {
    @Operation(summary = "Get a user with a given name", description = "Get a specific user with a given name")
    @ApiResponses(value = [
        ApiResponse(
                responseCode = "200",
                description = "Found user",
                content = [Content(mediaType = "application/json", schema = Schema(implementation = User::class))]
        ),
        ApiResponse(
                responseCode = "404",
                description = "User not found"
        )
    ])
    @GetMapping("/{name}")
    fun getUser(@Parameter(description = "name of user", example = "Irene") @PathVariable name: String) =
            users.find { it.name == name } ?: throw Exception("$name is not found")
}
執行一下程式,現在可以看到加上說明後的 Responses,是不是有更好的可讀性呢!
整合 Spring Validation
Spring Validation 可以幫我們自動地檢查 RequestBody 裡面的資料是否符合規定。例如,AddUserRequest.age 是不可以小於 1 的。藉由 Spring Validation,我們不再需要寫程式去檢查所有的資料,而是透過 Annotations 來定義資料的 Constraints。
而上面我們有介紹到,如何用 Springdoc 來定義資料的 Constraints。然而,這些定義都只是顯示在文件上,實際上程式是不會像 Spring Validation 一樣,真的去檢查每一個資料是否有符合 Constraints。
Springdoc 有整合 Spring Validation。它會在 Swagger UI 上顯示 Spring Validation 的 Constraints。也就是說,當用 Spring Validation 定義 Constraints 時,我們就不需要再用 Springdoc 定義一次。
首先必須要引入 Spring Validation 套件,我們在一開始建立專案時,就已經有引入了。
修改 AddUserRequest,對每個欄位加上 Constraint。
package com.waynestalk.springdoc

import io.swagger.v3.oas.annotations.media.Schema
import javax.validation.constraints.Min
import javax.validation.constraints.NotBlank
import javax.validation.constraints.Pattern

data class AddUserRequest(
        @field:Schema(description = "name of user", example = "Irene")
        @field:NotBlank
        val name: String,
        @field:Schema(description = "age of user", example = "18")
        @field:Min(1)
        val age: Int,
        @field:Schema(description = "email of user", example = "irene@abc.com")
        @field:Pattern(regexp = "^([a-zA-Z0-9_\\-.]+)@([a-zA-Z0-9_\\-.]+)\\.([a-zA-Z]{2,5})\$")
        val email: String)
在 addUser() 中,替 AddUserRequest 參數加上 @Valid。這樣 Spring Validation 就知道要檢查 request 參數。
import javax.validation.Valid

@RestController
@RequestMapping("/users")
class UserController {
    fun addUser(@Valid @RequestBody request: AddUserRequest): User {
        val user = User(request.name, request.age, request.email)
        users.add(user)
        return user
    }
}
程式修改好後,執行一下專案。瀏覽 Swagger UI,你可以看到在 POST /users 的 Request body 下的 Schema 中的說明和之前是一樣的。另外,也試著發一個 request,但將 age 設定為 -1。你會看到 Spring Validation 替我們擋下這個 Bad Request。
結語
很多用過 Swagger 的人都知道,用過後就真的回不去了。Swagger UI 的介面是又乾淨又漂亮,令人愛不釋手。它很方便,讓你可以把 API 文件寫在程式裡面。加上 Springdoc 讓我們用 Annotations 就可以寫文件,不需要寫程式。程式一部署,文件也跟著一起部署好,數不盡的好處!


