
本章將介紹在 Spring Security 下,如何在前端做 Google Sign-In 登入後,取得 Authorization Code 並傳給後端。後端和 Google 驗證過後,再傳 JWT token 給前端。過程中,將從 Google Sign-In 取得的 Email 和從 JPA 讀取的帳號做比對。

Table of Contents
OAuth Login 的問題
Spring Security 的 OAuth Login 可以讓我們透過 Google Sign-In 做第三方登入。OAuth Login 的流程是,由後端對 OAuth Server 發出 Authorization Code 的請求。然後,OAuth Server 會將前端重新導向到登入畫面。前端登入後,OAuth Server 在傳 Authorization Code 給後端。最後,後端再對 OAuth Server 發出驗證 Authorization Code、Client ID、和 Client Secret 的請求。OAuth Server 驗證成功後,傳回 ID Token 和 Access Token 給後端。如果,不熟悉以上的流程的話,可以先閱讀以下這篇文章。

由上述的流程可知,OAuth Login 是完全符合網頁的運作模式,但是不完全適合手機前端。至少,重新導向這點在手機端就不是那麼地直覺。
OAuth2 + JWT-Token-Based Authentication
本章要介紹的方式是,結合 OAuth Login 和 JWT-Token-Based 的模式。大致流程會像是 Google Sign-In for server-side apps 所描述的一樣,如下圖。
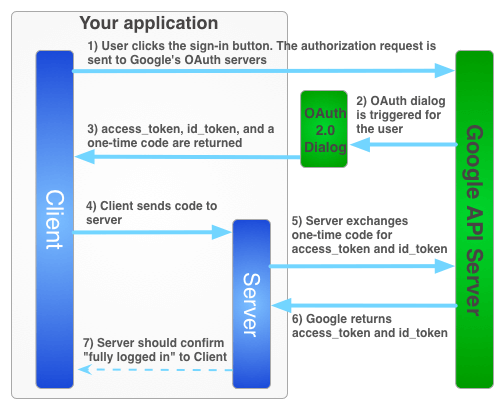
前端直接向 Google API Server 發出 Authorization 請求,然後重新導向到 OAuth 2.0 登入畫面。使用者登入後,回傳 id_token 和 access_token 給前端。前端再將 id_token 和 access_token 發送給後端。後端會利用 id_token 和 access_token 向 Google API Server 做驗證。驗證成功的話,就告知前端登入成功,整個流程大致完成。
與上面的不同是的,我們在前端會跟 Google API Server 要 Authorization Code,再將它傳給後端。後端就會將 Authorization Code、Client ID、和 Client Secret 送到 Google API Server 做驗證。成功後,將收到的 OAuth 的資訊做成 JWT 傳給前端。之後,前端就用 JWT 做驗證,同下面文章所介紹的 JWT-Token-Based Authentication。

為何我們不用 id_token 和 access_token,而改用 Authorization Code 呢?這是因為 Spring Security 的 OAuth Login 是採用 Authorization Code 流程。所以和它用一樣的方式的話,我們可以借用 OAuth Login 的驗證流程,這樣一來我們可以少很多程式碼。如果用 id_token 和 access_token,那就連同驗證流程都要重寫了。
OAuth2 + JWT-Token-Based Authentication 流程
在開始寫程式之前,我們先來了解一下,我們要實作的流程,如下圖所示:

如果對圖中的 SecurityFilterChain、ExceptionTranslationFilter、FilterSecurityInterceptor 不熟悉的話,請先閱讀下面的文章。

構想是在 SecurityFilterChain 中加入兩個 Filter,分別是 RestOAuth2AuthorizationFilter 和 RestOAuth2AuthenticationFilter。登入時,進入 RestOAuth2AuthenticationFilter 的流程,最後回傳前端一個 JWT。之後,前端的請求會帶著這個 JWT,RestOAuth2AuthorizationFilter 就會負責驗證這個 JWT。
OAuth2 + JWT-Token-Based Authentication 架構
下圖是顯示在 OAuth Login 的架構下,我們如何去修改成我們的架構。紅色的部分就是我們會新增的,其餘都還是借用 OAuth Login 的。如果我們用 id_token 和 access_token 的話,那就會連同橘色的部分都要實作了。

OAuth2 + JWT-Token-Based Authentication 專案
在這專案中,透過 Google Sign-In 驗證後,再將取得的使用者 Email 作為帳號。再從 JPA 讀取使用者帳號並做比對,如果存在則進行比對,如果不存在則會創建新帳號。
建立 Google OAuth Credentials
首先,我們要先取得一組 Client ID 和 Client Secret。在 Google Console 上,創建 Credentials 就可以了,下面的文章有說明詳細的步驟。
不過在 Authorized redirect URIs 的地方,不需要填入任何 URI,如下圖。

建立專案
建立一個 Spring Boot 專案,並引入圖中的 Dependencies。

如果不知道要怎麼建立專案,或不了解上圖的話,可以先參考下面這篇文章。

因為我們還會用到 Jackson 來解析 JSON 字串,以及用 JJWT 來產生 JWT,所以還要再引入以下的 Dependencies。
dependencies {
    implementation("com.fasterxml.jackson.module:jackson-module-kotlin")

    implementation("io.jsonwebtoken:jjwt-api:0.11.2")
    implementation("io.jsonwebtoken:jjwt-impl:0.11.2")
    implementation("io.jsonwebtoken:jjwt-jackson:0.11.2")
}
設定 Client DI & Client Secret
把剛剛產生的 Client ID 和 Client Secret 寫到 application.properties。
spring.security.oauth2.client.registration.google.client-id=63245096424-6nn16rjn23h8p11g8bkp2aogl4kqneuc.apps.googleusercontent.com
spring.security.oauth2.client.registration.google.client-secret=JP-lvQxE8eo359zgQMKpvC5k
login.html
新增 login.html,其程式碼如下:
<html>
<head>
    <meta charset="UTF-8">
    <title>Title</title>
    <script src="https://unpkg.com/axios/dist/axios.min.js"></script>
    <script src="https://apis.google.com/js/client:platform.js?onload=renderButton" async defer></script>
    <script>
        function renderButton() {
            gapi.load('auth2', function () {
                auth2 = gapi.auth2.init({
                    client_id: '63245096424-6nn16rjn23h8p11g8bkp2aogl4kqneuc.apps.googleusercontent.com',
                    scope: 'profile email',
                });
            });
        }
    </script>
</head>
<body>
<button id="signInButton" onclick="onClickSignIn()">Sign in with Google</button>
<button onclick="onClickAdmin()">Admin Endpoint</button>
<button onclick="onClickUser()">User Endpoint</button>
<script>
    let token;

    function onSuccess(result) {
        console.log(result);

        authenticate(result.code)
            .then(res => {
                token = res.data.token;
                console.log(res);
            })
            .catch(console.log);
    }

    function authenticate(code) {
        return axios.post('http://localhost:8080/auth/google', JSON.stringify({code}));
    }

    function callEndpoint(uri, token) {
        return axios.get(`http://localhost:8080/${uri}`, {headers: {Authorization: `Bearer ${token}`}});
    }

    function onFailure(error) {
        console.log(error);
    }

    function onClickSignIn() {
        auth2.grantOfflineAccess()
            .then(onSuccess)
            .catch(onFailure);
    }

    function onClickAdmin() {
        callEndpoint('admin', token)
            .then(console.log)
            .catch(console.log)
    }

    function onClickUser() {
        callEndpoint('user', token)
            .then(console.log)
            .catch(console.log)
    }
</script>
</body>
</html>
login.html 會顯示三個按鈕,分別是 Sign In with Google、Admin Endpoint、和 User Endpoint。使用者會先點擊 Sign In with Google 做第三方登入,登入成功後,Google 會回傳 Authorization Code,再將它傳給後端,後端再利用它來做登入。登入後,使用者可以點擊 Admin Endpoint 或 User Endpoint 來取得使用者資料。不同的是,Admin Endpoint 是需要 Admin 權限。
RestOAuth2AuthenticationFilter
使用者取得 Authorization Code 後,會對後端請求 POST /auth/google 並帶入 Authorization Code 來做登入。RestOAuth2authenticationFilter 會來處理這個請求,其中的流程和 OAuth Login 中的 OAuth2LoginAuthenticationFilter 很像,建議先閱讀下面的文章。
新增 RestOAuth2authenticationFilter,其程式碼如下:
@Component
class RestOAuth2AuthenticationFilter(
        private val clientRegistrationRepository: ClientRegistrationRepository,
        private val authorizedClientRepository: OAuth2AuthorizedClientRepository,
        private val tokenManager: TokenManager,
        private val userDetailsService: MemberUserDetailsService,
        private val memberRepository: MemberRepository
) : GenericFilterBean() {
    companion object {
        private const val contentTypeHeader = "Content-Type"
        private const val baseUri = "/auth"
        private const val registrationIdUriVariableName = "registrationId"
        private const val redirectUri = "postmessage"
        private const val nonceParameterName = "nonce"
    }

    private val authenticationManager: AuthenticationManager
    private val authorizationRequestResolver = DefaultOAuth2AuthorizationRequestResolver(clientRegistrationRepository, baseUri)
    private val requestMatcher = AntPathRequestMatcher("$baseUri/{$registrationIdUriVariableName}", HttpMethod.POST.name)

    init {
        val accessTokenResponseClient = DefaultAuthorizationCodeTokenResponseClient()
        val userService = OidcUserService()
        val authenticationProvider = OidcAuthorizationCodeAuthenticationProvider(accessTokenResponseClient, userService)
        authenticationManager = ProviderManager(authenticationProvider)

        authorizationRequestResolver.setAuthorizationRequestCustomizer {
            it.redirectUri(redirectUri)
            it.additionalParameters { additionalParameters -> additionalParameters.remove(nonceParameterName) }
            it.attributes { attributes -> attributes.remove(nonceParameterName) }
        }
    }

    override fun doFilter(req: ServletRequest, res: ServletResponse, chain: FilterChain) {
        val request = req as HttpServletRequest
        val response = res as HttpServletResponse

        if (!requireAuthentication(request)) {
            chain.doFilter(request, response)
            return
        }

        try {
            val authentication = authenticate(request, response)
            successfulAuthentication(response, authentication)
        } catch (e: Exception) {
            unsuccessfulAuthentication(response, e)
        }
    }

    private fun requireAuthentication(request: HttpServletRequest) = requestMatcher.matches(request)

    private fun authenticate(request: HttpServletRequest, response: HttpServletResponse): OAuth2AuthenticationToken {
        val code = readCode(request)
                ?: throw OAuth2AuthenticationException(OAuth2Error("authentication_code_missing"))
        val registrationId = requestMatcher.matcher(request).variables[registrationIdUriVariableName]
                ?: throw OAuth2AuthenticationException(OAuth2Error("client_registration_not_found"))
        val clientRegistration = clientRegistrationRepository.findByRegistrationId(registrationId)
                ?: throw OAuth2AuthenticationException(OAuth2Error("client_registration_not_found"))

        val authorizationRequest = authorizationRequestResolver.resolve(request, registrationId)

        val authorizationResponse = OAuth2AuthorizationResponse
                .success(code)
                .redirectUri(redirectUri)
                .state(authorizationRequest.state)
                .build()

        val authenticationRequest = OAuth2LoginAuthenticationToken(
                clientRegistration, OAuth2AuthorizationExchange(authorizationRequest, authorizationResponse))

        val authenticationResult = authenticationManager.authenticate(authenticationRequest)
                as OAuth2LoginAuthenticationToken

        val username = authenticationResult.principal.attributes["email"] as String
        val user = loadUser(username) ?: createUser(authenticationResult)
        val authorities = mergeAuthorities(authenticationResult, user)

        val oauth2Authentication = OAuth2AuthenticationToken(
                authenticationResult.principal,
                authorities,
                authenticationResult.clientRegistration.registrationId)

        val authorizedClient = OAuth2AuthorizedClient(
                authenticationResult.clientRegistration,
                oauth2Authentication.name,
                authenticationResult.accessToken,
                authenticationResult.refreshToken)

        authorizedClientRepository.saveAuthorizedClient(authorizedClient, oauth2Authentication, request, response)

        return oauth2Authentication
    }

    private fun readCode(request: HttpServletRequest): String? {
        val authRequest: Map<String, Any> = jacksonObjectMapper().readValue(request.reader)
        return authRequest["code"] as? String
    }

    private fun loadUser(username: String): UserDetails? {
        return try {
            userDetailsService.loadUserByUsername(username)
        } catch (e: Exception) {
            null
        }
    }

    private fun createUser(authentication: OAuth2LoginAuthenticationToken): UserDetails {
        val attributes = authentication.principal.attributes
        val username = attributes["email"] as String
        val member = Member(
                username,
                authentication.clientRegistration.registrationId,
                attributes["name"] as String,
                listOf("ROLE_USER")
        )
        memberRepository.save(member)

        return userDetailsService.loadUserByUsername(username)
    }

    private fun mergeAuthorities(authentication: OAuth2LoginAuthenticationToken, user: UserDetails): Collection<GrantedAuthority> {
        val authorities = HashSet<GrantedAuthority>()
        authorities.addAll(authentication.authorities)
        authorities.addAll(user.authorities)
        return authorities
    }

    private fun successfulAuthentication(response: HttpServletResponse, authentication: OAuth2AuthenticationToken) {
        SecurityContextHolder.getContext().authentication = authentication

        val token = tokenManager.generate(authentication)
        tokenManager[token] = authentication

        response.addHeader(contentTypeHeader, MediaType.APPLICATION_JSON_VALUE)
        response.writer.println(jacksonObjectMapper().writeValueAsString(TokenResponse(token)))
    }

    private fun unsuccessfulAuthentication(response: HttpServletResponse, exception: Exception) {
        SecurityContextHolder.clearContext()
        response.sendError(HttpServletResponse.SC_UNAUTHORIZED, exception.message)
    }

    private data class TokenResponse(val token: String)
}
doFilter() 先檢查請求的 URI 是不是 /auth/{registrationId},不是的話就會直接跳到下一個 Filter。在 login.html 裡,它對 POST /auth/google 發出登入的請求,所以在這裡 registrationId 就會是 google。這邊的邏輯是沿用 OAuth Login 的。
接下來,取得 Authorization Code、registrationId、和 ClientRegistration。然後,產生出 OAuth2LoginAuthenticationToken,並呼叫 authenticationManager.authenticate() 做驗證。
authenticationManager 中,我們加入了 OidcAuthorizationCodeAuthenticationProvider,因為 Google Sign-In 是使用 Oidc 協定。如果是用 OAuth 2.0 的話,如 GitHub,可以再加入 OAuth2AuthorizationCodeAuthenticationProvider。
驗證通過後,我們取得使用者的 Email。與 JPA 中的帳號做比對,如果不存在,我們就創建一個帳號。
最後,產生一個 OAuth2AuthenticationToken,其包含了使用者的基本資料和權限。successfulAuthentication() 會將這 Authentication 物件放入 SecurityContextHolder。然後,產生一個 JWT,將它和 Authentication 物件放入 Cache 裡。最後,回傳 JWT 給前端。
RestOAuth2AuthorizationFilter
前端取得 JWT 後,在請求任何的 REST APIs 時,在 Header 都要帶入 JWT,如下:
Authorization: Bearer <JWT>
RestOAuth2AuthorizationFilter 則會攔截每一個請求,並檢查是否有帶 JWT,其程式碼如下:
@Component
class RestOAuth2AuthorizationFilter(private val tokenManager: TokenManager) : GenericFilterBean() {
    companion object {
        private const val authenticationHeader = "Authorization"
        private const val authenticationScheme = "Bearer"
    }

    override fun doFilter(request: ServletRequest, response: ServletResponse, chain: FilterChain) {
        val token = extractToken(request as HttpServletRequest)
        if (token != null && StringUtils.hasText(token)) {
            val authentication = tokenManager[token]
            if (authentication != null) {
                SecurityContextHolder.getContext().authentication = authentication
            }
        }

        chain.doFilter(request, response)
    }

    private fun extractToken(request: HttpServletRequest): String? {
        val bearerToken = request.getHeader(authenticationHeader)
        if (StringUtils.hasText(bearerToken) && bearerToken.startsWith("$authenticationScheme ")) {
            return bearerToken.substring(authenticationScheme.length + 1)
        }
        return null
    }
}
如果檢查到有 JWT 的話,它就會從 Cache 中取出 Authentication 物件,並放入 SecurityContextHolder,就這樣就等於認證成功!
建立資料庫
新增 Member Entity,包含 username、registrationId、和 authorities。
@Entity
data class Member(
        @Column(unique = true) val username: String,
        val registrationId: String,
        val name: String,
        @ElementCollection val authorities: Collection<String>,
        @Id @GeneratedValue var id: Long? = null
)
新增 MemberRepository 來讀取資料庫。
interface MemberRepository : JpaRepository<Member, Long> {
    @Query("SELECT m FROM Member m JOIN FETCH m.authorities WHERE m.username = (:username)")
    fun findByUsername(username: String): Member?
}
為了方便稍後的測試,我們這邊先預先創建幾個 Member 到資料庫裡。注意只有 Monika 才有 ADMIN 權限。
@Configuration
class MemberConfiguration {
    @Bean
    fun initMembers(memberRepository: MemberRepository) = ApplicationRunner {
        memberRepository.saveAll(listOf(
                Member("monika@gmail.com", "google", "Monika", listOf("ROLE_ADMIN", "ROLE_USER")),
                Member("jack@gmail.com", "google", "Jack", listOf("ROLE_USER")),
                Member("peter@gmail.com", "google", "Peter", listOf("ROLE_USER"))
        ))
    }
}
新增 MemberUserDetailsService,因為 RestOAuth2AuthenticationFilter 會利用它來讀取使用者資料。
@Component
class MemberUserDetailsService(private val memberRepository: MemberRepository) : UserDetailsService {
    override fun loadUserByUsername(username: String): UserDetails {
        val member = memberRepository.findByUsername(username)
                ?: throw UsernameNotFoundException("$username was not found")

        val authority = member.authorities.map { SimpleGrantedAuthority(it) }
        return User(member.username, "", authority)
    }
}
TokenManager
新增 TokenManager 來管理 JWT 和 Authentication。而且,還提供產生和驗證 JWT 的 Method。
@Component
class TokenManager(cacheManager: CacheManager) {
    companion object {
        private const val claimAuthorities = "authorities"
        private const val claimName = "name"
        private const val claimEmail = "email"

        private const val secret = "qsbWaaBHBN/I7FYOrev4yQFJm60sgZkWIEDlGtsRl7El/k+DbUmg8nmWiVvEfhZ91Y67Sc6Ifobi05b/XDwBy4kXUcKTitNqocy7rQ9Z3kMipYjbL3WZUJU2luigIRxhTVNw8FXdT5q56VfY0LcQv3mEp6iFm1JG43WyvGFV3hCkhLPBJV0TWnEi69CfqbUMAIjmymhGjcbqEK8Wt10bbfxkM5uar3tpyqzp3Q=="
        private val key = Keys.hmacShaKeyFor(Decoders.BASE64.decode(secret))
    }

    private val cache = cacheManager.getCache("tokenManager")!!

    operator fun get(token: String): OAuth2AuthenticationToken? {
        return if (validate(token)) {
            val authentication = cache.get(token)?.get()
            authentication as OAuth2AuthenticationToken
        } else {
            cache.evict(token)
            null
        }
    }

    operator fun set(token: String, authentication: OAuth2AuthenticationToken) {
        cache.put(token, authentication)
    }

    fun generate(authentication: OAuth2AuthenticationToken): String {
        val subject = authentication.name
        val name = authentication.principal.attributes["name"]
        val email = authentication.principal.attributes["email"]
        val authorities = authentication.authorities?.joinToString { it.authority } ?: ""
        val expiration = Date(System.currentTimeMillis() + (60 * 60 * 1000))
        return Jwts.builder()
                .setSubject(subject)
                .claim(claimAuthorities, authorities)
                .claim(claimName, name)
                .claim(claimEmail, email)
                .signWith(key, SignatureAlgorithm.HS512)
                .setExpiration(expiration)
                .compact()
    }

    private fun validate(token: String): Boolean {
        return try {
            val jwtParser = Jwts.parserBuilder().setSigningKey(key).build()
            jwtParser.parse(token)
            true
        } catch (e: Exception) {
            false
        }
    }
}
另外,用下面的程式碼來啟動 Cache。
@Configuration
@EnableCaching
class CacheConfig {
}
MemberController
新增 MemberController,其程式碼如下:
@RestController
class MemberController(private val authorizedClientRepository: OAuth2AuthorizedClientRepository) {
    @GetMapping("/user")
    @PreAuthorize("hasRole('ROLE_USER')")
    fun user(principal: Principal): UserResponse {
        val authentication = principal as OAuth2AuthenticationToken
        return UserResponse(
                authentication.principal.attributes["email"] as String,
                authentication.principal.attributes["name"] as String
        )
    }

    data class UserResponse(val email: String, val name: String)

    @GetMapping("/admin")
    @PreAuthorize("hasRole('ROLE_ADMIN')")
    fun admin(principal: Principal, request: HttpServletRequest): AdminResponse {
        val authentication = principal as OAuth2AuthenticationToken
        val authorizedClient = authorizedClientRepository.loadAuthorizedClient<OAuth2AuthorizedClient>(
                authentication.authorizedClientRegistrationId,
                authentication,
                request)
        return AdminResponse(
                authentication.principal.attributes["email"] as String,
                authentication.principal.attributes["name"] as String,
                authorizedClient.accessToken.tokenValue,
                authorizedClient.refreshToken?.tokenValue ?: ""
        )
    }

    data class AdminResponse(val email: String, val name: String, val accessToken: String, val refreshToken: String)
}
MemberController 提供了 2 個 Endpoint,其中 admin() 需要 ROLE_ADMIN 的權限,也就是只有 Monika 才能成功發起。
設定 Spring Security
最後,就是要設定 Spring Security 了。新增 SecurityConfiguration,其程式碼如下:
@Configuration
@EnableWebSecurity
@EnableGlobalMethodSecurity(prePostEnabled = true)
class SecurityConfig(
        private val restfulOAuth2AuthorizationFilter: RestOAuth2AuthorizationFilter,
        private val restfulOAuth2AuthenticationFilter: RestOAuth2AuthenticationFilter
) : WebSecurityConfigurerAdapter() {
    override fun configure(http: HttpSecurity) {
        http
                .csrf().disable()

                .addFilterBefore(restfulOAuth2AuthorizationFilter, BasicAuthenticationFilter::class.java)
                .addFilterBefore(restfulOAuth2AuthenticationFilter, BasicAuthenticationFilter::class.java)

                .sessionManagement()
                .sessionCreationPolicy(SessionCreationPolicy.STATELESS)

                .and()
                .exceptionHandling()
                .authenticationEntryPoint(RestOAuth2AuthenticationEntryPoint())
                .accessDeniedHandler(RestOAuth2AccessDeniedHandler())

                .and()
                .authorizeRequests()
                .antMatchers("/login.html").permitAll()
                .anyRequest().authenticated()
    }
}
我們將 RestOAuth2AuthorizationFilter 和 RestOAuth2AuthenticationFilter 插入到 SecurityFilterChain 中。並且,設定 AuthenticationEntryPoint 和AccessDeniedHandler。
測試
執行專案後,瀏覽 http://localhost:8080/login.html。先點擊 Sign In with Google 做第三方登入,成功會,會自動向後端請求登入。登入成功後,再點擊 User Endpoint 來測試是否可以成功存取。最後,再點擊 Admin Endpoint,如果沒有 ROLE_ADMIN 權限的話,應該要被禁止存取。
Springdoc
如果想到整合 Springdoc 的話,其模式會像以下的文章所用的方式一樣。將取得的 JWT 設定到 Springdoc。之後發起的任何請求,Springdoc 都會自動幫你帶入 JWT。
結語
Spring Security 的 OAuth Login 對 OAuth 2.0 已經提供很好的實作,但是對手機程式卻不是那麼地友善。因為它使用 Cookies 而且不是 RESTful APIs 的架構。當然,我們也可以完全不借用 OAuth Login 的程式碼,自己實作和 Google Sign-In 驗證的部分。但這樣的話,對於每一種 OAuth 2.0 Server 我們都要實作,這也是蠻麻煩的。


2 comments
Hello Wayne,
Great article as always. I have few queries. If I would like to implement this authentication at api gateway (mostly zuul) generate the jwt token. All of downstream services are microservices so can I implement the authorisation part in each of microservices (I cannot not leverage the localhost network provided security because these apps can be deployed in multiple cloud providers/some may be in on-prem).
I would like to make all of my downstream services as resource servers, each can validate the jwt token generated using same key. Any thoughts on this?
Thank you
Hi Sai,
I think so. Each micro-service can run on different machine, so each of them has to validate the JWT token with the same key.