
本章將介紹,如何使用 Spring Security 的 Form Login。並且,還會介紹如何整合 JPA。此外,我們會對 Form Login 的流程與架構,做一個深入的解析。最後,再介紹如何整合 Springdoc。希望在閱讀之後,可以對 Spring Security 的 Form Login 有深入的了解。

Table of Contents
Form Login 流程
再開始動手寫程式之前,我們先來了解一下,Spring Security Form Login 的運作流程。下圖是 Form Login 大致的流程。
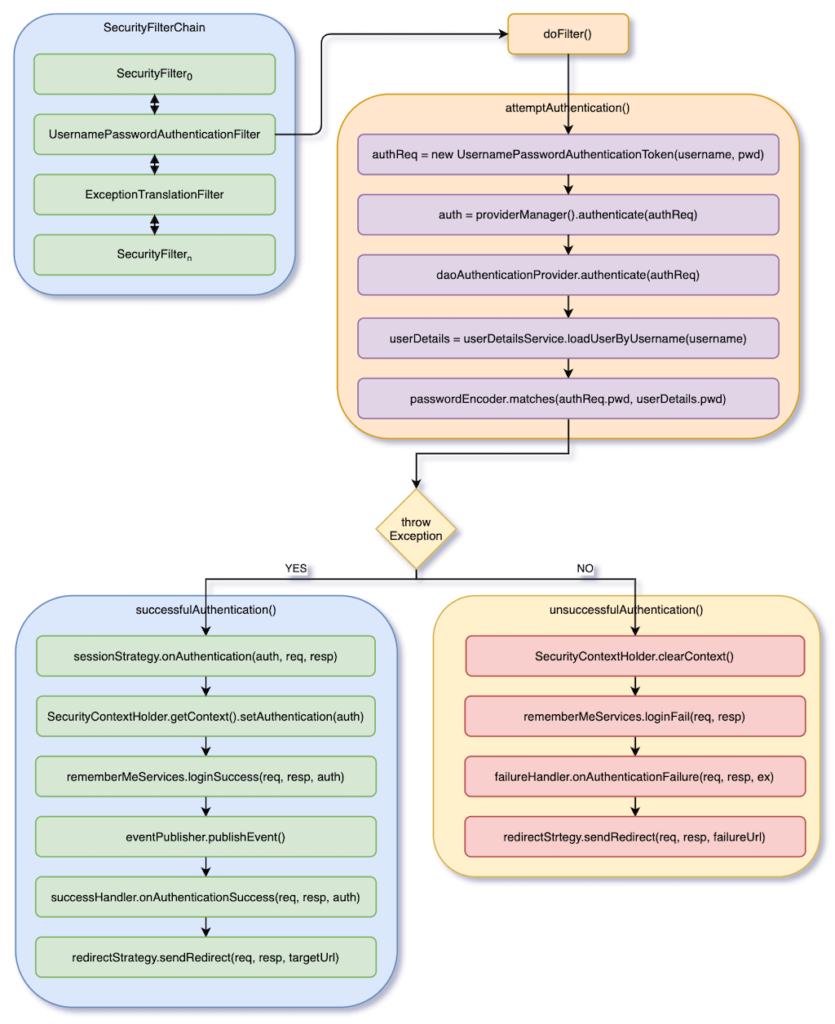
我們將從圖中左上方 SecurityFilterChain 裡的 UsernamePasswordAuthenticationFilter 開始講解。如果還不太熟悉 Spring Security 是怎麼進入到 SecurityFilterChain 的話,可以先閱讀這篇文章。

UsernamePasswordAuthenticationFilter 可以說是,Spring Security 用來支援 Form Login 最一開始的地方。它主要分為三個部分 – 驗證、驗證成功、與驗證失敗。
一開始,UsernamePasswordAuthenticationFilter 會先檢查,進來的 HTTP Request URI 是不是 /login。如果是,那再從 Form Data 中取得 username 和 password。然後,才會進入驗證部分。如果以上的條件沒有符合,那就不做,直接呼叫下一個 Filter。
在驗證部分,它先產生一個 UsernamePasswordAuthenticationToken 叫 authReq,它是繼承 Authentication,然後用 ProviderManager 裡的 DaoAuthenticationProvider 來驗證 authReq。DaoAuthenticationProvider 用 UserDetailsService 取得 username 的 password,然後再把 userDetails.password 與 authReq.password 做比對。PasswordEncoder 會先將 authReq.password 編碼後,在與 userDetails.password 比對。
驗證成功的話,它會把 auth 設定到 SecurityContextHolder。然後,呼叫 rememberMeService.loginSuccess()。最後呼叫 successHandler.onAuthenticationSuccess(),而它會重新導向到登入成功的 URI。這個 URI 預設是 /,所以說,當登入成功後,就會從 /login 被重新導向到 /。
驗證失敗的話,它會清空 SecurityContextHolder。最後呼叫 failureHandler.onAuthenticationFailure(),並重新導向到 /login?error。
RememberMeService 是用來送 Cookie 到前端 Browser。這樣的話,在之後的 Session 有偵測到這個 Cookie 的話,就會自動做 Login。
其實整個流程倒是還蠻直接。了解這個大致的流程的話,那接下來的細節就好辦了!
Form Login 架構
Spring Security 的高度抽象化,讓它有強大的可擴充性和可客製化,但也卻讓它複雜到難以理解。下圖是流程中所用到的 interface 與 class,其中 interface 和 abstract class 就足足有 9 個。
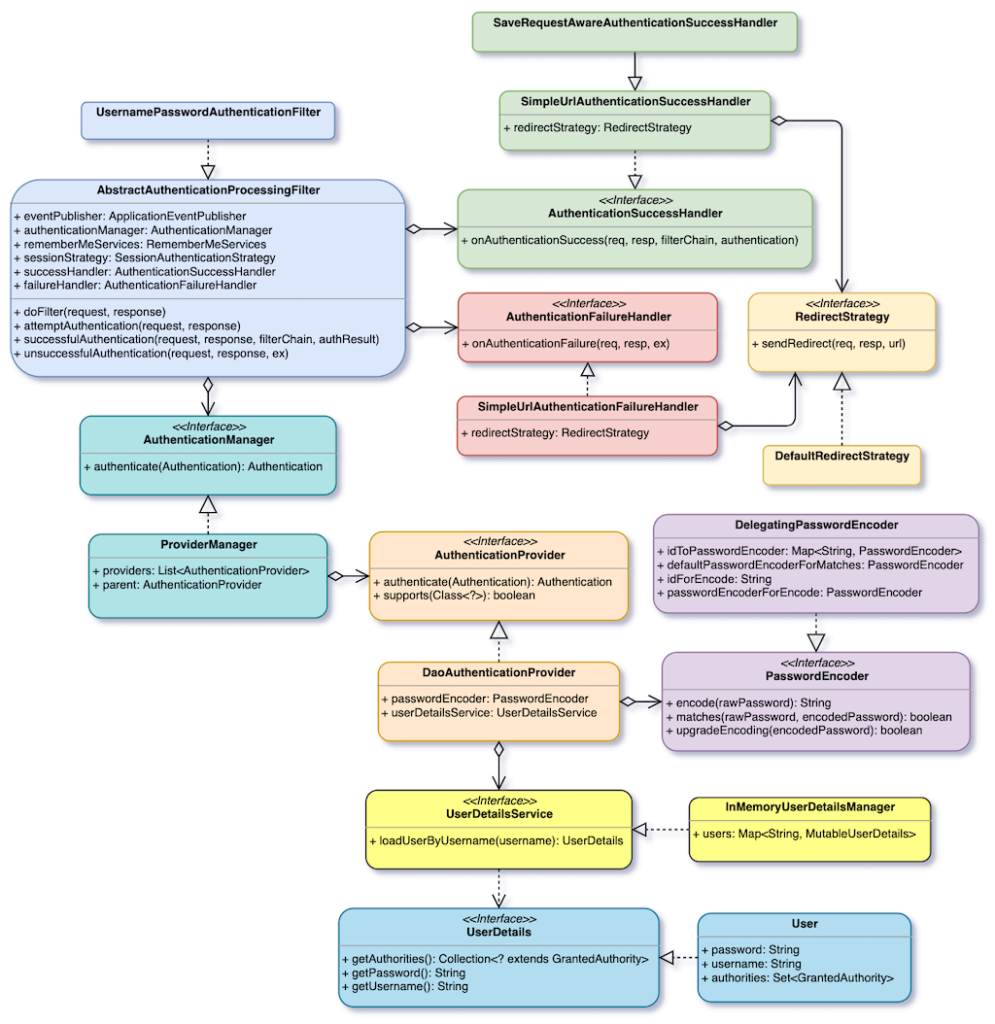
接下來我們會介紹各個 interface 和 class。有些已經在底下這篇文章有介紹過,那我們就不再深入討論。若是有不了解,可以再回去複習。
AbstractAuthenticationProcessingFilter
AbstractAuthenticationProcessingFilter 主要架構了整個 Form Login 的流程。它呼叫 attemptAuthentication() 以做驗證,之後在呼叫 successfulAuthentication() 或是 unsuccessfulAuthentication(),並且實作了這兩個 Method。
UsernamePasswordAuthenticationFilter
UsernamePasswordAuthenticationFilter 主要是實作 attemptAuthentication(),以提供驗證的流程。從 Form Data 中取得 username 和 password,並呼叫 ProviderManager 來進行驗證。
AuthenticationManager
AuthenticationManager 是用來驗證 Authentication 物件的 interface。
ProviderManager
ProviderManager 是最常用的 AuthenticationManager 實作。它包含一個 List<AuthenticationProvider> 和 parent,提供多個機會來驗證 Authentication 物件。
AuthenticationProvider
AuthenticationProvider 和 AuthenticationManager 的作用是相同的,都是要驗證 Authentication 物件。不一樣的是,AuthenticationProvider 是被包含在 ProviderManager 裡面。
DaoAuthenticationProvider
DaoAuthenticationProvider 這個實作,主要是利用 UserDetailsService,來取得傳進來的 username 的真實 password,並用 PasswordEncoder 比對,傳進來的 password 和真實的 password,兩者是否相符。
UserDetailsService
UserDetailsService 是用來取得某的 username 的 password 的 interface。
InMemoryUserDetailsManager
InMemoryUserDetailsManager 包含一個 users field,來儲存數個 UserDetails 在記憶體中。當然,它也只能比較這幾個 username 而已。所以實際上,不太會使用它。
UserDetails
UserDetails 是用來提供使用者的 username、password、以及 Collection<GrantedAuthority> 的 interface。GrantedAuthority 指的是使用者的權限。
User
User 是最簡單的 UserDetails 實作。它包含三個 Field,也就是 username、password、和 authorities。它雖然簡單,但卻很實用。
PasswordEncoder
PasswordEncoder 主要提供了兩個方法。encode() 是用來加密密碼。而, matches() 是用來,比對明文密碼和加密過密碼。
DelegatingPasswordEncoder
DelegatingPasswordEncoder 包含了一個 Map<String, PasswordEncoder>,可以同時支援多個 PasswordEncoder。為了區分密碼的編碼方式,密碼的格式為 {id}Password。密碼前綴有括號將 id 包起來,它利用這個 id 在 Map 中取得相對應的 PasswordEncoder。Spring Security 有提供一些 PasswordEncoder,如 BCryptPasswordEncoder、Argon2PasswordEncoder、Pbkdf2PasswordEncoder、SCryptPasswordEncoder 等。
AuthenticationSuccessHandler
AuthenticationSuccessHandler 提供一個機會,讓你可以在驗證成功後,處理一些事情。
SimpleUrlAuthenticationSuccessHandler
SimpleUrlAuthenticationSuccessHandler 主要就是重新導向到設定好的 URI,預設是 /。
AuthenticationFailureHandler
AuthenticationFailureHandler 提供一個機會,讓你可以在驗證失敗後,處理一些事情。
SimpleUrlAuthenticationFailureHandler
SimpleUrlAuthenticationFailureHandler 主要就是重新導向到設定好的 URI,預設是 /login?error。
RedirectStrategy
RedirectStrategy 提供重新導向的功能。
DefaultRedirectStrategy
DefaultRedirectStrategy 是最基本的實作。它直接呼叫 HttpServletResponse.sendRedirect() 做重新導向。
Form Login + JPA 專案
了解 Spring Security 的 Form Login 的流程與架構後,我們來試著建立一個 Spring Security 專案。在這專案中,我們用 Form Login 作為登入流程,然後從資料庫中讀取 Username 和 Password 來做驗證。
建立專案
建立一個 Spring Boot 專案,並引入下圖中的 4 個 Dependencies。

如果不知道要怎麼建立專案,或不了解上圖的話,可以先參考下面這篇文章。

建立資料庫
新增 Member 作為資料庫的 Entity。除了有必要的 username 和 password 之外,還有代表權限的 authorities。
package com.waynestalk.usernamepasswordexample.model

import javax.persistence.*

@Entity
data class Member(
        @Column(unique = true) val username: String,
        val password: String,
        val name: String,
        @ElementCollection val authorities: Collection<String>,
        @Id @GeneratedValue var id: Long? = null
)
新增 MemberRepository 來讀取資料庫資料。它根據 username 來找到相對應的 Member。
package com.waynestalk.usernamepasswordexample.repository

import com.waynestalk.usernamepasswordexample.model.Member
import org.springframework.data.jpa.repository.JpaRepository
import org.springframework.data.jpa.repository.Query

interface MemberRepository : JpaRepository<Member, Long> {
    @Query("SELECT m FROM Member m JOIN FETCH m.authorities WHERE m.username = (:username)")
    fun findByUsername(username: String): Member?
}
因為這是範例程式碼,所以我們預先創建幾個 Member 到資料庫裡面,以便稍後可以用來測試。其中,只有 Monika 有 USER 和 ADMIN 的權限。
package com.waynestalk.usernamepasswordexample.config

import com.waynestalk.usernamepasswordexample.model.Member
import com.waynestalk.usernamepasswordexample.repository.MemberRepository
import org.springframework.boot.ApplicationRunner
import org.springframework.context.annotation.Bean
import org.springframework.context.annotation.Configuration
import org.springframework.security.crypto.password.PasswordEncoder

@Configuration
class MemberConfiguration {
    @Bean
    fun initMembers(memberRepository: MemberRepository, passwordEncoder: PasswordEncoder) = ApplicationRunner {
        memberRepository.saveAll(listOf(
                Member("monika", passwordEncoder.encode("123456"), "Monika", listOf("ROLE_ADMIN", "ROLE_USER")),
                Member("jack", passwordEncoder.encode("123456"), "Jack", listOf("ROLE_USER")),
                Member("peter", "123456", "Peter", listOf("ROLE_USER"))
        ))
    }
}
設定 Spring Security
Spring Security 的設定是透過覆寫 WebSecurityConfigurerAdapter.configure() 的方式。新增 SecurityConfiguration,其程式碼如下:
package com.waynestalk.usernamepasswordexample.config

import org.springframework.context.annotation.Configuration
import org.springframework.security.config.annotation.web.builders.HttpSecurity
import org.springframework.security.config.annotation.web.configuration.EnableWebSecurity
import org.springframework.security.config.annotation.web.configuration.WebSecurityConfigurerAdapter

@Configuration
@EnableWebSecurity
class SecurityConfiguration : WebSecurityConfigurerAdapter() {
    override fun configure(http: HttpSecurity) {
        http
                .csrf().disable()
                .authorizeRequests()
                .antMatchers("/greet").hasRole("ADMIN")
                .anyRequest().authenticated()
                .and()
                .formLogin()
                .defaultSuccessUrl("/welcome")
    }
}
SecurityConfiguration 要加上 @EnableWebSecurity 宣吿,才會啟動 Spring Security。非常重要,千萬別漏掉了!
我們設定 GET /greet 必須要有 ADMIN 權限。所以 Monika 可以存取 /greet,而 Jack 和 Peter 會被拒絕。
程式中,還設定要用 Form Login,而且設定驗證成功後,重新導向的 URI 是 /welcome。
新增 MemberController,並且實作 GET /greet 和 GET /welcome。
package com.waynestalk.usernamepasswordexample.controller

import com.waynestalk.usernamepasswordexample.repository.MemberRepository
import org.springframework.web.bind.annotation.GetMapping
import org.springframework.web.bind.annotation.RestController
import javax.servlet.http.HttpServletRequest

@RestController
class MemberController(private val memberRepository: MemberRepository) {
    @GetMapping("/welcome")
    fun welcome(request: HttpServletRequest): WelcomeResponse {
        val member = memberRepository.findByUsername(request.userPrincipal.name)!!
        return WelcomeResponse(member.name, member.authorities)
    }

    data class WelcomeResponse(val name: String, val authorities: Collection<String>)

    @GetMapping("/greet")
    fun greet(request: HttpServletRequest): GreetResponse {
        val member = memberRepository.findByUsername(request.userPrincipal.name)!!
        return GreetResponse("Hello ${member.name}")
    }

    data class GreetResponse(val message: String)
}
設定 UserDetailsService & PasswordEncoder
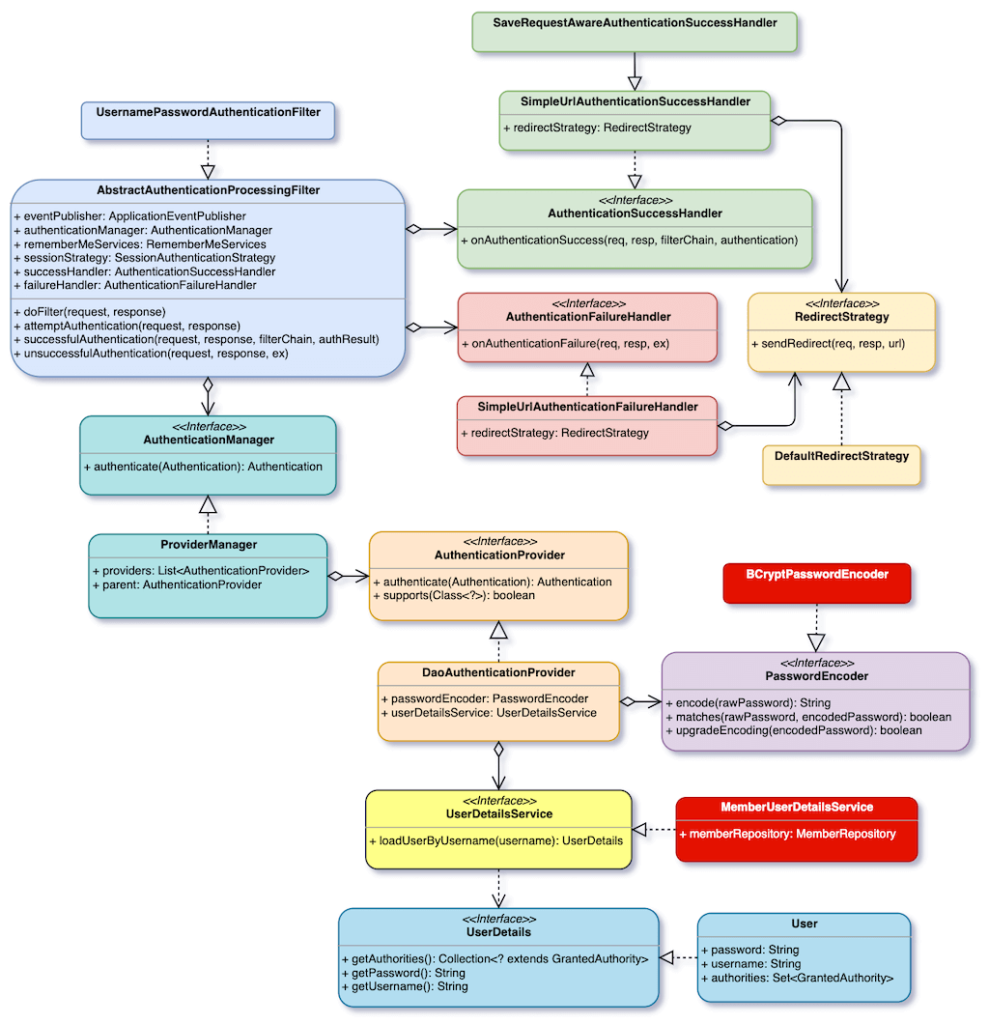
由之前的架構圖可知,如果要從資料庫中讀取 Member 資料來做驗證的話,那我們必須要從 UserDetailsService 下手。Spring Security 預設的是 InMemoryUserDetailsManager,我們會新增 MemberUserDetailsService 來取代它。另外,我們也會用 BCryptPasswordEncoder 來取代 DelegatingPasswordEncoder。
下圖顯示我們實作的策略。和之前的架構圖相比,紅色顯示我們這次要變動的部分。下圖應該可以比較清楚地表達,為何我們要新增 MemberUserDetailsService。
首先,先在 SecurityConfiguration 中,加入 BCryptPasswordEncoder 的 Bean。這樣 Spring Security 就會用這個 Bean 來取代原本預設的 PasswordEncoder。
class SecurityConfiguration : WebSecurityConfigurerAdapter() {
    @Bean
    fun passwordEncoder(): PasswordEncoder = BCryptPasswordEncoder()

    // ...
}
新增 MemberUserDetailsService,程式碼如下:
package com.waynestalk.usernamepasswordexample.config

import com.waynestalk.usernamepasswordexample.repository.MemberRepository
import org.springframework.security.core.authority.SimpleGrantedAuthority
import org.springframework.security.core.userdetails.User
import org.springframework.security.core.userdetails.UserDetails
import org.springframework.security.core.userdetails.UserDetailsService
import org.springframework.security.core.userdetails.UsernameNotFoundException
import org.springframework.stereotype.Component

@Component
class MemberUserDetailsService(private val memberRepository: MemberRepository) : UserDetailsService {
    override fun loadUserByUsername(username: String): UserDetails {
        val member = memberRepository.findByUsername(username)
                ?: throw UsernameNotFoundException("$username was not found")

        val authority = member.authorities.map { SimpleGrantedAuthority(it) }
        return User(member.username, member.password, authority)
    }
}
MemberUserDetailsService 的邏輯很簡單,它根據傳進來的 username 來從資料庫中取得 Member,然後將 Member 轉換成 User 物件並回傳。
我們也只需要將 MemberUserDetailsService 宣告成 @Component 即可。Spring Security 就會把它取代原本的預設的 UserDetailsService。
測試
接下來,我們來測試一下。先用 Monika 登入。
% curl --location --request POST 'http://localhost:8080/login' \
--header 'Content-Type: application/x-www-form-urlencoded' \
--data-urlencode 'username=monika' \
--data-urlencode 'password=123456'
登入後,會收到 JSESSIONID cookie,然後再用它來存取 GET /greet。
% curl --location --request GET 'http://localhost:8080/greet' \
--header 'Cookie: JSESSIONID=56EF2022BFC6E48DE1918DDF998E33FB'
然後會收到下面的回應。表示 Monika 有存取 GET /greet 的權限。
{
    "message": "Hello Monika"
}
再來用 Jack 登入。
% curl --location --request POST 'http://localhost:8080/login' \
--header 'Content-Type: application/x-www-form-urlencoded' \
--data-urlencode 'username=jack' \
--data-urlencode 'password=123456'
登入後,再用收到的 JSESSIONID 去存取 GET /greet。
% curl --location --request GET 'http://localhost:8080/greet' \
--header 'Cookie: JSESSIONID=5BB631D503A5CF8F035D1B40E57C2E22'
如我們預期的,Jack 沒有存取 GET /greet 的權限。因此,會收到下面的 403 回應。
{
    "timestamp": "2020-08-19T03:06:26.550+00:00",
    "status": 403,
    "error": "Forbidden",
    "message": "",
    "path": "/greet"
}
Method Security
Spring Security 的 Method Security 是指,我們可以透過 Annotation 來對 Method 設定存取權限。和在 WebSecurityConfigurerAdapter.configure() 裡設定相比,各有各的好處。一個是分散管理,一個是集中管理。
此外,WebSecurityConfigurerAdapter.configure() 是對 URI 做權限的設定。而,Method Security 可以對任何的 Method 做權限設定。這功能更加強化了整個程式的安全性控管。
在 SecurityConfiguration.configure() 中,移除 .antMatchers("/greet").hasRole("ADMIN")。並在 SecurityConfiguration 上,加上 @EnableGlobalMethodSecurity(prePostEnabled = true)。
import org.springframework.security.config.annotation.method.configuration.EnableGlobalMethodSecurity

@Configuration
@EnableWebSecurity
@EnableGlobalMethodSecurity(prePostEnabled = true)
class SecurityConfiguration : WebSecurityConfigurerAdapter() {
    @Bean
    fun passwordEncoder(): PasswordEncoder = BCryptPasswordEncoder()

    override fun configure(http: HttpSecurity) {
        http
                .csrf().disable()
                .authorizeRequests()
                .anyRequest().authenticated()
                .and()
                .formLogin()
                .defaultSuccessUrl("/welcome")
    }
}
在 MemberController 裡,對我們想要控管的 greet() Method 上,加上 @PreAuthorize("hasRole('ROLE_ADMIN')") 即可。程式碼如下:
import org.springframework.security.access.prepost.PreAuthorize

@RestController
class MemberController(private val memberRepository: MemberRepository) {
    @GetMapping("/greet")
    @PreAuthorize("hasRole('ROLE_ADMIN')")
    fun greet(request: HttpServletRequest): GreetResponse {
        val member = memberRepository.findByUsername(request.userPrincipal.name)!!
        return GreetResponse("Hello ${member.name}")
    }

    data class GreetResponse(val message: String)
}
這樣可以使用 Method Security 了,是不是蠻簡單的呢?再來用之前測試過的流程,再測試一次吧!
Form Login + Springdoc
Springdoc 套件可以幫我們產生 Swagger 介面的 API 文件。如果不了解 Springdoc,或是不知如何引入 Springdoc Dependency 的話,可以先閱讀下面這篇文章。

引入 Springdoc 的 Dependency 之後,新增 SwaggerConfiguration,其程式碼如下:
package com.waynestalk.usernamepasswordexample.config

import io.swagger.v3.oas.annotations.OpenAPIDefinition
import io.swagger.v3.oas.annotations.info.Info
import org.springframework.context.annotation.Configuration

@OpenAPIDefinition(info = Info(title = "Wayne's Talk API", version = "v1.0.0"))
@Configuration
class SwaggerConfiguration
這樣 Springdoc 的設定也就足夠了。但是這樣卻無法瀏覽 http://localhost:8080/swagger-ui.html,原因是被 Spring Security 擋住了。因此,我們要告訴 Spring Security,要允許 Springdoc 相關的 URI,不需要驗證就可以通過。
@Configuration
@EnableWebSecurity
@EnableGlobalMethodSecurity(prePostEnabled = true)
class SecurityConfiguration : WebSecurityConfigurerAdapter() {
    @Bean
    fun passwordEncoder(): PasswordEncoder = BCryptPasswordEncoder()

    override fun configure(http: HttpSecurity) {
        http
                .csrf().disable()
                .authorizeRequests()
                .antMatchers("/v3/api-docs/**", "/swagger-ui/**", "/swagger-ui.html").permitAll()
                .anyRequest().authenticated()
                .and()
                .formLogin()
                .defaultSuccessUrl("/welcome")
    }
}
現在可以瀏覽 http://localhost:8080/swagger-ui.html 了。不過,我們會發現 Swagger 裡沒有 POST /login,這樣我們就無法在 Swagger 裡做登入。這是因為我們沒有一個 @RestController,有宣告 POST /login。
新增 LoginController,並宣告 login()。不過,我們不實作內容。因為,Spring Security 會攔截 POST /login,並做驗證。驗證成功後,會重新導向到預設的 URI。所以,HTTP Request 最終不會到達 login()。這邊的宣告,只是要讓 Springdoc 可以產生 POST /login 的 Swagger 介面。
package com.waynestalk.usernamepasswordexample.controller

import org.springframework.http.MediaType
import org.springframework.web.bind.annotation.PostMapping
import org.springframework.web.bind.annotation.RequestBody
import org.springframework.web.bind.annotation.RestController

@RestController
class LoginController {
    @PostMapping("/login", consumes = [MediaType.APPLICATION_FORM_URLENCODED_VALUE])
    fun login(@RequestBody request: LoginRequest) {
        throw NotImplementedError("/login should not be called")
    }

    data class LoginRequest(val username: String, val password: String)
}
這樣子,我們就可以在 Swagger 介面上做登入。登入後,Swagger 會收到 JSESSIONID Cookie。然後,在存取 GET /greet 時,會自動帶上 Cookie。
結語
閱讀本章後,會發現其實在 Spring Security 的架構下,客製化我們要的功能,其實是相當地容易。很多都是透過 Bean 就可以達成。但問題是,要了解這個複雜的架構,已經就是不容易了。此外,還要了解,哪些元件是 Bean,哪些不是,這樣才知道要怎麼去取代原本的元件。不過,Spring Security 已經幫我們實作了很多的邏輯,加上又有很多人在使用它。所以,它有可靠的安全性和穩定性。我覺得還是很值得去了解它的。


