This article will explain how to implement JWT-Token-Based authentication in Spring Security. We will explain how to read username and password from JPA for login verification, how to generate JWT Tokens, and how to verify JWT Tokens. Finally, we also show how to integrate with Springdoc.
The complete code can be found in .
Table of Contents
JWT-Token-Based Authentication
In recent years, frontend is no longer only web pages, but also includes mobile phones (Android/iOS). In the early days, web page code was output by backend, such as PHP, ASP, and JSP. Under these architectures, frontend and backend use cookies to record session IDs. And these session IDs are also used to check whether users have been logged in. This process is called Form Login. Spring Security certainly supports Form Login authentication, you can refer to the following article.
However, a verification process such as Form Login is not easy to implement on mobile because of cookies. Mobile does not use cookies, and there is no need for backend to output code. Mobile just needs data from backend. Therefore, REST APIs are a very friendly way for mobile phones. Recently, frontend has also developed a Single Page Application (SPA) architecture. SPA can use cookies and does not require backend to output code. It just needs data. Therefore, SPA and RESTf APIs work quite well together.
In order to meet the needs of the mobile phone, backend must provide a verification method that does not use cookies. One of them is based on tokens. Simply put, it is to put what was put in cookies into HTTP request header instead. Spring Security provides Basic Authentication and Digest Authentication. These 2 processes are Username-and-Password authentication the same as Form Login, but they are based on Token authentication. JWT-Token-Based Authentication introduced in this article is also an Username-and-Password authentication, but uses JSON Web Token (JWT) as its token format.
JWT-Token-Based Authentication Flow
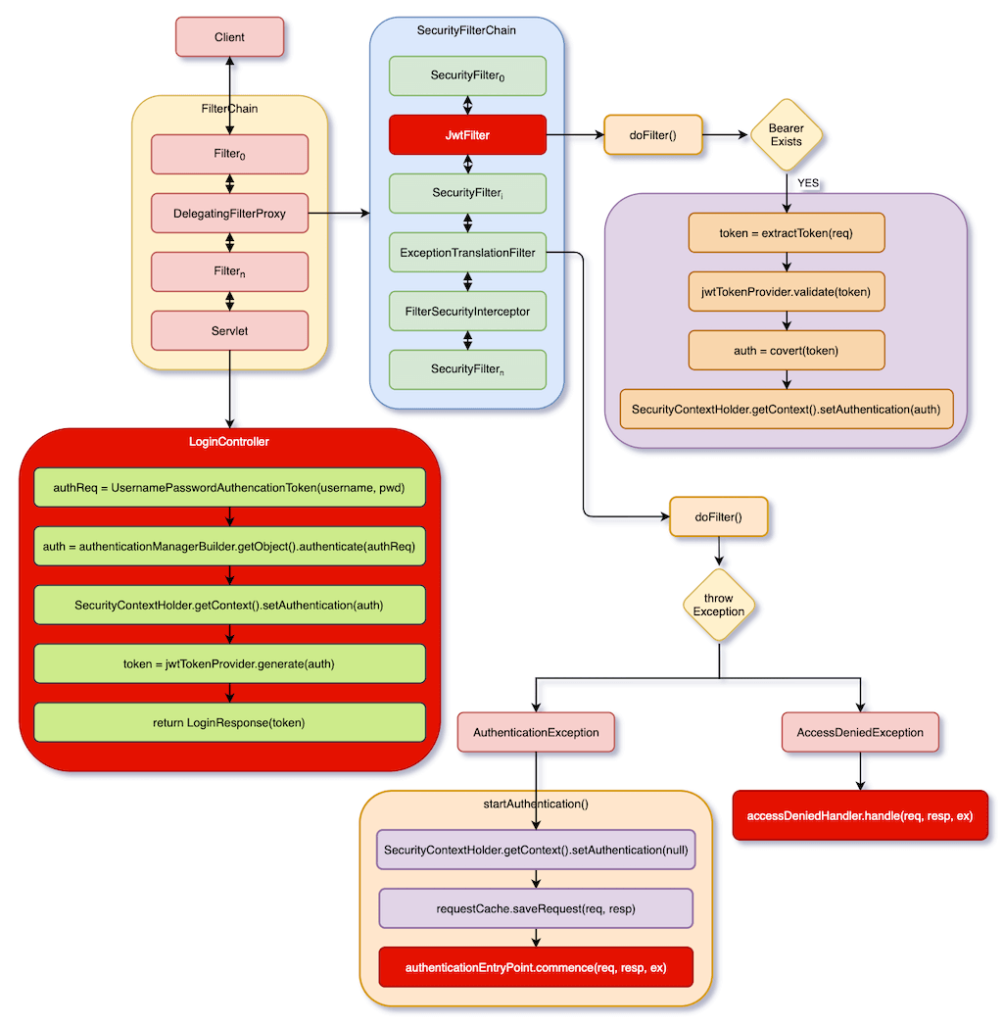
Before starting to program, let’s have a brief understanding of the flow we want to implement, as shown in the following figure:

If you are not familiar with FilterChain, SecurityFilterChain, ExceptionTranslatorFilter, FilterSecurityInterceptor in the figure, please read the following article first, otherwise you will not be able to understand it.
To implement our flow in Spring Security, the idea is to insert JwtFilter in SecurityFilterChain. It obtains a JWT token from HTTP request header, and verify if the received JWT token is valid. Finally, convert the JWT token into an Authentication object and set it into SecurityContextHolder, which means that this HTTP request or session has been authenticated.
If it is, there is no JWT token in header, or JWT Token is illegal, then an exception will be thrown in FilterSecurityInterceptor, and ExceptionTranslationFilter will handle this exception. In the original flow, both authenticationEntryPoint.commence() and accessDeniedHandler.handle() perform redirection. However, now we only want them to return error messages, so these two methods must be reimplemented.
If POST /login comes in, it will pass JwtFilter, ExceptionTranslatorFilter and FilterSecurityInterceptor, because we will set /login without permission. So, it will eventually reach LoginController.login().
LoginController.login() authenticates users and return a JWT token. After that, frontend can use this JWT token to access backend’s APIs.
The flow is not complicated. Next, let’s look at the implementation.
JWT-Token-Based Authentication Project
In this project, we read user data from JPA for verification. In JWT part, we will not explain it in depth.
Creating Project
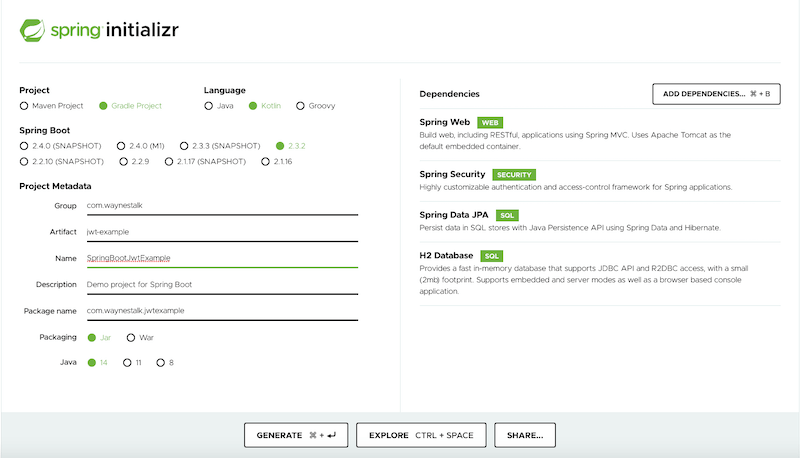
Create a Spring Boot project and include these 4 dependencies in the figure.

If you don’t know how to create a project, or don’t understand the picture above, you can refer to the following article first.
Creating Database
Add Member Entity, include username, password, and authorities.
package com.waynestalk.jwtexample.model

import javax.persistence.*

@Entity
data class Member(
        @Column(unique = true) val username: String,
        val password: String,
        val name: String,
        @ElementCollection val authorities: Collection<String>,
        @Id @GeneratedValue var id: Long? = null
)
Add MemberRepository to read database.
package com.waynestalk.jwtexample.repository

import com.waynestalk.jwtexample.model.Member
import org.springframework.data.jpa.repository.JpaRepository
import org.springframework.data.jpa.repository.Query

interface MemberRepository : JpaRepository<Member, Long> {
    @Query("SELECT m FROM Member m JOIN FETCH m.authorities WHERE m.username = (:username)")
    fun findByUsername(username: String): Member?
}
For the ease of later testing, let’s create a few members in advance in database. Note that only Monika has ADMIN authority.
package com.waynestalk.jwtexample.config

import com.waynestalk.jwtexample.repository.MemberRepository
import com.waynestalk.jwtexample.model.Member
import org.springframework.boot.ApplicationRunner
import org.springframework.context.annotation.Bean
import org.springframework.context.annotation.Configuration
import org.springframework.security.crypto.password.PasswordEncoder

@Configuration
class MemberConfiguration {
    @Bean
    fun initMembers(memberRepository: MemberRepository, passwordEncoder: PasswordEncoder) = ApplicationRunner {
        memberRepository.saveAll(listOf(
                Member("monika", passwordEncoder.encode("123456"), "Monika", listOf("ROLE_ADMIN", "ROLE_USER")),
                Member("jack", passwordEncoder.encode("123456"), "Jack", listOf("ROLE_USER")),
                Member("peter", "123456", "Peter", listOf("ROLE_USER"))
        ))
    }
}
Creating JwtTokenProvider
Create JwtTokenProvider, which provides three methods, that is generating a JWT token, verifying a JWT token, and converting a JWT token into an Authentication object.
package com.waynestalk.jwtexample.auth

import io.jsonwebtoken.Jwts
import io.jsonwebtoken.SignatureAlgorithm
import io.jsonwebtoken.io.Decoders
import io.jsonwebtoken.security.Keys
import org.slf4j.LoggerFactory
import org.springframework.security.authentication.UsernamePasswordAuthenticationToken
import org.springframework.security.core.Authentication
import org.springframework.security.core.authority.SimpleGrantedAuthority
import org.springframework.security.core.userdetails.User
import org.springframework.stereotype.Component
import java.util.*

@Component
class JwtTokenProvider {
    companion object {
        const val claimAuthorities = "authorities"
    }

    private val logger = LoggerFactory.getLogger(this::class.java)
    private val secret = "qsbWaaBHBN/I7FYOrev4yQFJm60sgZkWIEDlGtsRl7El/k+DbUmg8nmWiVvEfhZ91Y67Sc6Ifobi05b/XDwBy4kXUcKTitNqocy7rQ9Z3kMipYjbL3WZUJU2luigIRxhTVNw8FXdT5q56VfY0LcQv3mEp6iFm1JG43WyvGFV3hCkhLPBJV0TWnEi69CfqbUMAIjmymhGjcbqEK8Wt10bbfxkM5uar3tpyqzp3Q=="
    private val key = Keys.hmacShaKeyFor(Decoders.BASE64.decode(secret))

    fun generate(authentication: Authentication): String {
        val authorities = authentication.authorities?.joinToString { it.authority } ?: ""
        val expiration = Date(System.currentTimeMillis() + (60 * 60 * 1000))
        return Jwts.builder()
                .setSubject(authentication.name)
                .claim(claimAuthorities, authorities)
                .signWith(key, SignatureAlgorithm.HS512)
                .setExpiration(expiration)
                .compact()
    }

    fun toAuthentication(token: String): Authentication {
        val jwtParser = Jwts.parserBuilder().setSigningKey(key).build()
        val claims = jwtParser.parseClaimsJws(token).body
        val authorities = claims[claimAuthorities].toString().split(",").map { SimpleGrantedAuthority(it) }
        val user = User(claims.subject, "", authorities)
        return UsernamePasswordAuthenticationToken(user, token, authorities)
    }

    fun validate(token: String): Boolean {
        val jwtParser = Jwts.parserBuilder().setSigningKey(key).build()

        try {
            jwtParser.parse(token)
            return true
        } catch (e: Exception) {
            logger.error(e.message)
        }

        return false
    }
}
The secret can be generated by the following command:
% openssl rand -base64 172
qsbWaaBHBN/I7FYOrev4yQFJm60sgZkWIEDlGtsRl7El/k+DbUmg8nmWiVvEfhZ91Y67Sc6Ifobi05b/XDwBy4kXUcKTitNqocy7rQ9Z3kMipYjbL3WZUJU2luigIRxhTVNw8FXdT5q56VfY0LcQv3mEp6iFm1JG43WyvGFV3hCkhLPBJV0TWnEi69CfqbUMAIjmymhGjcbqEK8Wt10bbfxkM5uar3tpyqzp3Q==
In generate(), we put an expiration time into a JWT token to make it time-sensitive.
In toAuthentication(), when UsernamePasswordAuthentication is created, credentials is token, so that there is no need to read password from database and put it into credentials.
Take a closer look at generate(), it does not store the generated JWT token. How validate() does verification? This is why JWT is powerful. Simply put, the entire JWT token contains plaintext and encrypted text. Only backend has the secret, so after encrypting the plaintext part of JWT token, compare it with the encrypted part of JWT token. In addition, the plaintext also contains an expiration date, so an expired token will of course fail the verification.
Creating JwtFilter
Add JwtFilter, the code is as follows:
package com.waynestalk.jwtexample.auth

import org.springframework.security.core.context.SecurityContextHolder
import org.springframework.util.StringUtils
import org.springframework.web.filter.GenericFilterBean
import javax.servlet.FilterChain
import javax.servlet.ServletRequest
import javax.servlet.ServletResponse
import javax.servlet.http.HttpServletRequest

class JwtFilter(private val jwtTokenProvider: JwtTokenProvider) : GenericFilterBean() {
    companion object {
        const val authenticationHeader = "Authorization"
        const val authenticationScheme = "Bearer"
    }

    override fun doFilter(request: ServletRequest, response: ServletResponse, chain: FilterChain) {
        val token = extractToken(request as HttpServletRequest)
        if (StringUtils.hasText(token) && jwtTokenProvider.validate(token)) {
            SecurityContextHolder.getContext().authentication = jwtTokenProvider.toAuthentication(token)
        }

        chain.doFilter(request, response)
    }

    private fun extractToken(request: HttpServletRequest): String {
        val bearerToken = request.getHeader(authenticationHeader)
        if (StringUtils.hasText(bearerToken) && bearerToken.startsWith("$authenticationScheme ")) {
            return bearerToken.substring(authenticationScheme.length + 1)
        }
        return ""
    }
}
JwtFilter gets a token from header, the format is as follows:
Authentication: Bearer <jwt-token>
After obtaining JWT token, and use JwtTokenProvider.validate() to verify it. If the verification passes, turn the token into an Authentication object by JwtTokenProvider.toAuthentication(), and set it to SecurityContextHolder. In this way, this HTTP request has been verified.
Overriding Error Handling of ExceptionTranslationFilter
When frontend has not logged in and wants to access backend’s resources, it will go into startAuthentication() flow. The end of this flow is to call AuthenticationEntryPoint.commence(). As the name suggests, AuthenticationEntryPoint is an entrance that provides frontend to authenticate. Spring Security’s default AuthenticationEntryPoint is to redirect response to login page. But, here we only want to inform frontend that this HTTP request has not been verified, so that there is no EntryPoint here. Add JwtAuthenticationEntryPoint, the code is as follows:
package com.waynestalk.jwtexample.auth

import org.springframework.security.core.AuthenticationException
import org.springframework.security.web.AuthenticationEntryPoint
import javax.servlet.http.HttpServletRequest
import javax.servlet.http.HttpServletResponse

class JwtAuthenticationEntryPoint : AuthenticationEntryPoint {
    override fun commence(request: HttpServletRequest, response: HttpServletResponse, authException: AuthenticationException) {
        response.sendError(HttpServletResponse.SC_UNAUTHORIZED, authException.message)
    }
}
When frontend has logged in, but it accesses to resources it does not have permission. For example, Jack only has USER authority, but when he wants to access a resource that requires ADMIN authority, he will go to AccessDeniedHandler. Like JwtAuthenticationEntryPoint, it tells frontend that this HTTP request has not been authenticated. Add JwtAccessDeniedHandler, the code is as follows:
package com.waynestalk.jwtexample.auth

import org.springframework.security.access.AccessDeniedException
import org.springframework.security.web.access.AccessDeniedHandler
import javax.servlet.http.HttpServletRequest
import javax.servlet.http.HttpServletResponse

class JwtAccessDeniedHandler : AccessDeniedHandler {
    override fun handle(request: HttpServletRequest, response: HttpServletResponse, accessDeniedException: AccessDeniedException) {
        response.sendError(HttpServletResponse.SC_FORBIDDEN, accessDeniedException.message)
    }
}
Creating LoginController
When an incoming HTTP request is POST /login, it goes to LoginController.login() to do login. The code is as follows:
package com.waynestalk.jwtexample.controller

import com.waynestalk.jwtexample.auth.JwtFilter
import com.waynestalk.jwtexample.auth.JwtTokenProvider
import org.springframework.security.authentication.UsernamePasswordAuthenticationToken
import org.springframework.security.config.annotation.authentication.builders.AuthenticationManagerBuilder
import org.springframework.security.core.context.SecurityContextHolder
import org.springframework.web.bind.annotation.PostMapping
import org.springframework.web.bind.annotation.RequestBody
import org.springframework.web.bind.annotation.RestController
import javax.servlet.http.HttpServletResponse
import javax.validation.Valid
import javax.validation.constraints.NotBlank

@RestController
class LoginController(val jwtTokenProvider: JwtTokenProvider,
                      val authenticationManagerBuilder: AuthenticationManagerBuilder) {
    @PostMapping("/login")
    fun login(@Valid @RequestBody request: LoginRequest, httpServletResponse: HttpServletResponse): LoginResponse {
        val authenticationToken = UsernamePasswordAuthenticationToken(request.username, request.password)
        val authentication = authenticationManagerBuilder.`object`.authenticate(authenticationToken)
        SecurityContextHolder.getContext().authentication = authentication

        val token = jwtTokenProvider.generate(authentication)
        httpServletResponse.addHeader(JwtFilter.authenticationHeader, "${JwtFilter.authenticationScheme} $token")

        return LoginResponse(token)
    }

    data class LoginRequest(@field:NotBlank val username: String,
                            @field:NotBlank val password: String)

    data class LoginResponse(val token: String)
}
As you can see, authenticationManagerBuilder.object.authenticate(authenticationToken) will do authentication. The entire verification process here is explained in detail in the article below.
It eventually calls UserDetailsService to get password of username passed in. Moreover, it is a bean. Therefore, we add MemberUserDetailsService, and retrieve password and authorities from database. The code is as follows:
package com.waynestalk.jwtexample.auth

import com.waynestalk.jwtexample.repository.MemberRepository
import org.springframework.security.core.authority.SimpleGrantedAuthority
import org.springframework.security.core.userdetails.User
import org.springframework.security.core.userdetails.UserDetails
import org.springframework.security.core.userdetails.UserDetailsService
import org.springframework.security.core.userdetails.UsernameNotFoundException
import org.springframework.stereotype.Component

@Component
class MemberUserDetailsService(private val memberRepository: MemberRepository) : UserDetailsService {
    override fun loadUserByUsername(username: String): UserDetails {
        val member = memberRepository.findByUsername(username)
                ?: throw UsernameNotFoundException("$username was not found")

        val authority = member.authorities.map { SimpleGrantedAuthority(it) }
        return User(member.username, member.password, authority)
    }
}
Then, use JwtTokenProvider.generate() to generate a JWT token, and return it back to frontend. The entire login flow is complete.
Configuring Spring Security
Next is to set up Spring Security. Add SecurityConfiguration, its code is as follows:
package com.waynestalk.jwtexample.config

import com.waynestalk.jwtexample.auth.JwtAccessDeniedHandler
import com.waynestalk.jwtexample.auth.JwtAuthenticationEntryPoint
import com.waynestalk.jwtexample.auth.JwtFilter
import com.waynestalk.jwtexample.auth.JwtTokenProvider
import org.springframework.context.annotation.Bean
import org.springframework.context.annotation.Configuration
import org.springframework.security.config.annotation.method.configuration.EnableGlobalMethodSecurity
import org.springframework.security.config.annotation.web.builders.HttpSecurity
import org.springframework.security.config.annotation.web.configuration.EnableWebSecurity
import org.springframework.security.config.annotation.web.configuration.WebSecurityConfigurerAdapter
import org.springframework.security.config.http.SessionCreationPolicy
import org.springframework.security.crypto.bcrypt.BCryptPasswordEncoder
import org.springframework.security.crypto.password.PasswordEncoder
import org.springframework.security.web.authentication.UsernamePasswordAuthenticationFilter

@Configuration
@EnableWebSecurity
@EnableGlobalMethodSecurity(prePostEnabled = true)
class SecurityConfiguration(val jwtTokenProvider: JwtTokenProvider) : WebSecurityConfigurerAdapter() {
    @Bean
    fun passwordEncoder(): PasswordEncoder = BCryptPasswordEncoder()

    override fun configure(http: HttpSecurity) {
        http
                .csrf().disable()

                .addFilterBefore(JwtFilter(jwtTokenProvider), UsernamePasswordAuthenticationFilter::class.java)

                .exceptionHandling()
                .authenticationEntryPoint(JwtAuthenticationEntryPoint())
                .accessDeniedHandler(JwtAccessDeniedHandler())

                .and()
                .sessionManagement()
                .sessionCreationPolicy(SessionCreationPolicy.STATELESS)

                .and()
                .authorizeRequests()
                .antMatchers("/login").permitAll()
                .anyRequest().authenticated()
    }
}
We create a BCryptPasswordEncoder to replace the default DelegatingPasswordEncoder.
In configure(), we insert JwtFilter in front of UsernamePasswordAuthenticationFilter. Then in exceptionHandling(), replace the default ones with JwtAuthenticationEntryPoint and JwtAccessDeniedHandler. Set SessionCreationPolicy to stateless. Finally, allow /login to be accessed without authentication, so that frontend can login.
The whole project is roughly completed. However, we have to add MemberController, that provides GET /greet resource and requires ADMIN permission to access it. Later, we will use this API to test the permission part.
package com.waynestalk.jwtexample.controller

import com.waynestalk.jwtexample.repository.MemberRepository
import org.springframework.security.access.prepost.PreAuthorize
import org.springframework.web.bind.annotation.GetMapping
import org.springframework.web.bind.annotation.RestController
import javax.servlet.http.HttpServletRequest

@RestController
class MemberController(private val memberRepository: MemberRepository) {
    @GetMapping("/greet")
    @PreAuthorize("hasRole('ROLE_ADMIN')")
    fun greet(request: HttpServletRequest): GreetResponse {
        val member = memberRepository.findByUsername(request.userPrincipal.name)!!
        return GreetResponse("Hello ${member.name}")
    }

    data class GreetResponse(val message: String)
}
Testing
Now let’s test the project. We use the following command to login with Monika.
% curl --location --request POST 'http://localhost:8080/login' \
--header 'Content-Type: application/json' \
--data-raw '{
    "username": "monika",
    "password": "123456"
}'
After the login is succeeded, you will get a response containing a token, as follows:
{
    "token": "eyJhbGciOiJIUzUxMiJ9.eyJzdWIiOiJtb25pa2EiLCJhdXRob3JpdGllcyI6IlJPTEVfQURNSU4sIFJPTEVfVVNFUiIsImV4cCI6MTU5Nzk5MzM0MX0.eUZFFKO_q31kT4soZCCphwxVIQEN-Ha2nZoo_kpb2ckpr9I8exMN8YDNxn-NflOK4xqCEi_eSwx9Eu8Q7XKg4Q"
}
Then use this token to access GET /greet.
% curl --location --request GET 'http://localhost:8080/greet' \
--header 'Authorization: Bearer eyJhbGciOiJIUzUxMiJ9.eyJzdWIiOiJtb25pa2EiLCJhdXRob3JpdGllcyI6IlJPTEVfQURNSU4sIFJPTEVfVVNFUiIsImV4cCI6MTU5Nzk5MzM0MX0.eUZFFKO_q31kT4soZCCphwxVIQEN-Ha2nZoo_kpb2ckpr9I8exMN8YDNxn-NflOK4xqCEi_eSwx9Eu8Q7XKg4Q'
You will receive the following JSON.
{
    "message": "Hello Monika"
}
If you access GET /greet with Jack, you will receive a 403 error.
{
    "timestamp": "2020-08-21T06:09:34.225+00:00",
    "status": 403,
    "error": "Forbidden",
    "message": "",
    "path": "/greet"
}
Integrating Springdoc
The Springdoc can help us generate API files with Swagger. If you don’t know Springdoc, you can read the following article first.
After including Springdoc, add SaggerConfiguration to setup Springdoc, the code is as follows:
package com.waynestalk.jwtexample.config

import io.swagger.v3.oas.models.Components
import io.swagger.v3.oas.models.OpenAPI
import io.swagger.v3.oas.models.info.Info
import io.swagger.v3.oas.models.security.SecurityRequirement
import io.swagger.v3.oas.models.security.SecurityScheme
import org.springframework.context.annotation.Bean
import org.springframework.context.annotation.Configuration

@Configuration
class SwaggerConfiguration {
    @Bean
    fun customOpenAPI(): OpenAPI {
        val securitySchemeName = "Auth JWT"
        return OpenAPI()
                .addSecurityItem(SecurityRequirement().addList(securitySchemeName))
                .components(
                        Components()
                                .addSecuritySchemes(securitySchemeName,
                                        SecurityScheme()
                                                .name(securitySchemeName)
                                                .type(SecurityScheme.Type.HTTP)
                                                .scheme("bearer")
                                                .bearerFormat("JWT")
                                )
                )
                .info(Info().title("Wayne's Talk APIs").version("v1.0.0"))
    }
}
This is not enough. Spring Security must be set up to allow Springdoc-related URIs to pass without authentication.
class SecurityConfiguration(val jwtTokenProvider: JwtTokenProvider) : WebSecurityConfigurerAdapter() {
    override fun configure(http: HttpSecurity) {
        http
                .authorizeRequests()
                .antMatchers("/v3/api-docs/**", "/swagger-ui/**", "/swagger-ui.html").permitAll()
                .antMatchers("/login").permitAll()
                .anyRequest().authenticated()
    }
}
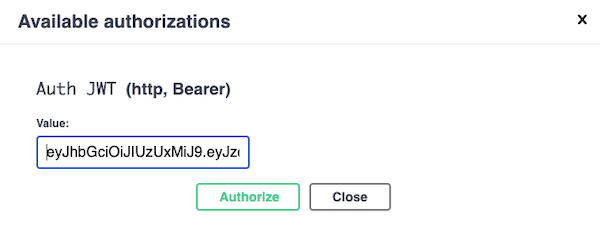
Now you can browse http://localhost:8080/swagger-ui.html . And login on Swagger, and copy the received token after logging in. Then, click the Authorize button on the upper right, and the following screen will appear. Paste the Token you just received, remember that you don’t need to input Bearer prefix, and then press Authorize. Next, go to access GET /greet on Swagger, you can see that Swagger will embed the token for you.

Conclusion
The login and authentication flows in this article have been customized a lot. You may feel that since almost all of them have to be written, why bother to integrate Spring Security? This is reasonable. If we don’t integrate Spring Security, the code may be simpler. However, in this case, we can not use Spring Security’s Authorization and Method Security. If you want to do authorization yourself, there will be a lot more code, and you can evaluate according to your needs.


2 comments
hi thanks for the article.. Just a comment: se line val securitySchemeName = “Auth JWT” its not a valid openapi schemeName, i think is val securitySchemeName = “bearerAuth” .
Hello Matias, I think there is no so-called valid name for securitySchemeName. I think securitySchemeName is just a name or key for a SecurityScheme, is’t it?