
Swift packages 是可重複使用的程式碼元件。它不但可以包含程式碼,還可以包含二進位 XCFrameworks。發佈 XCFrameworks 可以保護程式碼不外洩。本文章將介紹如何使用 Swift packages 發佈 XCFrameworks。
Table of Contents
建立 XCFrameworks
如果你不熟悉如何建立 XCFrameworks,請先參照以下文章。

首先我們建立一個 framework 叫 GreetingUI,並在裡面宣告 GreetingViewController,其程式碼如下。
import UIKit

public class GreetingViewController: UIViewController {
    public static func newInstance() -> GreetingViewController {
        let storyboard = UIStoryboard(name: "Greeting", bundle: Bundle(for: Self.self))
        let viewController = storyboard.instantiateViewController(withIdentifier: "GreetingViewController") as! GreetingViewController
        return viewController
    }

    @IBOutlet weak var greetingLabel: UILabel!

    public override func viewDidLoad() {
        super.viewDidLoad()

        greetingLabel.text = "Hello Wayne's Talk!"
    }
}
接下來用下面的 shell script 產生 XCFramework。它會在 archives 資料夾下產生GreetingUI.xcframework。
#!/bin/sh

PROJECT_NAME="GreetingUI"
OUTPUT_DIR="archives"

xcodebuild archive \
  -project "$PROJECT_NAME/$PROJECT_NAME.xcodeproj" \
  -scheme "$PROJECT_NAME" \
  -destination "generic/platform=iOS" \
  -archivePath "archives/iOS" \
  SKIP_INSTALL=NO \
  BUILD_LIBRARY_FOR_DISTRIBUTION=YES

xcodebuild archive \
  -project "$PROJECT_NAME/$PROJECT_NAME.xcodeproj" \
  -scheme "$PROJECT_NAME" \
  -destination "generic/platform=iOS Simulator" \
  -archivePath "archives/iOS-Simulator" \
  SKIP_INSTALL=NO \
  BUILD_LIBRARY_FOR_DISTRIBUTION=YES

xcodebuild -create-xcframework \
    -framework "$OUTPUT_DIR/iOS.xcarchive/Products/Library/Frameworks/$PROJECT_NAME.framework" \
    -framework "$OUTPUT_DIR/iOS-Simulator.xcarchive/Products/Library/Frameworks/$PROJECT_NAME.framework" \
    -output "$OUTPUT_DIR/$PROJECT_NAME.xcframework"
用 Swift Packages 發佈 XCFrameworks
如果你不熟悉如何建立 Swift packages,請先參照以下文章。

Swift packages 支援兩種方式來發佈 XCFrameworks。一種是將 XCFrameworks 和 Swift packages 放在同一個硬碟。另一種是將 XCFrameworks 與 Swift packages 放在不同的主機。
Swift Packages 指向在同一個硬碟的 XCFrameworks
建立一個 Swift package 叫 GreetingUISDK。將剛剛產生出來的 GreetingUI.xcframework 移至 GreetingUISDK 資料夾下。
在 Package.swift 中,用 .binaryTarget() 來新增一個 target,其 name 為 GreetingUI 和 path 為 GreetingUI.xcframework。然後,將 target GreetingUI 加入到 product GreetingUISDK 的 targets 裡面。
如果 GreetingUISDK 沒有包含任何程式碼的話,那我們可以移除 target GreetingSDK,且也要將它從 product GreetingUISDK 的 targets 中移除。
import PackageDescription

let package = Package(
    name: "GreetingUISDK",
    products: [
        // Products define the executables and libraries a package produces, and make them visible to other packages.
        .library(name: "GreetingUISDK", targets: ["GreetingUISDK", "GreetingUI"]),
    ],
    dependencies: [
        // Dependencies declare other packages that this package depends on.
        // .package(url: /* package url */, from: "1.0.0"),
    ],
    targets: [
        // Targets are the basic building blocks of a package. A target can define a module or a test suite.
        // Targets can depend on other targets in this package, and on products in packages this package depends on.
        .target(name: "GreetingUISDK", dependencies: []),
        .binaryTarget(name: "GreetingUI", path: "GreetingUI.xcframework"),
        .testTarget(name: "GreetingUISDKTests", dependencies: ["GreetingUISDK"]),
    ]
)
最後用 Git tag 建立版本 1.0.0,然後將 GreetingUISDK push 到 https://github.com/xhhuango/GreetingUISDK 後,就發佈完成了。
Swift Packages 指向 Remote XCFrameworks
我們也可以將 Swift Package 和 XCFramework 放在不同的主機。
用 zip 將 GreetingUI.xcframework 打包成 GreetingUI.xcframework.zip,再用以下指令計算 GreetingUI.xcframework.zip 的 checksum。將 GreetingUI.xcframework.zip 放到某個主機上。
% swift package compute-checksum GreetingUI.xcframework.zip
758990849603c7be90c8ff277cd0a004e649770773492cf9f526a4baad5192f9
在 Package.swift 中,用 .binaryTarget() 來新增一個 target,並且指定其 name、 GreetingUI.xcframework.zip 的 url、和剛剛計算的 checksum。
import PackageDescription

let package = Package(
    name: "GreetingUISDK",
    platforms: [.iOS(.v13)],
    products: [
        // Products define the executables and libraries a package produces, and make them visible to other packages.
        .library(name: "GreetingUISDK", targets: ["GreetingUISDK", "GreetingUI"]),
    ],
    dependencies: [
        // Dependencies declare other packages that this package depends on.
        // .package(url: /* package url */, from: "1.0.0"),
    ],
    targets: [
        // Targets are the basic building blocks of a package. A target can define a module or a test suite.
        // Targets can depend on other targets in this package, and on products in packages this package depends on.
        .target(name: "GreetingUISDK", dependencies: []),
        .binaryTarget(
            name: "GreetingUI",
            url: "https://your.domain.com/path/GreetingUI.xcframework.zip",
            checksum: "758990849603c7be90c8ff277cd0a004e649770773492cf9f526a4baad5192f9"),
        .testTarget(name: "GreetingUISDKTests", dependencies: ["GreetingUISDK"]),
    ]
)
最後用 Git tag 建立版本 1.1.0,然後將 GreetingUISDK push 到 https://github.com/xhhuango/GreetingUISDK 後,就發佈完成了。
加入包含 XCFrameworks 的 Swift Packages 依賴到 Apps
如果你不熟悉如何加入 Swift package 依賴到 Apps,請先參照以下文章。
建立 GreetingApp 專案,用 https://github.com/xhhuango/GreetingUISDK 加入 GreetingUISDK 依賴。

我們現在可以在 GreetingApp 中使用 GreetingUI.GreetingViewController,如下。
import UIKit
import GreetingUI

class ViewController: UIViewController {
    @IBAction func onClick(_ sender: Any) {
        let viewController = GreetingViewController.newInstance()
        present(viewController, animated: true)
    }

    override func viewDidLoad() {
        super.viewDidLoad()
    }
}
用 Swift Packages 發佈有依賴其他 Swift Packages 的 XCFrameworks
如果 XCFramework 有依賴其他 local 或 open-source Swift packages,那當你使用以上所介紹的方式的話,在編譯 App 時會發生錯誤。
假設 GreetingUI 有依賴 Toast-Swift,並且在 GreetingViewController 裡面使用 Toast-Swift,如下程式碼。
import UIKit
import Toast

public class GreetingViewController: UIViewController {
    public static func newInstance() -> GreetingViewController {
        let storyboard = UIStoryboard(name: "Greeting", bundle: Bundle(for: Self.self))
        let viewController = storyboard.instantiateViewController(withIdentifier: "GreetingViewController") as! GreetingViewController
        return viewController
    }

    @IBOutlet weak var greetingLabel: UILabel!

    @IBAction func onClick(_ sender: Any) {
        view.makeToast("Hello Wayne's Talk!")
    }

    public override func viewDidLoad() {
        super.viewDidLoad()

        greetingLabel.text = "Hello Wayne's Talk!"
    }
}
然後,我們產生 GreetingUI.xcframework,並用之前介紹的方式發佈到 https://github.com/xhhuango/GreetingUISDK,且建立版本 2.0.0。
在 GreetingApp 中,加入版本 2.0.0 的 GreetingUISDK 依賴,編譯時 Xcode 會顯示 No such module Toast 的錯誤。
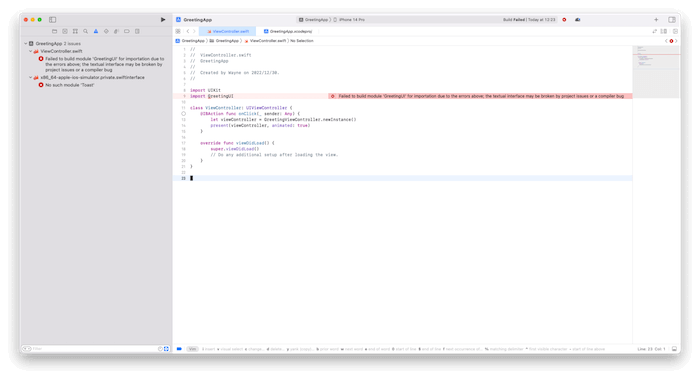
這是因為在 GreetingUI.xcframework/ios-arm64_x86_64-simulator/GreetingUI.framework/Modules/GreetingUI.swiftmodule/x86_64-apple-ios-simulator.private.swiftinterface 裡面有一行 import Toast。
// swift-interface-format-version: 1.0
// swift-compiler-version: Apple Swift version 5.7.2 (swiftlang-5.7.2.135.5 clang-1400.0.29.51)
// swift-module-flags: -target x86_64-apple-ios16.2-simulator -enable-objc-interop -enable-library-evolution -swift-version 5 -enforce-exclusivity=checked -O -module-name GreetingUI
// swift-module-flags-ignorable: -enable-bare-slash-regex
@_exported import GreetingUI
import Swift
import Toast
import UIKit
import _Concurrency
import _StringProcessing
@objc @_inheritsConvenienceInitializers @_Concurrency.MainActor(unsafe) public class GreetingViewController : UIKit.UIViewController {
  @_Concurrency.MainActor(unsafe) public static func newInstance() -> GreetingUI.GreetingViewController
  @_Concurrency.MainActor(unsafe) @objc override dynamic public func viewDidLoad()
  @_Concurrency.MainActor(unsafe) @objc override dynamic public init(nibName nibNameOrNil: Swift.String?, bundle nibBundleOrNil: Foundation.Bundle?)
  @_Concurrency.MainActor(unsafe) @objc required dynamic public init?(coder: Foundation.NSCoder)
  @objc deinit
}
當在產生 GreetingUI.xcframework 時,xcodebuild 編譯 Toast-Swift,並 statically link Toast-Swift 至 GreetingUI.xcframework,所以沒有產生 Toast-Swift 的 .swiftmodule。因此 GreetingApp 無法找到 Toast 模組。
在 Issue with third party dependencies inside a XCFramework through SPM 中,NeoNacho 提到兩個解決方案。
第一個方案是,在產生 GreetingUI.xcframework 時,要求 xcodebuild 不在要再 GreetingUI.xcframework/ios-arm64_x86_64-simulator/GreetingUI.framework/Modules/GreetingUI.swiftmodule/x86_64-apple-ios-simulator.private.swiftinterface 裡加上 import Toast。我們可以在 GreetingUI 裡使用 @_implementationOnly import 來 privately import Toast,如下。
但這會產生一個問題。如果使用 @_implementationOnly import Toast 的話,你就不可以在 GreetingUI 的 public interface 中使用到 Toast 的 symbols。
import UIKit
@_implementationOnly import Toast

public class GreetingViewController: UIViewController {
    public static func newInstance() -> GreetingViewController {
        let storyboard = UIStoryboard(name: "Greeting", bundle: Bundle(for: Self.self))
        let viewController = storyboard.instantiateViewController(withIdentifier: "GreetingViewController") as! GreetingViewController
        return viewController
    }

    @IBOutlet weak var greetingLabel: UILabel!

    @IBAction func onClick(_ sender: Any) {
        view.makeToast("Hello Wayne's Talk!")
    }

    public override func viewDidLoad() {
        super.viewDidLoad()

        greetingLabel.text = "Hello Wayne's Talk!"
    }
}
第二個方案是,將 Toast-Swift 編譯成 Toast.xcframework,然後 GreetingUI 依賴 Toast.xcframework。這樣 GreetingUI.xcframework 就不會 statically link Toast-Swift。
但這樣做的話,在發佈 GreetingUISDK 時,GreetingUISDK 必須要包含 GreetingUI.xcframework 和 Toast.xcframework。如果 GreetingUI 依賴多個 Swift packages 的話,就必須要將這些 Swift packages 一一編譯成 xcframework。發佈流程會變得複雜。
你需要將 Toast.xcframework 也移到 GreetingUISDK 資料夾下,然後修改 Package.swift 如下。
// swift-tools-version: 5.7
// The swift-tools-version declares the minimum version of Swift required to build this package.

import PackageDescription

let package = Package(
    name: "GreetingUISDK",
    platforms: [.iOS(.v13)],
    products: [
        // Products define the executables and libraries a package produces, and make them visible to other packages.
        .library( name: "GreetingUISDK", targets: ["GreetingUISDK", "GreetingUI", "Toast"]),
    ],
    dependencies: [
        // Dependencies declare other packages that this package depends on.
        // .package(url: /* package url */, from: "1.0.0"),
    ],
    targets: [
        // Targets are the basic building blocks of a package. A target can define a module or a test suite.
        // Targets can depend on other targets in this package, and on products in packages this package depends on.
        .target(name: "GreetingUISDK", dependencies: []),
        .binaryTarget(name: "GreetingUI", path: "GreetingUI.xcframework"),
        .binaryTarget(name: "Toast", path: "Toast.xcframework"),
        .testTarget(name: "GreetingUISDKTests", dependencies: ["GreetingUISDK"]),
    ]
)
結語
當我們發佈的產品是一個二進位 xcframework 時,我們會需要保護程式碼不外洩。目前 Swift packages 可以支援發佈二進位 xcframework。但當我們的 xcframework 有依賴其他的 Swift packages,會有 symbol references 的問題。希望未來 Xcode 會改善這部分。


