
Angular 的路由器根據 URL 將對應的畫面輸出到用戶面前。所以說,路由表也就反映了網站整個畫面的階層架構。本文章會介紹如何設定路由器、如何導航到其他畫面、以及如何傳遞參數至其他畫面。
Table of Contents
建立 Angular Router 專案
用下面的指令建立一個 Angular 專案。–routing 選項會讓指令加入 Angular Router 套件。
% ng new angular-router-example --routing
建立好專案後,用下面的指令執行專案。
angular-router-example % ng serve
在瀏覽器上開啟 http://localhost:4200/ 就可以看到 Angular 專案的預設畫面。為了之後的講解方便,我們要簡化這個複雜的畫面。開起 app.component.html,將其內容簡化如下。
<h1>App</h1>
<router-outlet></router-outlet>
修改後,專案的首頁就會變成只有 App 一個字。

路由(Routes)
設定路由
在 Angular 中設定路由是很簡單的事情。讓我們加上第一個路由吧!
新增一個 component 叫 food。
angular-router-example % ng generate component food
CREATE src/app/food/food.component.scss (0 bytes)
CREATE src/app/food/food.component.html (19 bytes)
CREATE src/app/food/food.component.spec.ts (612 bytes)
CREATE src/app/food/food.component.ts (268 bytes)
UPDATE src/app/app.module.ts (467 bytes)
打開 app-routing.module.js,把 FoodComponent 加入路由。
import {NgModule} from '@angular/core';
import {Routes, RouterModule} from '@angular/router';
import {FoodComponent} from './food/food.component';

const routes: Routes = [
  {
    path: 'food',
    component: FoodComponent,
  },
];

@NgModule({
  imports: [RouterModule.forRoot(routes)],
  exports: [RouterModule],
})
export class AppRoutingModule {
}
路由最重要就是要指定 path 和 component。
- path:指的是路由的路徑。這路徑是相對路徑,而不是絕對路徑。所以
path='food'是指 Root 路徑(/)下的 food,它的絕對路徑就是 /food。再加上專案的網址 http://localhost:4200/,那它對應的 URL 就會是 http://localhost:4200/food。 - component:指的是這個路由路徑顯示的畫面元件。
設定好 food 路由後,瀏覽 http://localhost:4200/food。

畫面中顯示成功地設定好路由。但問題是,為何 AppComponent 的內容也被顯示出來呢?這是因為 Angular Router 是用階層方式顯示路由畫面。當顯示 /food 畫面時,Angular Router 會先顯示 Root 路徑(/)的畫面,也就是 AppComponent。然後,AppComponent 用 <router-outlet/> 決定下一層級 food 路由的顯示位置。
設定 Wildcard 路由
當用戶嘗試瀏覽的 URL 和路由表裡的路徑都不匹配時,路由器就會選擇 Wildcard 路由。
打開 app-routing.module.ts,加上 Wildcard 路由。Wildcard 路由會顯示 FoodComponent。當然你可以新增一個 PageNotFoundComponent 來顯示頁面不存在的錯誤訊息。
const routes: Routes = [
  {
    path: 'food',
    component: FoodComponent,
  },
  {
    path: '**',
    component: FoodComponent,
  },
];
設定重新導向路由
Angular Router 支援重新導向的功能。當用戶瀏覽某的 URL 時,Angular Router 會自動將用戶重新導向到另一個 URL。
打開 app-routing.module.ts,加入重新導向路由。當用戶瀏覽 Root 路徑時,就會被重新導向到 /food。
const routes: Routes = [
  {
    path: 'food',
    component: FoodComponent,
  },
  {
    path: '',
    redirectTo: 'food',
    pathMatch: 'full',
  },
  {
    path: '**',
    component: FoodComponent,
  },
];
加入後,瀏覽 http://localhost:4200/,會被重新導向至 http://localhost:4200/food。
路由匹配順序(Route Order)
路由的匹配順序是由上至下。路由器在匹配路由時,是從陣列中第一個路由開始匹配,並且選擇第一個匹配到的路由。所以,一般來說,Wildcard 路由會放在最後一個。
設定路由參數(Route Parameters)
我們可以在路由的路徑上加上變數,並且在 component 中取得變數值。
新增 beverage component。
angular-router-example % ng generate component beverage
CREATE src/app/beverage/beverage.component.scss (0 bytes)
CREATE src/app/beverage/beverage.component.html (23 bytes)
CREATE src/app/beverage/beverage.component.spec.ts (640 bytes)
CREATE src/app/beverage/beverage.component.ts (284 bytes)
UPDATE src/app/app.module.ts (662 bytes)
在 app-routing.module.ts 中,設定路由路徑為 /beverage/:name。其中 :name 就是路由參數。
const routes: Routes = [
  {
    path: 'food',
    component: FoodComponent,
    ],
  },
  {
    path: 'beverage/:name',
    component: BeverageComponent,
  },
  {
    path: '',
    redirectTo: 'food',
    pathMatch: 'full',
  },
  {
    path: '**',
    component: FoodComponent,
  },
];
我們可以用 ActivatedRoute.paramMap 來取得路由參數的值。將 beverage.component.ts 修改如下:
import {Component, OnInit} from '@angular/core';
import {Observable} from 'rxjs';
import {ActivatedRoute} from '@angular/router';
import {map} from 'rxjs/operators';

@Component({
  selector: 'app-beverage',
  templateUrl: './beverage.component.html',
  styleUrls: ['./beverage.component.scss'],
})
export class BeverageComponent implements OnInit {
  name: Observable<string>;

  constructor(private route: ActivatedRoute) {}

  ngOnInit(): void {
    this.name = this.route.paramMap.pipe(map(params => params.get('name')));
  }
}
name 是 Observable<string> 而不是單純的 string。這樣當路由參數值被變更時,name 可以被通知。取得 name 的值後,我們將它在 beverage.component.html 中顯示出來。顯示時要搭配 async,因為它是 Observable。
<p>beverage {{name | async}} works!</p>點擊連結後,會顯示下面的結果。

ActivatedRoute
當 Angular router 導航到某個路由後,它會創建一個 ActivatedRoute 物件。這個物件包含了當前路由的狀態。例如,你可以取得當前的 URL、路由參數、查詢參數、路由設定等。
設定巢狀路由/子路由(Nesting/Child Routes)
當網站變得複雜時,你需要建立巢狀路由以便於管理。巢狀路由也稱子路由。
在 food 下,新增 food-detail component。
angular-router-example % ng generate component food/food-detail
CREATE src/app/food/food-detail/food-detail.component.scss (0 bytes)
CREATE src/app/food/food-detail/food-detail.component.html (26 bytes)
CREATE src/app/food/food-detail/food-detail.component.spec.ts (655 bytes)
CREATE src/app/food/food-detail/food-detail.component.ts (295 bytes)
UPDATE src/app/app.module.ts (659 bytes)
打開 app-routing.module.ts,將 food-detail 加入到 food 路由下。
const routes: Routes = [
  {
    path: 'food',
    component: FoodComponent,
    children: [
      {
        path: 'detail',
        component: FoodDetailComponent,
      },
    ],
  },
  {
    path: 'beverage/:name',
    component: BeverageComponent,
  },
  {
    path: '',
    redirectTo: 'food',
    pathMatch: 'full',
  },
  {
    path: '**',
    component: FoodComponent,
  },
];這樣設定就完成了。food-detail 的路由路徑被設定為 /food/detail。但是,如果你瀏覽 http://localhost:4200/food/detail 的話,你是看不到 food-detail 的內容。因為你還沒有在 FoodComponent 內顯示子路由。打開 food.component.html,用 <router-outlet/> 來顯示子路由畫面。
<p>food works!</p>
<router-outlet></router-outlet>
所以說,子路由的畫面是由父路由來負責顯示的。
設定子路由模組(Child Route Module)
在路由表中,我們在 children 下加入子路由。另外,我們也可以將某個路由分支拆離到一個子路由模組,這樣會更易於管理。
在 food 資料夾下,新增一個子路由模組。
angular-router-example % ng generate module food --routing
CREATE src/app/food/food-routing.module.ts (247 bytes)
CREATE src/app/food/food.module.ts (272 bytes)
將 food 路由從 app-routing.module 中移除。
const routes: Routes = [
  {
    path: 'beverage/:name',
    component: BeverageComponent,
  },
  {
    path: '',
    redirectTo: 'food',
    pathMatch: 'full',
  },
  {
    path: '**',
    component: FoodComponent,
  },
];

@NgModule({
  imports: [RouterModule.forRoot(routes)],
  exports: [RouterModule],
})
export class AppRoutingModule {
}
將 food 路由加入 food-routing.module.ts。
const routes: Routes = [
  {
    path: 'food',
    component: FoodComponent,
    children: [
      {
        path: 'detail',
        component: FoodDetailComponent,
      },
    ],
  },
];

@NgModule({
  imports: [RouterModule.forChild(routes)],
  exports: [RouterModule],
})
export class FoodRoutingModule {
}
最後,記得要在 app.module.ts 中引入 FoodModule。注意,必須在 AppRoutingModule 之前引入。因為在 AppRoutingModule 中我們有設定 Wildcard 路由。如果你將 FoodModule 放在 AppRoutingModule 後面的話,那瀏覽 http://localhost:4200/food 時,Angular Router 就會先匹配到 Wildcard 路由。
@NgModule({
  declarations: [
    AppComponent,
    FoodComponent,
    FoodDetailComponent,
    BeverageComponent,
  ],
  imports: [
    BrowserModule,
    FoodModule,
    AppRoutingModule,
  ],
  providers: [],
  bootstrap: [AppComponent],
})
export class AppModule {
}
導航(Navigation)
Angular Router 提供兩種導航方式。一種是用在 .html 中,就是用 routerLink。另一種是用在程式中,也就是 Router 物件。
routerLink
我們可以用 routerLink 在 .html 中提供導航的連結。
將 app.component.html 修改成以下程式碼。
<h1>App</h1>
<nav>
  <ul>
    <li><a routerLink="/food">Food with absolute path</a></li>
    <li><a routerLink="food">Food with relative path</a></li>
    <li><a routerLink="/beverage/Pepsi">Beverage with path</a></li>
    <li><a [routerLink]="['/beverage', 'CocaCola']">Beverage with route parameter</a></li>
  </ul>
</nav>
<router-outlet></router-outlet>- routerLink=”/food”:用絕對路徑(Absolute Path)來導覽。
- routerLink=”food”:用相對路徑(Relative Path)來導覽。
- routerLink=”/beverage/Pepsi”:直接在路徑上指定
:name的值。 - [routerLink]=”[‘/beverage’, ‘CocaCola’]”:當 routerLink 是陣列時,第一個參數是路徑,第二個參數是路由參數的值。
Router 物件
Router 物件有提供導航的功能。
在 app.component.ts 中加入 show7Up()。
@Component({
  selector: 'app-root',
  templateUrl: './app.component.html',
  styleUrls: ['./app.component.scss'],
})
export class AppComponent {
  title = 'angular-router-example';

  constructor(private router: Router) {
  }

  show7Up(): void {
    this.router.navigate(['/beverage', '7UP']);
  }
}
在建構子中引入 Router。然後呼叫 router.navigate() 並帶入路徑。參數和 routerLink 一樣是陣列,第一個是路由路徑,第二個是路由參數。這邊的路由路徑是絕對路徑。
如果想要用相對路徑的話,那還要再引入 ActivatedRoute,並且將 ActivatedRoute 傳給 router.navigate() ,以告訴它第一個參數中的路由路徑是相對於傳入 ActivatedRoute。
@Component({
  selector: 'app-root',
  templateUrl: './app.component.html',
  styleUrls: ['./app.component.scss'],
})
export class AppComponent {
  title = 'angular-router-example';

  constructor(private router: Router,
              private route: ActivatedRoute) {
  }

  show7Up(): void {
    this.router.navigate(['beverage', '7UP'], {relativeTo: this.route});
  }
}
最後,修改 app.component.html 如下。
<h1>App</h1>
<p>routerLink</p>
<nav>
  <ul>
    <li><a routerLink="/food">Food with absolute path</a></li>
    <li><a routerLink="food">Food with relative path</a></li>
    <li><a routerLink="/beverage/Pepsi">Beverage with path</a></li>
    <li><a [routerLink]="['/beverage', 'CocaCola']">Beverage with route parameter</a></li>
    <li><a (click)="show7Up()">Beverage with router</a></li>
  </ul>
</nav>
<router-outlet></router-outlet>
參數傳遞
有兩種方式可以傳遞參數給下一個 component。一種是路由參數,這我們已經有談論到。另一種是查詢參數。
路由參數(Route Parameters)
先前提到使用路由參數時,是用來傳遞路徑上的變數。下方的程式碼中傳遞 price 給 /food/detail,但是 price 並不是路徑上的變數。在 app.component.html 中加入一個帶有 price 參數的 routerLink。
<li><a [routerLink]="['/food/detail', {price: 10}]">FoodDetail with price by route parameter</a></li>當用戶點擊上方的連結時,會導航至 http://localhost:4200/food/detail;price=10。這種將參數放置在分號後面的 URL 叫 Matrix URIs。
我們也可以在程式中傳遞路由參數。
this.router.navigate(['/food/detail', {price: 10}]);我們可以用 ActivatedRoute.paramMap 來接收路由參數。在 food.component.ts 中接收路由參數。
@Component({
  selector: 'app-food',
  templateUrl: './food.component.html',
  styleUrls: ['./food.component.scss'],
})
export class FoodComponent implements OnInit {
  price: Observable<string>;

  constructor(private route: ActivatedRoute) {
  }

  ngOnInit(): void {
    this.price = this.route.paramMap.pipe(map(params => params.get('price')));
  }
}
在 food-detail.component.ts 中也接收路由參數。
@Component({
  selector: 'app-food-detail',
  templateUrl: './food-detail.component.html',
  styleUrls: ['./food-detail.component.scss'],
})
export class FoodDetailComponent implements OnInit {
  price: Observable<string>;

  constructor(private route: ActivatedRoute) {
  }

  ngOnInit(): void {
    this.price = this.route.paramMap.pipe(map(params => params.get('price')));
  }
}
在 food.component.html 中,我們將 price 顯示出來。
<p>food: price is {{price | async}}</p>
<router-outlet></router-outlet>
也在 food-detail.component.html 中顯示 price。
<p>food-detail: price is {{price | async}}</p>點擊 FoodDetail with price by route parameter 連結。
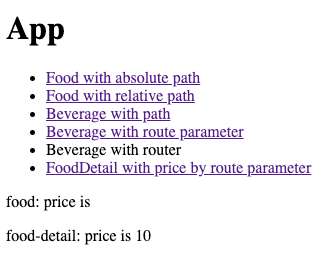
只有 FoodDetail 有接收到路由參數,而 Food 卻沒有接收到。這是因為路徑是 /food/detail。
只有路由路徑的 Component 可以接收到傳過來的路由參數。
查詢參數(Query Parameters)
另外我們也可以利用查詢參數來傳遞參數。在 app.component.html 加入一行帶有 size 查詢參數的連結。與傳遞路由參數時不同,查詢參數的值是要放在 queryParams 裡。
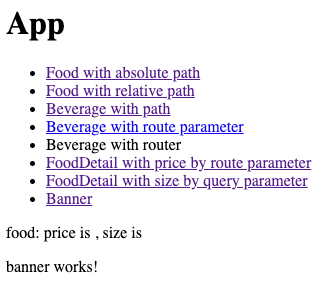
<li><a routerLink="/food/detail" [queryParams]="{size: 20}">FoodDetail with size by query parameter</a></li>點擊上方的連結會導航至 http://localhost:4200/food/detail?size=20。這種將參數放置在問號後面的 URL 叫查詢參數。這也是我們比較常看到的方式。我們也可以在程式中傳遞查詢參數。
this.router.navigate( ['/food/detail'], {queryParams: {quantity: 2}});我們可以用 ActivatedRoute.queryParamMap 來接收查詢參數。用法和接收路由參數差不多。
在 food.component.ts 中接收查詢參數。
@Component({
  selector: 'app-food',
  templateUrl: './food.component.html',
  styleUrls: ['./food.component.scss'],
})
export class FoodComponent implements OnInit {
  price: Observable<string>;
  size: Observable<string>;

  constructor(private route: ActivatedRoute) {
  }

  ngOnInit(): void {
    this.price = this.route.paramMap.pipe(map(params => params.get('price')));
    this.size = this.route.queryParamMap.pipe(map(params => params.get('size')));
  }
}
也在 food-detail.component.ts 中接收查詢參數。
@Component({
  selector: 'app-food-detail',
  templateUrl: './food-detail.component.html',
  styleUrls: ['./food-detail.component.scss'],
})
export class FoodDetailComponent implements OnInit {
  price: Observable<string>;
  size: Observable<string>;

  constructor(private route: ActivatedRoute) {
  }

  ngOnInit(): void {
    this.price = this.route.paramMap.pipe(map(params => params.get('price')));
    this.size = this.route.queryParamMap.pipe(map(params => params.get('size')));
  }
}
在 food.component.html 中顯示 size。
<p>food: price is {{price | async}}, size is {{size | async}}</p>
<router-outlet></router-outlet>
也在 food-detail.component.html 中顯示 size。
<p>food-detail: price is {{price | async}}, size is {{size | async}}</p>點擊 FoodDetail with size by query parameter 連結。

路徑是 /food/detail,但是 FoodComponent 和 FoodDetailComponent 都有接收到 size 參數。
畫面上所有的 component 都可以接收到查詢參數。
用命名 Outlet 顯示多個路由
目前為止,我們看到的 component 裡都只有一個 <router-outlet/>。所以,這些 component 裡都只能顯示一個 child component。那要如何在一個 component 裡面顯示多個 child components 呢?其中一個方式就是用命名 Outlet(Named Outlet)。
新增一個 component 叫 banner。
angular-router-example % ng generate component banner
CREATE src/app/banner/banner.component.scss (0 bytes)
CREATE src/app/banner/banner.component.html (21 bytes)
CREATE src/app/banner/banner.component.spec.ts (626 bytes)
CREATE src/app/banner/banner.component.ts (276 bytes)
UPDATE src/app/app.module.ts (796 bytes)
把 banner 加到 routes 裡面,並且指定顯示在一個叫 ads 的 outlet 上。
const routes: Routes = [
  {
    path: 'beverage/:name',
    component: BeverageComponent,
  },
  {
    path: 'banner',
    component: BannerComponent,
    outlet: 'ads',
  },
  {
    path: '',
    redirectTo: 'food',
    pathMatch: 'full',
  },
  {
    path: '**',
    component: FoodComponent,
  },
];
在 app.component.html 中,加入一個命名 Outlet。加上一個 routerLink,並指定要顯示的 outlet 名字和路徑。
...
    <li><a [routerLink]="[{outlets: {ads: ['banner']}}]">Banner</a></li>
  </ul>
</nav>
<router-outlet></router-outlet>
<router-outlet name="ads"></router-outlet>
點擊 Banner 後,可以看到畫面顯示了兩個 outlet,而路徑是 /food(ads:banner)。
結論
Angular Router 提供不少功能。文章中討論到的是基礎的但也是最常用的功能。由於 Angular Router 是官方推出的套件,因此完美地整合到 Angular。一開始接觸時,可能會覺得有點複雜,但是習慣後,會覺得蠻方便的。


