Firebase Cloud Messaging (FCM) 可以讓我們傳送訊息給 Android、iOS、或 Web 應用程式,也就是所謂的 push notifications(推播)。本文章將介紹如何設定 Firebase console,以及如何實作一個 Android app 來接收 push notifications。
Table of Contents
設定 Firebase Console
先到 Firebase Console。如果你還沒任何 Firebase project,請先建立一個新的 Firebase project。然後點選你剛剛建立的專案。在專案的左欄中,選擇 Cloud Messaging,如下圖。然後點選 Android 的圖示來建立一個 app。

點選後,就會出現下方的畫面。填入你 Android app 的 package name,在這邊我們填入 com.waynestalk.fcmexample,然後點擊 Register app 按鈕。

下載 google-services.json。稍後,我們要將它加入到我們的 Android app 專案。

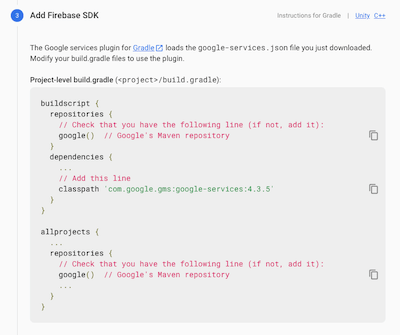
接下來,它顯示如何設定 Android app 專案的 build.gradle 來引入 Firebase SDK。


最後,按下 Continue to console 來回到 Firebase console。這樣就完成 FCM 的設定了。

建立 Android App 來接收 FCM
引入 FCM SDK 到專案
建立一個新的 Android 專案,並且將 package name 設定為剛剛你在 Firebase console 設定的。我們剛剛設定為 com.waynestalk.fcmexample。並且將剛剛下載的 google-services.json 加入到專案中 app 資料夾下面。

打開 project-level 的 build.gradle,也就是 project-path/build.gradle。加入 google-services 的 classpath,如下。
// Top-level build file where you can add configuration options common to all sub-projects/modules.
buildscript {
    ext.kotlin_version = "1.3.72"
    repositories {
        google()
        jcenter()
    }
    dependencies {
        classpath "com.android.tools.build:gradle:4.1.3"
        classpath "org.jetbrains.kotlin:kotlin-gradle-plugin:$kotlin_version"
        classpath 'com.google.gms:google-services:4.3.5'

        // NOTE: Do not place your application dependencies here; they belong
        // in the individual module build.gradle files
    }
}

allprojects {
    repositories {
        google()
        jcenter()
    }
}

task clean(type: Delete) {
    delete rootProject.buildDir
}
打開 app-level 的 build.gradle,也就是 project-path/app/build.gradle。在 plugins 中,加上 google-services plugin。然後,在 dependencies 中,加上三個 Firebase 相關的 SDK。
plugins {
    id 'com.android.application'
    id 'kotlin-android'
    id 'com.google.gms.google-services'
}

android {
    compileSdkVersion 30
    buildToolsVersion "30.0.3"

    defaultConfig {
        applicationId "com.waynestalk.fcmexample"
        minSdkVersion 16
        targetSdkVersion 30
        versionCode 1
        versionName "1.0"

        testInstrumentationRunner "androidx.test.runner.AndroidJUnitRunner"
    }

    buildTypes {
        release {
            minifyEnabled false
            proguardFiles getDefaultProguardFile('proguard-android-optimize.txt'), 'proguard-rules.pro'
        }
    }
    compileOptions {
        sourceCompatibility JavaVersion.VERSION_1_8
        targetCompatibility JavaVersion.VERSION_1_8
    }
    kotlinOptions {
        jvmTarget = '1.8'
    }
}

dependencies {
    implementation "org.jetbrains.kotlin:kotlin-stdlib:$kotlin_version"
    implementation 'androidx.core:core-ktx:1.3.2'
    implementation 'androidx.appcompat:appcompat:1.2.0'
    implementation 'com.google.android.material:material:1.3.0'
    implementation 'androidx.constraintlayout:constraintlayout:2.0.4'
    testImplementation 'junit:junit:4.+'
    androidTestImplementation 'androidx.test.ext:junit:1.1.2'
    androidTestImplementation 'androidx.test.espresso:espresso-core:3.3.0'

    // FCM
    implementation platform('com.google.firebase:firebase-bom:27.0.0')
    implementation 'com.google.firebase:firebase-analytics-ktx'
    implementation 'com.google.firebase:firebase-messaging-ktx'
}
以上的設定,在 Firebase console 中建立一個 app 時,它都已經有提及了。
新增 FirebaseMessagingService 來接收 Push Notifications
建立 FcmService 並繼承 FirebaseMessagingService,程式碼如下。
每當你安裝 app 到新的裝置時,或是重新安裝 app 到裝置時,Firebase SDK 就會取得一個新的 token,並且呼叫 onNewToken() 來通知 app。
每當收到 Firebase server 發送過來的 push notifications,onMessageReceived() 就會被呼叫。
class FcmService : FirebaseMessagingService() {
    private val tag = FcmService::class.java.name

    override fun onMessageReceived(remoteMessage: RemoteMessage) {
        super.onMessageReceived(remoteMessage)

        Log.d(tag, "Received FCM from ${remoteMessage.notification?.body}")
    }

    override fun onNewToken(token: String) {
        super.onNewToken(token)

        Log.d(tag, "Received FCM token: $token")
    }
}
最後,要將 FcmService 加到 AndroidManifest.xml,並且要加上 MESSAGING_EVENT 和 INSTANCE_ID_EVENT 這兩個 intent。
<?xml version="1.0" encoding="utf-8"?>
<manifest xmlns:android="http://schemas.android.com/apk/res/android"
    package="com.waynestalk.fcmexample">

    <application
        android:allowBackup="true"
        android:icon="@mipmap/ic_launcher"
        android:label="@string/app_name"
        android:roundIcon="@mipmap/ic_launcher_round"
        android:supportsRtl="true"
        android:theme="@style/Theme.AndroidFCMExample"
        android:usesCleartextTraffic="true">
        <service
            android:name=".FcmService"
            android:enabled="true"
            android:exported="true">
            <intent-filter>
                <action android:name="com.google.firebase.MESSAGING_EVENT" />
                <action android:name="com.google.firebase.INSTANCE_ID_EVENT" />
            </intent-filter>
        </service>

        <activity android:name=".MainActivity">
            <intent-filter>
                <action android:name="android.intent.action.MAIN" />

                <category android:name="android.intent.category.LAUNCHER" />
            </intent-filter>
        </activity>
    </application>

</manifest>
最後,讓我們來執行一下專案。執行專案後,我們可以在 logcat 中看到 onNewToken() 被呼叫。這表示我們的 app 收到了一個 FCM token。
D/com.waynestalk.fcmexample.FcmService: Received FCM token: etQxjMkGTXih_zuFwgeGjO:APA91bEpCGCD5kZnmxYm540gVu5zSDXwu_ov_-vDffxfAULiy_C07TeQA0tEy1b7A5BHEjEACMq4aWXHgypjBP4s8p5bSUruCG_Rpmxqcu8ju_aC3aIe0d8I2ZRoKQQ2fAUTY8GH9_5G
從 Firebase Console 發送 Push Notifications
Firebase console 可以讓我們在線上發送 push notifications。開啟 Firebase console 的 Cloud Messaging 頁面,然後點選 Send your first message 按鈕。

輸入 push notification 的標題和內文,然後按下 Send test message 按鈕。

它會跳出以下的視窗。新增我們的 Android app 專案剛才收到的 FCM token。

新增後,選擇我們這個 FCM token,並且按下 Test 按鈕,它就會發送一個 push notification 到我們的 Android app。

當我們的 Android app 收到 push notification 時,onMessageReceived() 就會被呼叫,並且印出下面的 log。這樣就完成了!
D/com.waynestalk.fcmexample.FcmService: Received FCM from Hello Wayne's Talk!
從 Spring Boot 發送 FCM
如果你需要從後端程式(如 Spring Boot app)發送 FCM 的話,可以參考以下的文章。
結論
Firebase Cloud Messaging (FCM) 不但可以讓我們發送 push notifications 給 Android,還可以發送給 iOS 和 Web app。它是一個跨平台(cross-platform)的解決方案,而且使用方式也相當地簡單。


