
CLIP(Contrastive Language-Image Pre-training)是由 OpenAI 於 2021 年提出的模型。它透過融合視覺與語言共同編碼達成強大的泛化能力,並具有廣泛的潛在用途。本文章將介紹 CLIP 的理論與實作。
Table of Contents
架構
OpenAI 於 2021 年提出 CLIP 模型。其設計的動機源於傳統圖像分類模型受限於固定的分類標籤,缺乏泛化能力。為克服此限制,CLIP 採用一種全新的預訓練方法,透過對比式學習(contrastive learning)從大量圖像與文本配對資料中學習視覺與語言共同的表徵空間(joint embedding space)。這種方法使 CLIP 在從未訓練過的任務上也能表現出卓越的零樣本(zero-shot)泛化能力。
CLIP 通過聯合訓練影像編碼器(image encoder)與文本編碼器(text encoder),學習一個多模態嵌入空間(multi-modal embedding space),以最大化每個真實配對影像與文本嵌入的餘弦相似度(cosine similarity),同時最小化錯誤配對的 embedding 的 cosine similarity,並對這些 similarity 分數使用對稱交叉熵損失(symmetric cross entropy loss)進行優化。
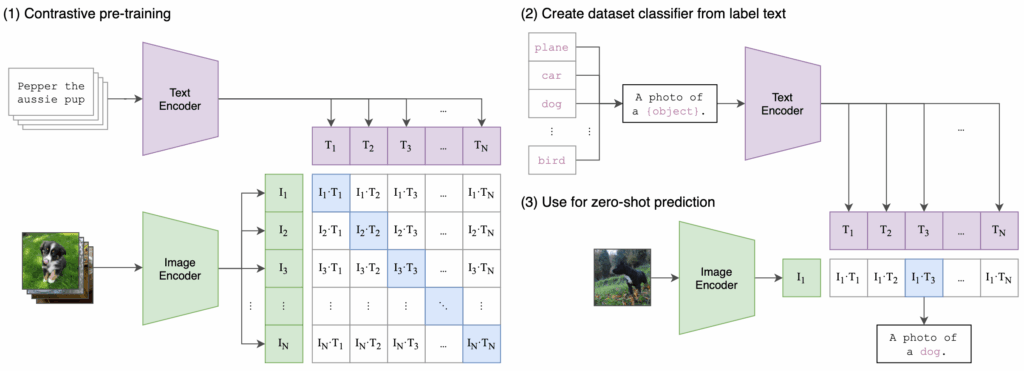
下面的 pseudo code 顯示,在 pre-training 時,如何利用 text 和 image 的 embeddings 來計算 loss。
# image_encoder - ResNet or Vision Transformer
# text_encoder - CBOW or Text Transformer
# I[n, h, w, c] - minibatch of aligned images
# T[n, l] - minibatch of aligned texts
# W_i[d_i, d_e] - learned proj of image to embed
# W_t[d_t, d_e] - learned proj of text to embed
# t - learned temperature parameter
# extract feature representations of each modality
I_f = image_encoder(I) #[n, d_i]
T_f = text_encoder(T) #[n, d_t]
# joint multimodal embedding [n, d_e]
I_e = l2_normalize(np.dot(I_f, W_i), axis=1)
T_e = l2_normalize(np.dot(T_f, W_t), axis=1)
# scaled pairwise cosine similarities [n, n]
logits = np.dot(I_e, T_e.T) * np.exp(t)
# symmetric loss function
labels = np.arange(n)
loss_i = cross_entropy_loss(logits, labels, axis=0)
loss_t = cross_entropy_loss(logits, labels, axis=1)
loss = (loss_i + loss_t)/2
文本編碼器(Text Encoder)
CLIP 的 text encoder 是採用 Transformer 的 encoder 架構。如果還不熟悉 Transformer 的話,請先參考以下文章。

CLIP 採用以下的參數設定:
- Layers: 12
- Attention heads: 8
- d_model: 512
- Tokenizer: Byte Pair Encoding (BPE)
- Vocab size: 49152
- Max sequence length: 76
- Total parameters: 63M
另外,CLIP 對於 Transformer 的 encoder 有些許的修改。此修改方式是參照 GPT 對 Transformer 的 decoder 的修改。如,將 LayerNorm 改為置於每個 sub-block 之前(pre-LM 結構)。
Text encoder 將 text sequence 以 [SOS] 與 [EOS] token 包圍,並在 Transformer 的 encoder 的最後 layer 的 activations 中,取 [EOS] 位置的 activation 作為 text 的特徵表徵(feature representation)。
OpenAI 有開放 CLIP 的原始碼,請參照這裡。以下的 text encoder 實作,是基於官方的原始碼改寫的精簡版。
import torch
import torch.nn as nn


class ResidualAttentionBlock(nn.Module):
    def __init__(self, d_model, n_head):
        super().__init__()
        self.attn = nn.MultiheadAttention(d_model, n_head)
        self.ln_1 = nn.LayerNorm(d_model)
        self.mlp = nn.Sequential(
            nn.Linear(d_model, d_model * 4),
            nn.GELU(),
            nn.Linear(d_model * 4, d_model)
        )
        self.ln_2 = nn.LayerNorm(d_model)

    def forward(self, x):
        """
        Parameters
        ----------
        x: Tensor of shape [batch_size, sequence_length, d_model]
        """
        attn_out, _ = self.attn(self.ln_1(x), self.ln_1(x), self.ln_1(x))
        x = x + attn_out
        x = x + self.mlp(self.ln_2(x))
        return x


class Transformer(nn.Module):
    def __init__(self, width, layers, heads):
        super().__init__()
        self.resblocks = nn.Sequential(
            *[ResidualAttentionBlock(width, heads) for _ in range(layers)]
        )

    def forward(self, x):
        return self.resblocks(x)


class TextEncoder(nn.Module):
    def __init__(self, vocab_size, context_length, width, layers, heads):
        super().__init__()
        self.token_embedding = nn.Embedding(vocab_size, width)
        self.positional_embedding = nn.Parameter(torch.empty(context_length, width))
        nn.init.normal_(self.positional_embedding, std=0.01)
        self.transformer = Transformer(width, layers, heads)
        self.ln_final = nn.LayerNorm(width)
        self.context_length = context_length

    def forward(self, text):
        """
        Parameters
        ----------
        text: Tensor of shape [batch_size, context_length] containing token indices.
        """

        x = self.token_embedding(text)  # [batch_size, context_length, width]
        x = x + self.positional_embedding
        x = x.permute(1, 0, 2)  # [context_length, batch, width]
        x = self.transformer(x)
        x = x.permute(1, 0, 2)  # [batch, context_length, width]
        x = self.ln_final(x)
        return x[:, -1, :]  # [batch, width]
影像編碼器(Image Encoder)
OpenAI 在 CLIP 論文中,比較了 5 種基於 ResNets 和 3 種基於 Vision Transformers 的不同的 image encoder 的效能表現,其分別如下:
- ResNet-50
- ResNet-101
- RN50x4: 擴展 4 倍的 ResNet-50
- RN50x16: 擴展 16 倍的 ResNet-50
- RN50x64: 擴展 64 倍的 ResNet-50
- ViT-B/32
- ViT-B/16
- ViT-L/14
論文中的 zero-shot 效能測試結果中,Vision Transformer(ViT)架構優於 CNN 架構(ResNet 系列)。而在 3 個 ViT 的模型中,ViT-L/14 的表現最佳,遠高於其他模型,其次為 ViT-B/16 和 ViT-B/32。這顯示 Vision Transformer 在大量預訓練數據下有極佳的泛化能力。
在 CLIP 的原始碼中,作者直接實作 Vision Transformer。下面的程式碼中,我們直接使用 torchvision 中的 vit_b_16。在 constructor 中,我們移除了 vit_b_16 模型的 classification head。
from torchvision.models import vit_b_16, ViT_B_16_Weights


class ImageEncoder(nn.Module):
    def __init__(self, output_dim=512):
        super().__init__()
        self.vit = vit_b_16(weights=ViT_B_16_Weights.IMAGENET1K_V1)
        self.vit.heads = nn.Identity()  # [batch, 768]
        self.proj = nn.Linear(self.vit.hidden_dim, output_dim)

    def forward(self, x):
        features = self.vit(x)  # [batch, 768]
        features = self.proj(features)  # [batch, output_dim]
        return features
CLIP
下面的程式碼中的 CLIP 整合了上述的 text 和 image encoders。我們可以看到,此程式碼其實就是先前 pesudo code 的實作。
class CLIP(nn.Module):
    def __init__(self, image_embed_dim, text_vocab_size, context_length, text_width, text_layers, text_heads):
        super().__init__()
        self.image_encoder = ImageEncoder(image_embed_dim)
        self.text_encoder = TextEncoder(text_vocab_size, context_length, text_width, text_layers, text_heads)
        self.logit_scale = nn.Parameter(torch.ones([]) * torch.log(torch.tensor(1 / 0.07)))

    def encode_image(self, image):
        return self.image_encoder(image)

    def encode_text(self, text):
        return self.text_encoder(text)

    def forward(self, image, text):
        image_features = F.normalize(self.encode_image(image), dim=-1)
        text_features = F.normalize(self.encode_text(text), dim=-1)
        logit_scale = self.logit_scale.exp()
        logits_per_image = logit_scale * image_features @ text_features.t()
        logits_per_text = logits_per_image.t()
        return logits_per_image, logits_per_text
以下程式碼顯示如何使用 CLIP。
if __name__ == "__main__":
    vocab_size = 49408
    context_length = 77
    image_embed_dim = 512
    text_width = 512
    text_layers = 12
    text_heads = 8

    model = CLIP(
        image_embed_dim=image_embed_dim,
        text_vocab_size=vocab_size,
        context_length=context_length,
        text_width=text_width,
        text_layers=text_layers,
        text_heads=text_heads
    )

    batch_size = 2
    image = torch.randn(batch_size, 3, 224, 224)
    text = torch.randint(0, vocab_size, (batch_size, context_length))

    logits_per_image, logits_per_text = model(image, text)
    print("logits_per_image shape:", logits_per_image.shape)
    print("logits_per_text shape:", logits_per_text.shape)
應用
由於 CLIP 把圖像和文字都嵌入到同一個向量空間,所以我們能做跨模態檢索(cross-modal retrieval)。最直接的應用就是視覺搜尋(visual search),其包含以下三種任務:
- Image-to-Image Search:用輸入的 image 找出相近的 images。
- Image-to-Text Search:用輸入的 image 找出相近的 texts。
- Text-to-Image Search:用輸入的 text 找出相近的 images。
範例
我們將利用 CLIP 來實作 image-to-image search。在此範例中,我們有 5 張電風扇商品圖、5 張冰箱商品圖、和 5 張洗衣機商品圖。
首先,我們先用 CLIP 的 image encoder 將這 15 張商品圖轉換成 embeddings。
import os
from pathlib import Path

import clip
import faiss
import numpy as np
import torch
from PIL import Image

device = "cuda" if torch.cuda.is_available() else "cpu"
model, preprocess = clip.load("ViT-B/32", device=device)

PRODUCT_IMAGES = Path(__file__).parent.parent / "product_images"


def build_database_embeddings(database_folder):
    image_files = [f for f in os.listdir(database_folder) if f.endswith(('.jpg', '.jpeg', '.png'))]
    embeddings = []
    filenames = []

    for img_file in image_files:
        img_path = os.path.join(database_folder, img_file)
        image = preprocess(Image.open(img_path)).unsqueeze(0).to(device)

        with torch.no_grad():
            embedding = model.encode_image(image).cpu().numpy()

        embeddings.append(embedding / np.linalg.norm(embedding))
        filenames.append(img_file)

    embeddings = np.vstack(embeddings).astype('float32')
    return embeddings, filenames


print("Building database embeddings...")
db_embeddings, filenames = build_database_embeddings(PRODUCT_IMAGES)
然後,將這些 embeddings 加入到 FAISS 的索引中。當然你可以使用其他的 vector databases,如 ChromaDB 或 Milvus。
def build_faiss_index(embeddings):
    dimension = embeddings.shape[1]
    index = faiss.IndexFlatIP(dimension)  # Inner product similarity
    index.add(embeddings)
    return index


print("Creating FAISS index...")
faiss_index = build_faiss_index(db_embeddings)
最後,我們想要找與 SEARCH_IMAGE 相似的圖。
def search_similar_product(user_image_path, index, filenames):
    image = preprocess(Image.open(user_image_path)).unsqueeze(0).to(device)

    with torch.no_grad():
        query_embedding = model.encode_image(image).cpu().numpy()

    query_embedding /= np.linalg.norm(query_embedding)
    distances, indices = index.search(query_embedding, k=3)
    return [(filenames[i], distances[0][idx]) for idx, i in enumerate(indices[0])]


SEARCH_IMAGE = "./search-image-1.jpg"

print("Searching for similar products...")
results = search_similar_product(SEARCH_IMAGE, faiss_index, filenames)

print("Top matched products:")
for filename, score in results:
    print(f"Product: {filename}, Similarity Score: {score:.4f}")
結語
CLIP 就像是教電腦同時學會看圖和讀字,讓它不僅能理解圖片,也能把文字描述和圖片精準連結起來。透過這種強大的能力,我們能更輕鬆地開發各種圖文互動的應用。
參考
- Alec Radford, Jong Wook Kim, Chris Hallacy, Aditya Ramesh, Gabriel Goh, Sandhini Agarwal, Girish Sastry, Amanda Askell, Pamela Mishkin, Jack Clark, Gretchen Krueger, and Ilya Sutskever. 2021. Learning Transferable Visual Models From Natural Language Supervision. In Proceedings of the 38th International Conference on Machine Learning.
- CLIP source code.


