
開發 iOS App 時,常常要設定 Border、Radius 和 Shadow。本章除了介紹如何用程式達成,還會介紹如何在 Xcode 的 Attributes Inspector 中可以直接設定,省去程式部分。
Table of Contents
透過 CALayer 設定 Border, Radius, Shadow
最直接的方式就是寫程式對 CALayer 做設定。
@IBOutlet weak var button: UIButton!

override func viewDidLoad() {
    super.viewDidLoad()

    button.layer.cornerRadius = 5  // Radius
    button.layer.borderWidth = 1 // Border 粗細
    button.layer.borderColor = UIColor.green.cgColor // Border 顏色

    button.backgroundColor = .red // 背景設為紅色,陰影比較明顯
    button.layer.shadowRadius = 5 // Shadow 的 Radius
    button.layer.shadowOpacity = 1 // Shadow 的不透明度,介於 0 至 1
    button.layer.shadowOffset = .zero // Shadow 的偏移量
    button.layer.shadowColor = UIColor.gray.cgColor // Shadow 的顏色
}
上面的設定就會使按鈕產生這樣的效果。

利用 CALayer 可以短短幾行程式就產生出漂亮的效果。
程式寫著寫著,慢慢會開始厭煩 CALayer。一個 App 中有這麼多的 UI 元件要設定 Border 和 Radius,這幾行程式碼不知不覺地充斥在你整個專案。導致程式碼不好閱讀。
在 Attributes Inspector 設定 Border, Radius, Shadow
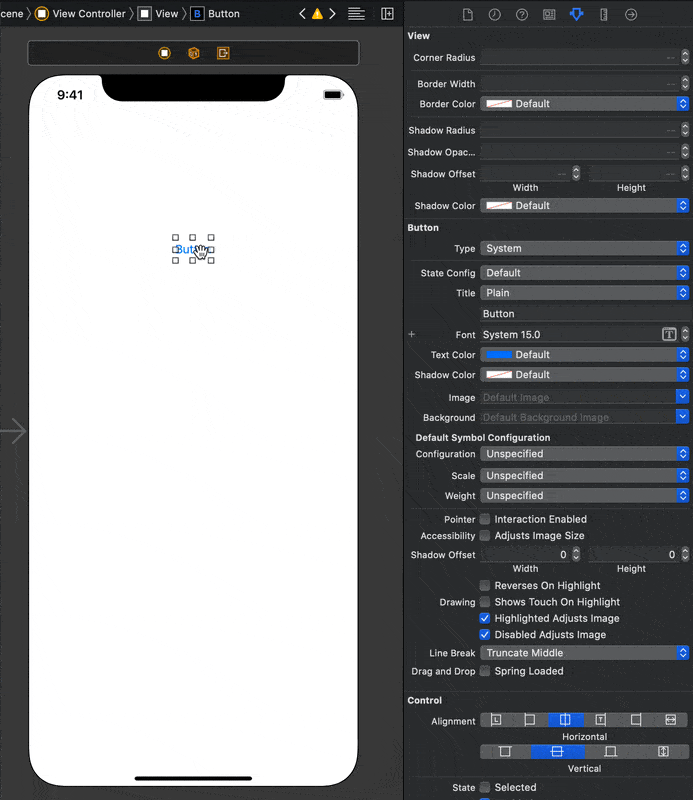
為了解決 CALayer 產生的問題,可以用 Xcode 的 Attributes Inspector 解決。下圖就是 Attributes Inspector。我們一直都用到,但可能不記得它的名稱。它左邊的叫 Identity Inspector,等等也需要用到。

如果可以在 Attributes Inspector 中設定 Border、Radius 和 Shadow 的話,那就真的太方便了。還可以解決 CALayer 程式碼一直重複的問題。接下來介紹如何在 Attributes Inspector 中新增其他屬性設定。
新增檔案 AttributedInspector.swift,並貼上下方程式碼。就大功告成了。很簡單吧。
import UIKit

@IBDesignable class DesignableView: UIView {
}

@IBDesignable class DesignableButton: UIButton {
}

extension UIView {
    @IBInspectable var cornerRadius: CGFloat {
        get {
            layer.cornerRadius
        }
        set {
            layer.cornerRadius = newValue
        }
    }

    @IBInspectable var borderWidth: CGFloat {
        get {
            layer.borderWidth
        }
        set {
            layer.borderWidth = newValue
        }
    }

    @IBInspectable var borderColor: UIColor? {
        get {
            if let color = layer.borderColor {
                return UIColor(cgColor: color)
            }
            return nil
        }
        set {
            if let color = newValue {
                layer.borderColor = color.cgColor
            } else {
                layer.borderColor = nil
            }
        }
    }

    @IBInspectable var shadowRadius: CGFloat {
        get {
            layer.shadowRadius
        }
        set {
            layer.shadowRadius = newValue
        }
    }

    @IBInspectable var shadowOpacity: Float {
        get {
            layer.shadowOpacity
        }
        set {
            layer.shadowOpacity = newValue
        }
    }

    @IBInspectable var shadowOffset: CGSize {
        get {
            layer.shadowOffset
        }
        set {
            layer.shadowOffset = newValue
        }
    }

    @IBInspectable var shadowColor: UIColor? {
        get {
            if let color = layer.shadowColor {
                return UIColor(cgColor: color)
            }
            return nil
        }
        set {
            if let color = newValue {
                layer.shadowColor = color.cgColor
            } else {
                layer.shadowColor = nil
            }
        }
    }
}
用以下的步驟來試試看:
- 在 Storyboard 中新增一個 UIButton。
- 在 Button 的 Identity Inspector 中,將 Class 屬性設定為 DesignableButton,就是剛剛在上面的程式碼中宣告。
- 切換到 Button 的 Attributes Inspector,你就可以看到 Border、Radius 和 Shadow 的屬性設定。
整合 CocoaPods
如果是 CocoaPods 專案的話,加上上述的程式碼,會產生錯誤。在 Podfile 最後面加上以下程式就可以解決。
post_install do |installer|
    installer.pods_project.targets.each do |target|
        target.build_configurations.each do |config|
            config.build_settings.delete('CODE_SIGNING_ALLOWED')
            config.build_settings.delete('CODE_SIGNING_REQUIRED')
        end
    end
    installer.pods_project.build_configurations.each do |config|
        config.build_settings.delete('CODE_SIGNING_ALLOWED')
        config.build_settings.delete('CODE_SIGNING_REQUIRED')
    end
end
結語
用 Attributes Inspector 設定可以省下大量重複的程式碼,增加程式碼的閱讀性,間接會降低 Bug 的產生。除了 UIButton 之外,也可以為 UILabel 和 UIImageView 加上屬性設定。


