相較於 Xcode project 的 Build Settings,Package.swift 使用起來簡單很多。然而,當我們將 Xcode framework project 轉換成 Swift package 時,卻無法順利地產生 XCFramework。本文章將介紹,如何將 Swift Package 編譯為 XCFramework。
Table of Contents
問題:Xcode 不支援將 Swift Package 編譯為 XCFramework
我們在以下的文章中,講解到如何將 framework project 編譯為 XCFramework。
在範例程式碼中,有一個 Greeting Swift package。我們用以上文章中介紹的方法來編譯 Greeting,其 script 如下。
#!/bin/bash

archiveDir="$(pwd)/archives"
distDir="$(pwd)/dist"
scheme="Greeting"
debugSymbols=1

simulatorArchivePath="$archiveDir/$scheme-simulator"
(cd "$scheme" && xcodebuild archive \
  -scheme "$scheme" \
  -configuration "Release" \
  -destination "generic/platform=iOS Simulator" \
  -archivePath "$simulatorArchivePath" \
  VALID_ARCHS="i386 x86_64 arm64" \
  SKIP_INSTALL=NO \
  BUILD_LIBRARY_FOR_DISTRIBUTION=YES) || exit 1

deviceArchivePath="$archiveDir/$scheme-device"
(cd "$scheme" && xcodebuild archive \
  -scheme "$scheme" \
  -configuration "Release" \
  -destination "generic/platform=iOS" \
  -archivePath "$deviceArchivePath" \
  VALID_ARCHS="i386 x86_64 arm64" \
  SKIP_INSTALL=NO \
  BUILD_LIBRARY_FOR_DISTRIBUTION=YES) || exit 2

xcframework="$distDir/$scheme.xcframework"
simulatorDebugSymbols=""
deviceDebugSymbols=""
if [ $debugSymbols -eq 1 ]; then
  simulatorDebugSymbols="-debug-symbols $simulatorArchivePath.xcarchive/dSYMs/$scheme.framework.dSYM"
  deviceDebugSymbols="-debug-symbols $deviceArchivePath.xcarchive/dSYMs/$scheme.framework.dSYM"
fi

xcodebuild -create-xcframework \
  -framework "$simulatorArchivePath.xcarchive/Products/usr/local/lib/$scheme.framework" \
  $simulatorDebugSymbols \
  -framework "$deviceArchivePath.xcarchive/Products/usr/local/lib/$scheme.framework" \
  $deviceDebugSymbols \
  -output "$distDir/$scheme.xcframework"
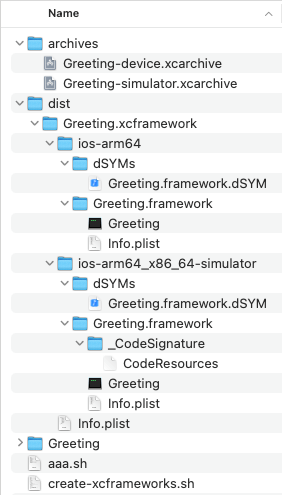
最後,我們編譯出來的 Greeting.xcframework 如下圖。我們發現它遺漏了 resources、umbrella header、swiftmodule 等。所以,它不是一個完整的 XCFramework。如果我們將它引入到 App project 中,編譯時會發生錯誤。

真正完整的 XCFramework 應該要如下。

將 Swift Package 編譯為 XCFramework
在以上的講解中,我們了解到 xcodebuild 不支援將 Swift package 編譯為 XCFramework。但是,如果分析一下 xcodebuild 在編譯過程中產生的 derived data,我們會發現,所有 XCFramework 需要的檔案,xcodebuild 其實都有產生出來。因此,我們可以利用 derived data 來產生 XCFramework。
以下的 script 是將 Building XCFrameworks from a hierarchy of Swift Packages 中提供的 build_xcframework_from_swift_package.sh 修改而來的。此 script 有以下的要點:
- 要編譯成 XCFramework 的 Swift package,其 type 必須為
.dynamic。 - 我們只需要
xcodebuild,而不需要xcodebuild archive。 - Scheme 為 Swift package 的名稱。
- 複製 umbrella header 檔案。
- 複製程式碼中所有的 header 檔案。
- 複製 swiftmodule 和 modulemap 檔案。
- 複製 bundle resource 檔案。
#!/bin/bash

SIMULATOR_SDK="iphonesimulator"
DEVICE_SDK="iphoneos"

PACKAGE="Greeting"
CONFIGURATION="Release"
DEBUG_SYMBOLS="true"

BUILD_DIR="$(pwd)/build"
DIST_DIR="$(pwd)/dist"

build_framework() {
  scheme=$1
  sdk=$2
  if [ "$2" = "$SIMULATOR_SDK" ]; then
    dest="generic/platform=iOS Simulator"
  elif [ "$2" = "$DEVICE_SDK" ]; then
    dest="generic/platform=iOS"
  else
    echo "Unknown SDK $2"
    exit 11
  fi

  echo "Build framework"
  echo "Scheme: $scheme"
  echo "Configuration: $CONFIGURATION"
  echo "SDK: $sdk"
  echo "Destination: $dest"
  echo

  (cd "$PACKAGE" &&
    xcodebuild \
      -scheme "$scheme" \
      -configuration "$CONFIGURATION" \
      -destination "$dest" \
      -sdk "$sdk" \
      -derivedDataPath "$BUILD_DIR" \
      SKIP_INSTALL=NO \
      BUILD_LIBRARY_FOR_DISTRIBUTION=YES \
      OTHER_SWIFT_FLAGS="-no-verify-emitted-module-interface") || exit 12

  product_path="$BUILD_DIR/Build/Products/$CONFIGURATION-$sdk"
  framework_path="$BUILD_DIR/Build/Products/$CONFIGURATION-$sdk/PackageFrameworks/$scheme.framework"

  # Copy Headers
  headers_path="$framework_path/Headers"
  mkdir "$headers_path"
  cp -pv \
    "$BUILD_DIR/Build/Intermediates.noindex/$PACKAGE.build/$CONFIGURATION-$sdk/$scheme.build/Objects-normal/arm64/$scheme-Swift.h" \
    "$headers_path/" || exit 13

  # Copy other headers from Sources/
  headers=$(find "$PACKAGE/$scheme" -name "*.h")
  for h in $headers; do
    cp -pv "$h" "$headers_path" || exit 14
  done

  # Copy Modules
  modules_path="$framework_path/Modules"
  mkdir "$modules_path"
  cp -pv \
    "$BUILD_DIR/Build/Intermediates.noindex/$PACKAGE.build/$CONFIGURATION-$sdk/$scheme.build/$scheme.modulemap" \
    "$modules_path" || exit 15
  mkdir "$modules_path/$scheme.swiftmodule"
  cp -pv "$product_path/$scheme.swiftmodule"/*.* "$modules_path/$scheme.swiftmodule/" || exit 16

  # Copy Bundle
  bundle_dir="$product_path/${PACKAGE}_$scheme.bundle"
  if [ -d "$bundle_dir" ]; then
    cp -prv "$bundle_dir"/* "$framework_path/" || exit 17
  fi
}

create_xcframework() {
  scheme=$1

  echo "Create $scheme.xcframework"

  args=""
  shift 1
  for p in "$@"; do
    args+=" -framework $BUILD_DIR/Build/Products/$CONFIGURATION-$p/PackageFrameworks/$scheme.framework"
    if [ "$DEBUG_SYMBOLS" = "true" ]; then
      args+=" -debug-symbols $BUILD_DIR/Build/Products/$CONFIGURATION-$p/$scheme.framework.dSYM"
    fi
  done

  xcodebuild -create-xcframework $args -output "$DIST_DIR/$scheme.xcframework" || exit 21
}

reset_package_type() {
  (cd "$PACKAGE" && sed -i '' 's/\( type: .dynamic,\)//g' Package.swift) || exit
}

set_package_type_as_dynamic() {
  (cd "$PACKAGE" && sed -i '' "s/\(.library(name: *\"$1\",\)/\1 type: .dynamic,/g" Package.swift) || exit
}

echo "**********************************"
echo "******* Build XCFrameworks *******"
echo "**********************************"
echo

rm -rf "$BUILD_DIR"
rm -rf "$DIST_DIR"

reset_package_type

set_package_type_as_dynamic "Greeting"
build_framework "Greeting" "$SIMULATOR_SDK"
build_framework "Greeting" "$DEVICE_SDK"
create_xcframework "Greeting" "$SIMULATOR_SDK" "$DEVICE_SDK"
Swift Package 的 Module 名稱
xcodebuild 在編譯 framework project 和 Swift package 成 XCFramework 後,其 XCFramework 的 module 名稱會不相同。
當編譯 framework project 時,其 XCFramework 的 module 名稱會是 scheme 的名稱。
當編譯 Swift package 時,其 XCFramework 的 module 名稱會是 [package]_[product]。如下的 Package.swift,其 module 名稱會是 Greeting_GreetingSDK。在上面的 script 中,其 scheme 會是 GreetingSDK。
// swift-tools-version: 5.9
// The swift-tools-version declares the minimum version of Swift required to build this package.

import PackageDescription

let package = Package(
    name: "Greeting",
    platforms: [.iOS(.v13)],
    products: [
        .library(name: "GreetingSDK", type: .dynamic, targets: ["Greeting"]),
    ],
    targets: [
        .target(name: "Greeting"),
    ]
)
因此,當想要存取 Swift package 中的 resources 時,要使用 [package]_[product].bundle,如下。
private var bundle: Bundle {
    get {
        let bundle = Bundle(for: Self.self)
        if let bundleURL = bundle.url(forResource: "Greeting_GreetingSDK",
                                      withExtension: "bundle") {
            return Bundle(url: bundleURL) ?? bundle
        } else {
            return bundle
        }
    }
}
在 Swift Package 中存取 Storyboard 和 Xib
當我們的 App project 存取範例程式中的 Greeting.storyboard 時,可能會有以下的錯誤發生。
[Storyboard] Unknown class Greeting_Greeting.GreetingViewController in interface Builder file.
要解決此錯誤,我們必須要在 storyboard 中,取消勾選 Inherit Module From Target,並且在 Module 中選擇 Greeting。
這是因為 GreetingViewController 在編譯後,其名稱為 Greeting.GreetingViewController。但是,其 module 名稱 Greeting_Greeting。如果勾選 Inherit Module From Target 時,在該 storyboard 中,它會認為 GreetingViewController 是 Greeting_Greeting.GreetingViewController,因而發生錯誤。
![Uncheck [Inherit Module From Target].](https://waynestalk.com/wp-content/uploads/2024/02/uncheck-inherit-module-from-target.png)
結語
相較於 framework project,Swift package 是一個更好且更簡單的專案管理方式。利用本文章中的 script,我們可以將原本的 framework project 轉換成 Swift package。
參考
- How to build Swift Package as XCFramework, Swift Forums.
- Building XCFrameworks from a hierarchy of Swift Packages, Apple Developer Forums.
- Turn Package.swift file into binary XCFramework, Stack Overflow.
- Can a Swift Package include a table view?, Swift Forums.


